Preserving the memory of great catches while allowing for a quick and safe release when fishing from a kayak.
There’s a sort of pressure I feel now that I didn’t feel before. It’s been 20 years since I began kayak fishing, and to look back at my first “basselfies” from the early 2000’s is an exercise in nostalgia. But it’s also an exercise in embarrassment: in one photo from early college, my face is framed with my embarrassing attempt at a goatee that I thought was pretty dapper. In another, I can almost hear the grinding of my reel handle bending, as the photo clearly shows it being crunched between the seat and hull of my yellow sit-inside kayak. I was a teenage kid who preferred solitude and the sound of bullfrog belches on a lonely mill pond over crowds and social events. It’s still that way now as I head into my late 30s.
But the pressure I feel now has nothing to do with needing to catch fish to consider a trip successful. As the father to a toddler, it’s really more about being away from the world for a few hours, absorbing sunrises and silence before delving back into the world of parenting. The pressure comes from one question that I can only answer when I get in the car after a fishing trip, did I get the shot?
The first time I had a photo shoot, I was a pre-teen and my family had gotten a new Dell desktop computer, complete with scanner, speakers, and printer. I used a disposable camera, laid my belly on the carpeted floor, and took 25 pictures of an ivory white, unmoving, poorly lit desktop computer. If that was the start of my love of photography, clearly things could only go up.
Since then, I’ve photographed golden orb weaver spiders in Queensland and Mardi Gras in Sydney, the Connecticut River in Vermont and the Grand Canyon in Arizona, my son, my dog, and way too many fish. I even directed a class on iPhone photography when I was an 8th grade teacher. All that said, I’m not by any stretch of the imagination a “photographer”, I just like photography. And when I get into my car after a long day kayak fishing the Long Island Sound, I am equally excited to see the photos as I was to have battled the fish that I love and respect so much.
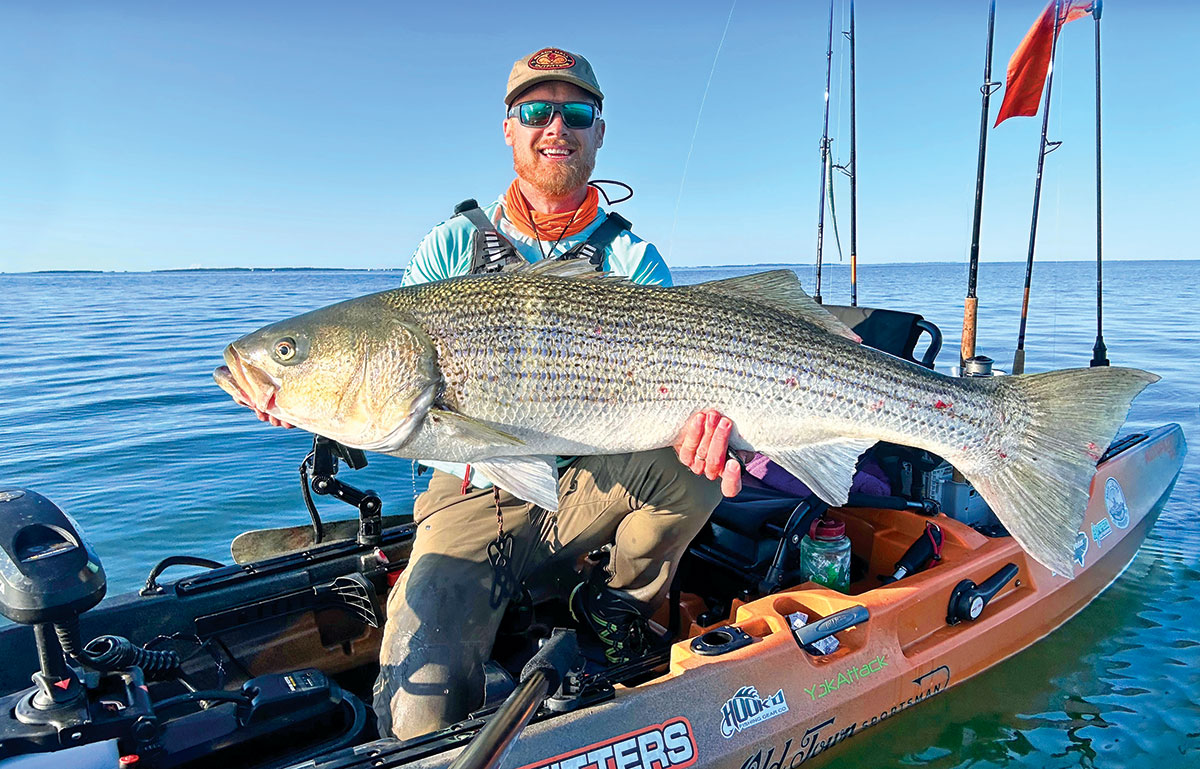
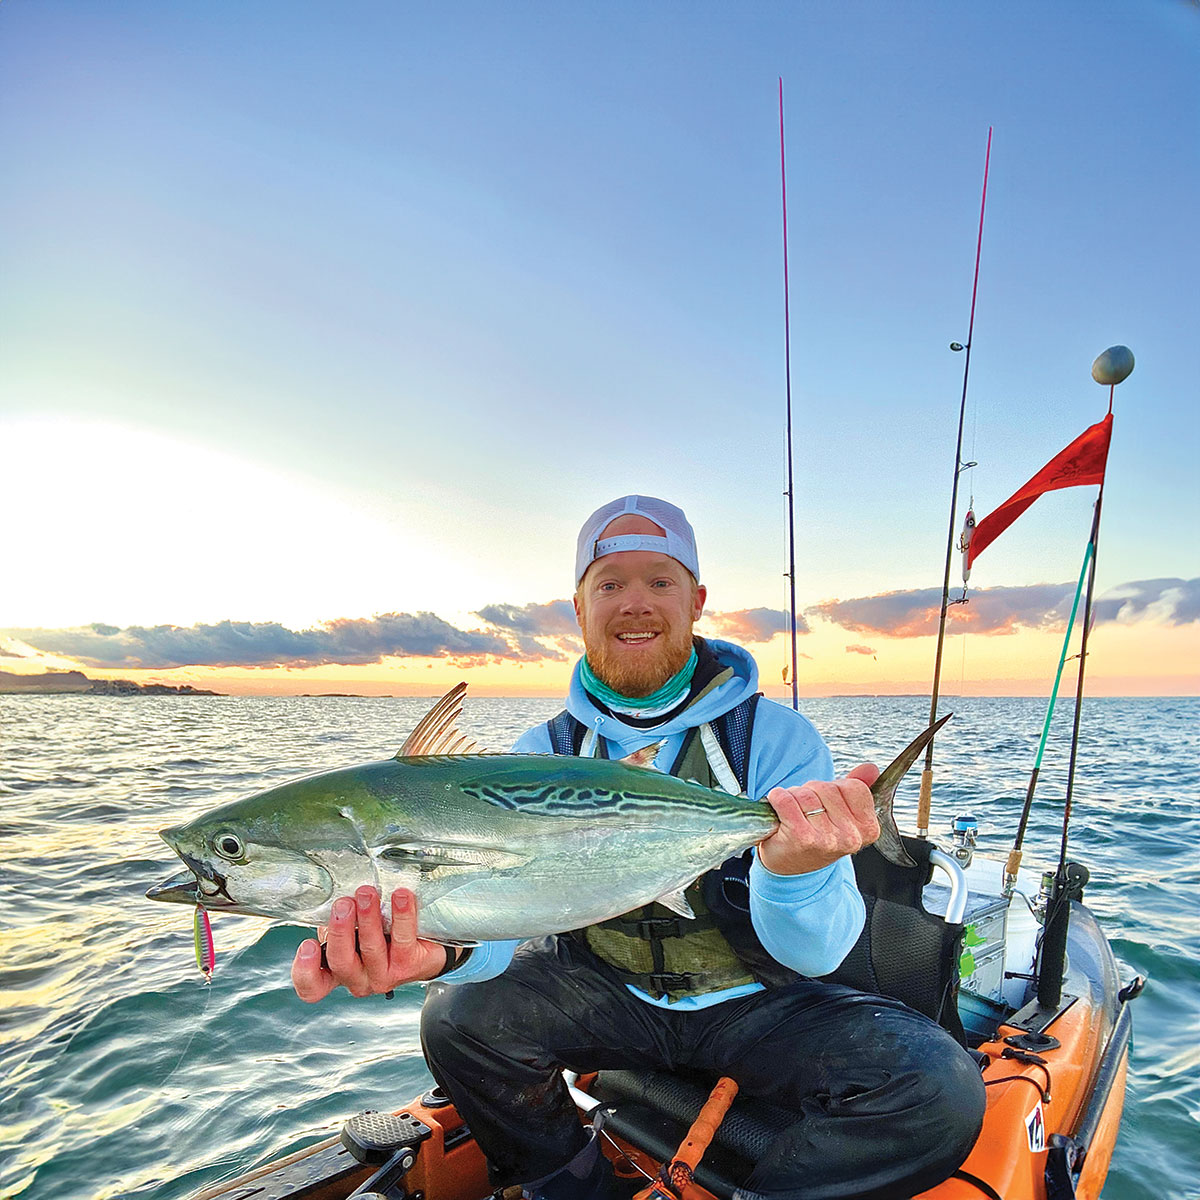
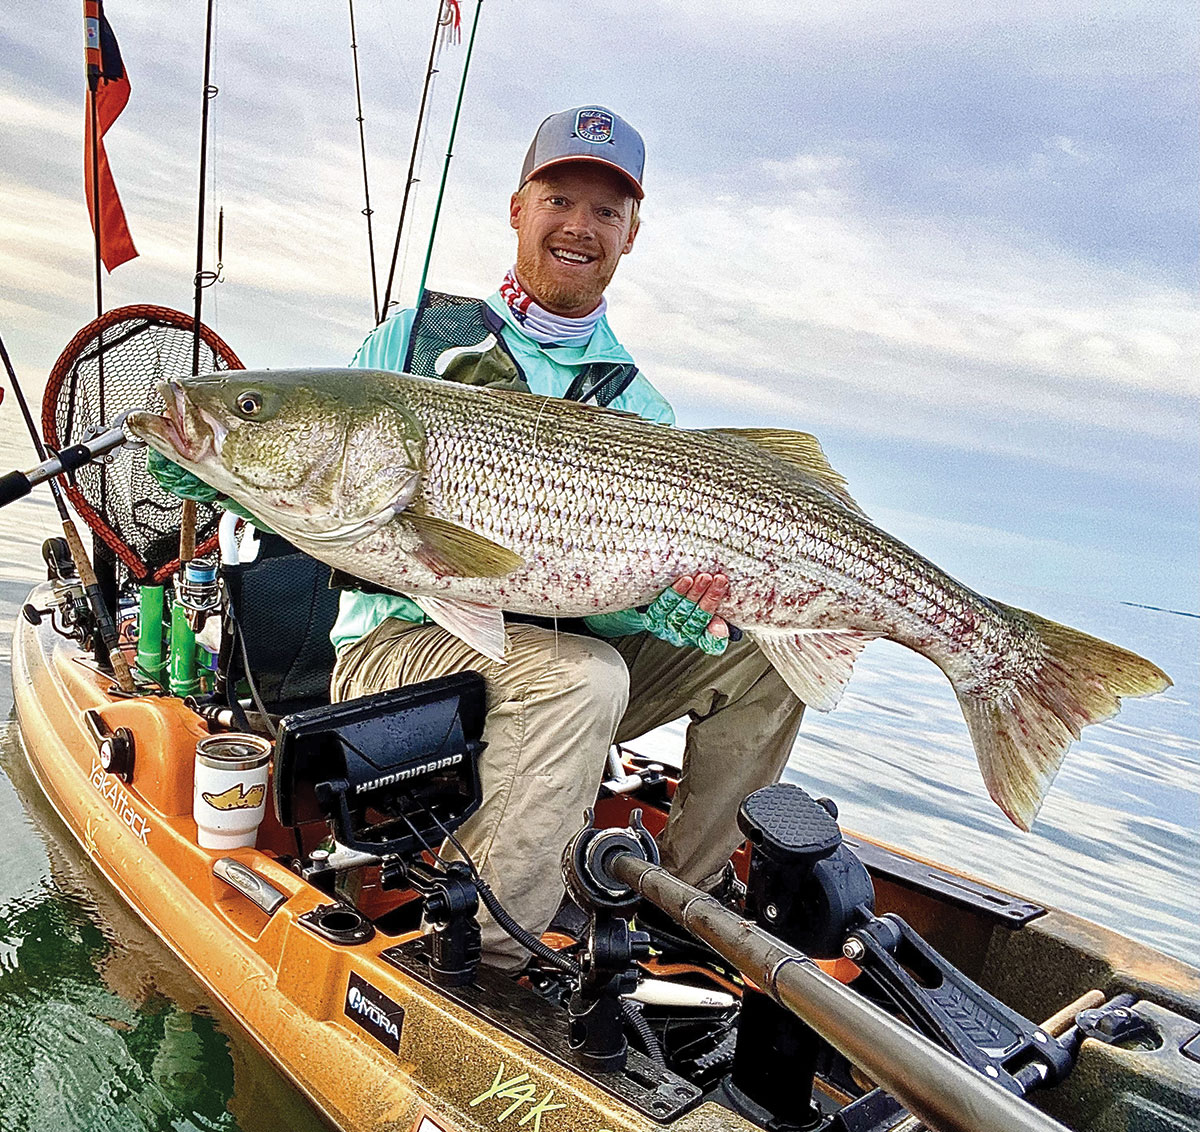
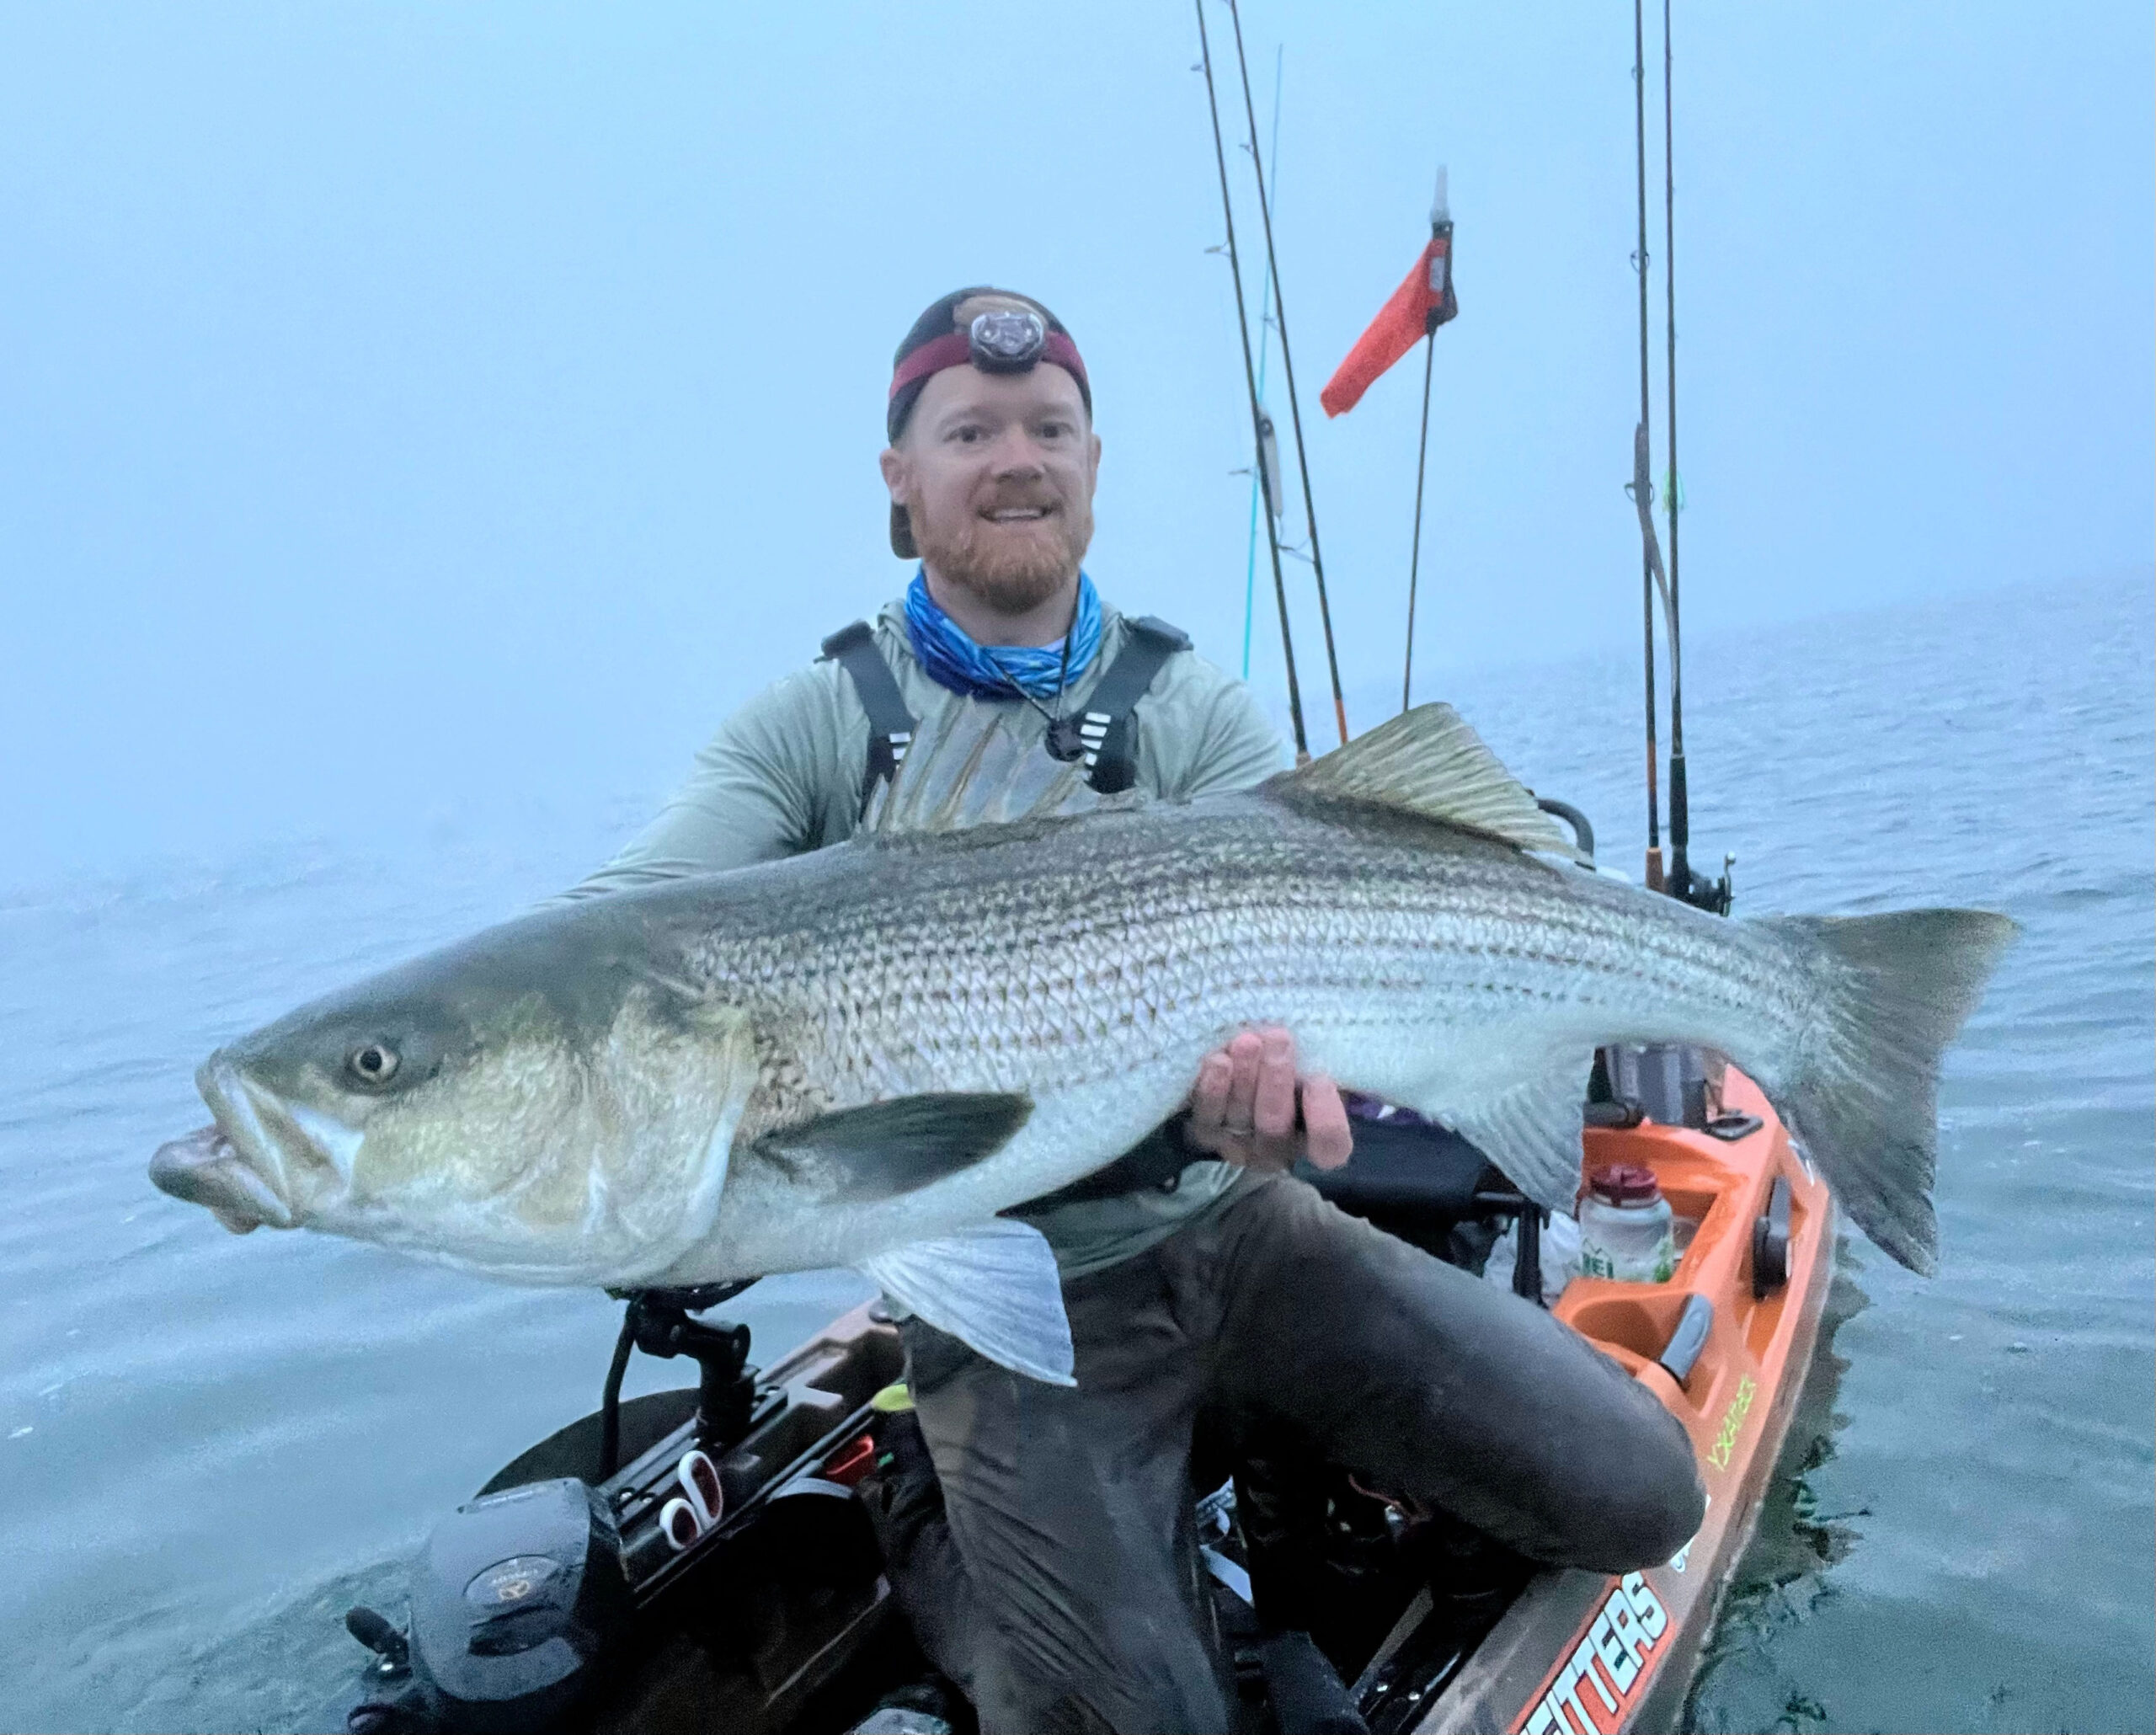
My goal is not to plaster my Instagram page with great photos, although it is fun to drop a few nice shots on social media now and then, it’s more about capturing a moment that I want to remember. A great day on the water is not guaranteed, and when they happen, those memories should be cherished. For me, the best way to cherish them is through photography. I’ve worked hard to learn my individual process of getting great kayak fishing photos, always keeping fish health at the forefront. Here’s a bit about how I get photos, from big striper “hero shots” to candid release pictures to the always glorious face slap gifted by the tail of an angry gator bluefish.
The Gear
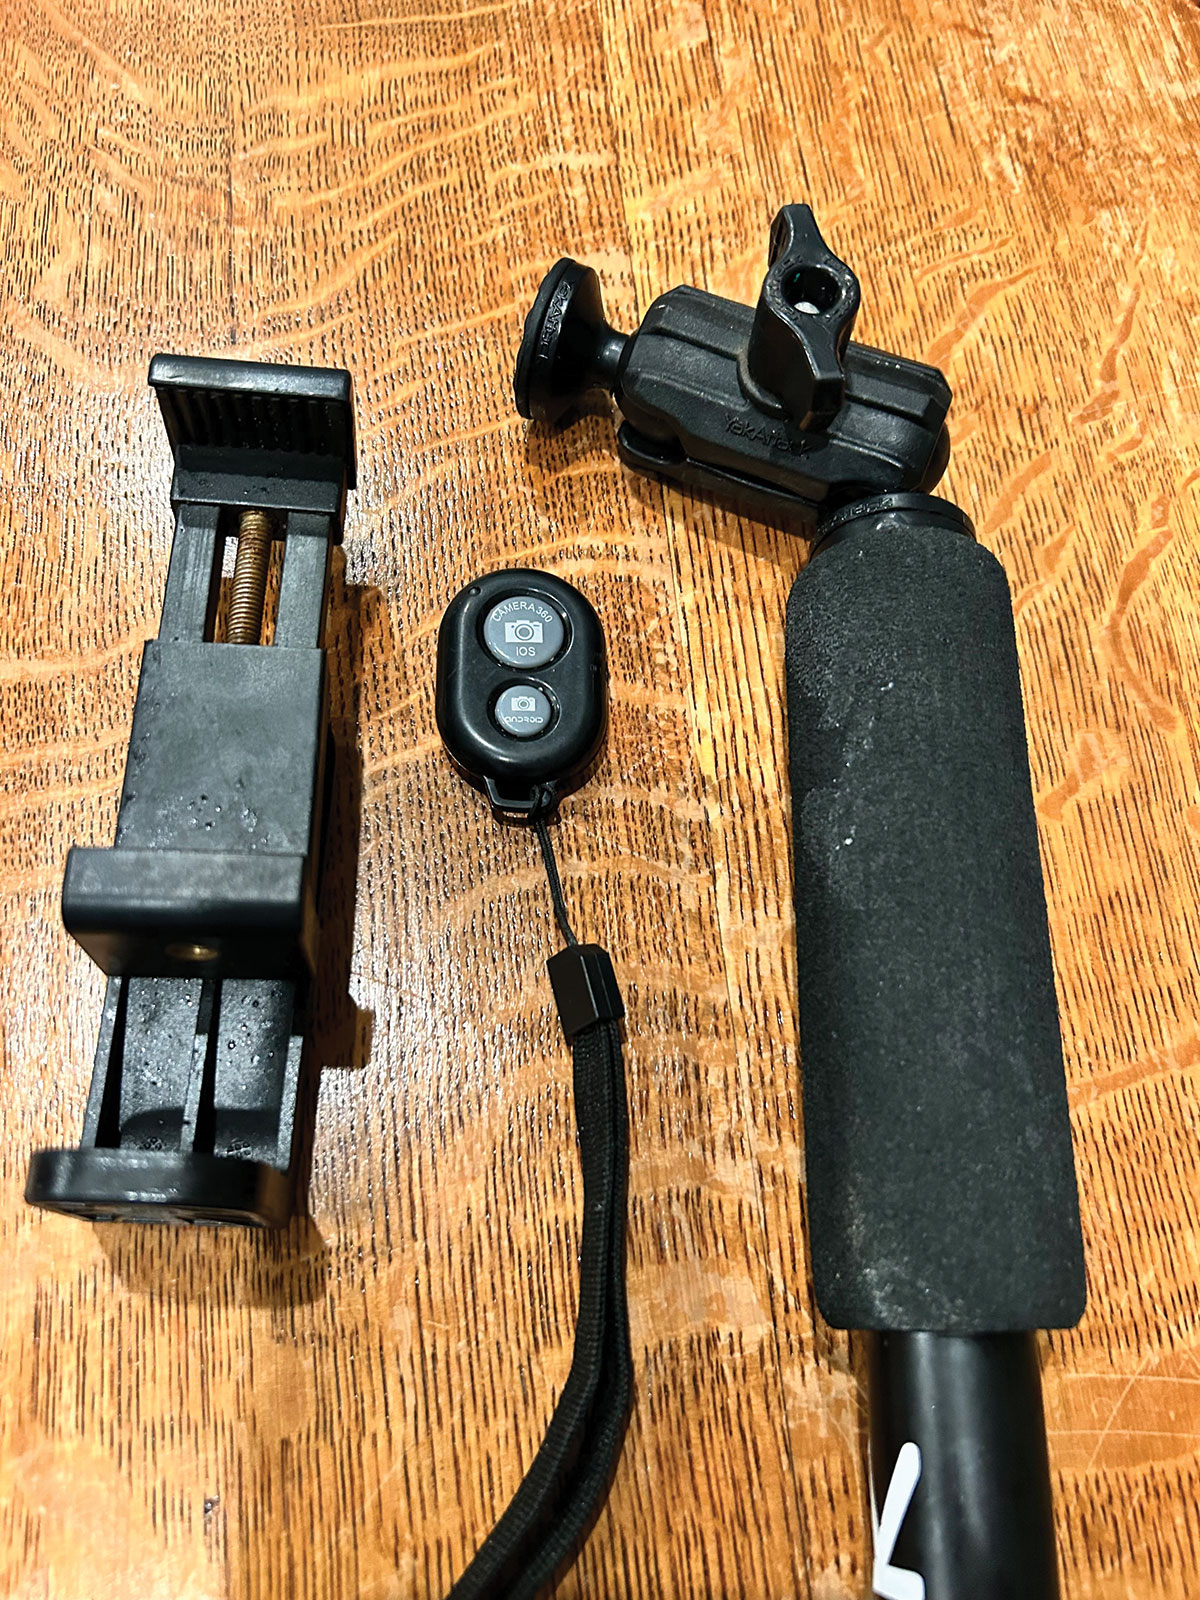
Unsurprisingly, the hardest part of grabbing great pictures in a single-person vessel is gathering the right gear for the job. For me, the introduction by Yak Attack of their BoomStick Pro and Panfish Pro camera mounts were the skeleton key that unlocked the ability to get epic shots from previously unseen angles. The only difference between the BoomStick Pro and PanFish Pro is that the BoomStick is longer. I own and use both, with the species and style of photo dictating which I bring. Both are track-mounted and adjustable without needing to detach them, so adjusting for different angles is easy. They come with a standard quarter-20 camera ball and a GoPro mount, so for any of you who like to get GoPro videos and stills, it’s perfect.
When I first got these boom mounts, I didn’t own a GoPro; I’d seen some GoPro still shots posted on social media and didn’t really like the quality. I figured the best-case scenario was to get my iPhone up there. A quick Amazon search led me to a quarter-20-adaptable phone clamp. A pack of two was about $25. The clamp screwed onto the stock quarter-20 thread on the YakAttack mounts. Just like that, I had the ability to get horizontal iPhone photos from a unique vantage point.
From there, I experimented with a self-timer, but those pictures felt rushed and you have to reset the timer after each shot. Not for me, especially considering that process meant more time the fish was out of water. Not good. So, I went back to Amazon and within minutes found an iPhone compatible Bluetooth remote camera shutter: $20 for two. And there’s the system: my iPhone mounted on the BoomStick or Panfish Pro, and the Bluetooth shutter strapped around my wrist. Now, I could get dozens of photos throughout the process of landing, admiring, and releasing a fish. We’re talking about a $150 investment. The Yak Attack products are bomb-proof and long-lasting, well worth it. The less expensive items are easy to replace and usually come in packs of two anyway: also an easy buy.
Set Up: Think Fish First
Before launching, I double-check that the base mounts of my BoomStick or Panfish Pro are securely tightened. On warm days the plastic of the kayak tracks can be a bit bendy, and while I’ve never had one give way, I’d hate to do so and lose my iPhone in the process. Next, I typically set up the camera and check the angle to make sure it’s going to fit everything. To help this, I use the front-facing camera so that I can see a preview of the shot as I’m holding the fish.
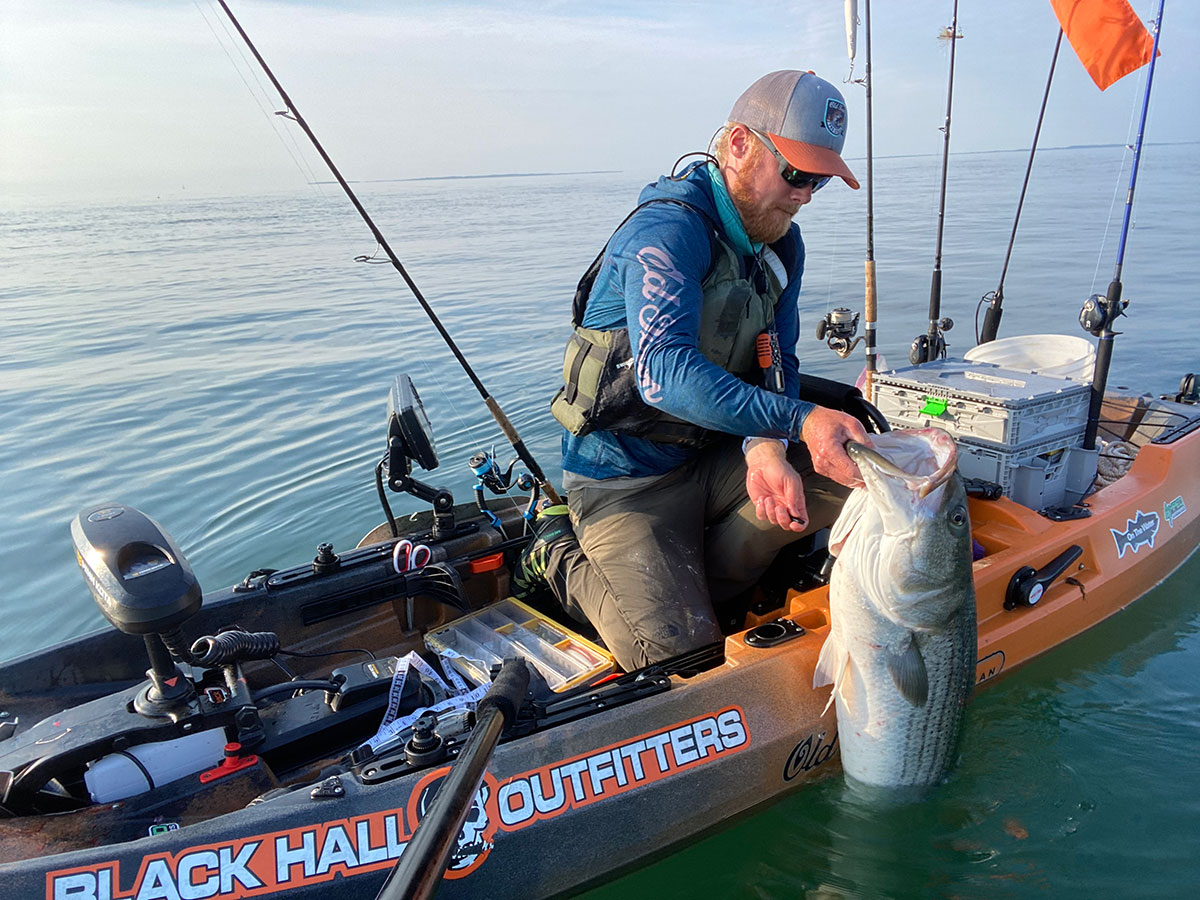
Another important piece of equipment, and arguably the most important for fish safety, is a good pair of fish grips or Boga Grips. You’ll use these to hold the fish at the side of your kayak while quickly clamping your phone into the mount. I always use a phone leash attached to my PFD, but once I’ve landed a photo-worthy fish, the phone gets removed and clamped into the camera mount. While this is happening, a good pair of fish grips is crucial. They should be long enough that you can hold the fish’s gills under water while you set up. This is especially important during the summer when release-mortality increases due to warm water. It does take practice to get set up with one hand, but once the process is refined it’ll be second nature.
The Picture Process
Once you’ve landed the fish, keep it in the water while setting up, as mentioned above. As soon as the phone is clamped in, I turn on the camera and pull the Bluetooth remote from my PFD. Most of these remotes auto-connect, so clicking it on and waiting a few seconds is all it takes. Once I’ve ensured the phone and remote are paired, the camera mount goes onto the track base and it’s photo time.
If you’re fishing in an area you’d like to keep secret, I recommend rotating your kayak in a direction that keeps only open water in the background. This is most easily done before pulling the fish out of the water, especially if it’s a bigger striper, which takes up a lot of room and can be really heavy. As I’m pulling in the fish, I keep the remote shutter clicking. Some of my favorite shots are the candid photos of the landing process. You can really see the girth and shoulders on these fish as they’re coming over the side of the kayak. For me, there is an extreme urgency once the fish is in the kayak, particularly for bigger striped bass. If you do it right, that fish should be out of the water for no longer than 15 to 25 seconds. Any more and you need to refine your technique.
There’s a lot of flack to be caught if you “long-arm” a fish in a photo, shoving it forward to exaggerate its size by skewing the viewer’s depth perception. To prevent this, but still represent the size of the fish, try to angle the fish’s body to be parallel to your phone. I usually move the fish back and forth until I can tell it’s lined up properly. All this should be done swiftly. After getting some shots, I recommend continuing to click away as you lower the fish back into the water. At that point, it’s all about a proper revival.
Revival & Gratitude
Call me soft if you must, but for me the most emotional part of catching a big striped bass is the revival and release. The adrenaline is as strong as ever, but the stress of landing the fish has dissipated – you did it. Crouching down towards the water allows you to really look at and admire the fish. The lavender hues, the silver dollar scales, its eyes meeting yours. For me, that’s the moment that sticks.
If you choose to take a fish out of water for a photo, particularly a big one and especially in the summer months, you should be equally as dedicated to its revival as you were to catching it in the first place. You got everything you wanted – a rush, a fight, and very likely a memory-making photo. The way I see it, anglers owe that fish a gentle and proper revival. You should orient your kayak into the current, submerge it, and let the water flow over its gills. Gently swimming it back and forth can help. So can opening its mouth to help the flow of water over the gills.
When it’s ready to go back, you may get a nice little love chomp on your hand, or it might just thrash out of your grip and kick off. Another signal to look for is a raised dorsal spine. Sometimes, this revival can take as long as five minutes, or even more. Enjoy it. If you don’t see signs that it’s ready to go back, don’t push it off and hope for the best. Take a look, soak it in. Dedicate yourself to the revival. If it all goes well: you get excitement and killer photos and that fish gets its life. A fair trade.
Whether it’s right after a healthy release or in the car at the end of the day, you’ll be able to open your photos and see some pretty cool shots from wide and unique angles, the type that are essentially impossible to get without the gear discussed here. If you’re fishing with a friend, of course all of this information can be tossed. But for those of us who like to fish solo and want a few shots to remember the day by, dialing in the right gear and routine for safely, quickly, and effectively grabbing great pictures in your kayak is a worthy pursuit.