Get your electronics dialed in and catch fish like the pros!
All of the top charter captains and professional anglers across the country, in both fresh and salt, have one thing in common and that is being dialed in to their electronics. This is because electronics play a critical role in locating fish and eliminating unproductive water. Which are two of the most time consuming elements in fishing. After all, you can’t catch fish if you’re not on them and at some point an angler looking to advance their game needs to be able to find their own bite and break free of the “chasing bent rods” mentality. I rarely fish blindly; every move I make is done so with a purpose and in order to fish with a high level of precision I rely heavily on my side imaging to locate the fish.

A Sidelong Glance
In 2017 I started using Humminbird’s Side Imaging (SI) technology, which has had the greatest impact on my ability to locate fish. The main reason is the large amount of water that can be covered in a shorter time period. Say you’re fishing in 15-feet of water, on SI I will have a 300-foot coverage area meaning I can see 150-feet to the port and 150-feet to the starboard. With traditional sonar the coverage area would be about 5 feet and you would have to drive directly over the fish, which is why in shallow water applications (depths under 15 feet) traditional sonar is not very effective in locating fish.
When adjusting the range on SI there is a threshold that you can find. If you are zoomed out too far the edge of your screen will be black and not give you anything readable. Find the distance where you have a good reading and zoom in to that distance. As you go shallower your range will decrease, in deeper water your range can increase. Which leads to my next tip, changing kilohertz frequencies. Humminbird SI offers three frequencies to choose from; 455 KHZ, 800 KHZ and Mega or 1200 MHZ. Mega Imaging offers the highest detail but a shorter range compared to 455KHZ. Generally when I’m fishing shallow water or in heavy structure and I want the best detail I run Mega. If I am in deeper water, call that over 30 feet, or I want to get greater range on a sand bottom I switch to 455. Depending on the water conditions, if I feel like I’m not seeing the distance I would like to, I switch to 455.
It’s important to understand that the SI beam is very wide but very thin. The transducer is mounted on the transom so when searching for fish, it is important to drive in a straight line and understand that you will not mark fish until you drive past them with the transom of the boat perpendicular to the fish. What I am saying is that SI does not look in front of your boat’s transom. When searching for fish and structure the ideal speed is 2 to 7 knots. You can still mark fish at a drift but the image will look more elongated and distorted. Try to envision where the sonar beam is in relation to the boat and where you are casting.
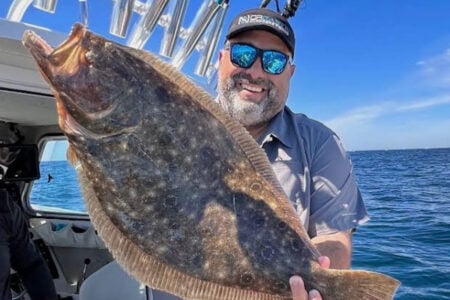
In order to get images to “pop” I turn my SI sensitivity down to 7 and contrast up to 12. Striped bass school in very large numbers which is why side imaging is such an effective tool for locating them. Most schools stripers have hundreds of fish, some schools can be in the thousands. The schools are often thick and densely-concentrated in a relatively small area. With SI, I can put our baits or lures directly on the fish’s noses, other boats can be in the right area but can be off the fish by 50 yards and not catching. It is common for striper schools to make small movements. We often catch a couple fish out of a large school and then lose the school. I will then start driving the boat and use SI to relocate the school that may have shifted 50 yards. When searching for fish I will search in a tight zig zag formation similar to mowing the lawn only I’m using my SI beam to “mow the lawn” by scanning the bottom and find the school.

Looking Down
When I’m fishing many of the deeper reefs located throughout Long Island Sound I use my traditional or 2D sonar and Down Imaging (DI). I like to run a side by side screen of 2D and DI. The 2D sonar is going to give a wider coverage area; picture an upside-down ice cream cone. My 2D transducer is a thru-Hull Airmar B175 High Wide, which is going to give you a coverage area of approximately 45 percent of the depth. So in 100 feet of water you are getting a 45 foot coverage area. Compared to DI which is only giving you a narrow picture of the bottom. The advantage of DI is its running off the same 455KHZ-1200MHZ as SI which gives you a crisp, clear reading with no noise. By comparing the two readouts side by side it gives you the ability to confirm what you’re seeing.
I find the DI can be very effective when stripers are lying on the bottom as it can be difficult to see the difference between bottom and fish. This is because stripers sit with their bellies very tight to the bottom as their eyes are oriented on the top of the skull and they feed looking up. I will also note that 2D, SI and DI all utilize CHIRP technology. Chirp sweeps over a range of frequencies to give more power and increased target separation. For example, my 2D sonar is running on high CHIRP 150-250 KHZ. In pre CHIRP days it only ran on a single frequency of 200KHZ (shallow water) or 50KHZ (deep water). If you are fishing deep water, over 500 feet, then you would run a medium or low CHIRP transducer which has a lower frequency. This is because a lower frequency provides more range to penetrate through deeper water.
With 2D Sonar if the sensitivity is set too low, you’ll miss fish and too high your screen will be over-cluttered. I use the Humminbirds default color pallet. Red is your hardest return, the bottom should be a thick red and then fade off to yellow, green and blue. Target species like striped bass and bluefish will show as a solid red return. Large baitfish like adult bunker will show as a dense red cloud. You want to find the threshold where you have a little bit of blue clutter on the screen. I would prefer to see a little excess noise rather than a totally clear screen so I can decipher what I perceive as a fish. If you are very new to sonar, then I will tell you right away, never use ‘fish symbols’ on your sonar! On DI/SI hard bottom is lighter and soft bottom is darker. On 2D sonar thicker red indicates hard bottom.

Unique Advantages
Think of the side imaging sonar beam like a flashlight, when it hits something it cast a shadow. A striper will look like a white sliver and cast a large black shadow that almost looks like a gold fish cracker. The shadow is what really pops out. The distance between the object and the shadow shows the distance the object is off the bottom. Schools of baitfish will show as dense clouds as there are thousands of small fish packed tightly together. A big part of our success for the day starts at the beginning of our trip catching bunker with a cast net. Sure, when the bait is thick and flipping on the surface it can be easy, but oftentimes the bait stays down and does not show on the surface. This is when I use side imaging to locate the bunker. It will also show what side of the boat to throw the net on. To be successful at catching bait when it’s thin, the location and timing of the throw has to be precise.
SI is also used to locate structure. Whether you are fishing for stripers, tog or any other predatory species, you need to understand what the bottom looks like. The detail of SI takes the guesswork out of it as you can clearly see boulders, sand waves, wrecks, logs and I have even spotted tires, kayaks and shopping carts. Anglers can find the structure they want to fish and precisely position their boat over it. Anglers can use the touch screen to drop a waypoint on the structure they wish to fish.

Position Precision
Once you have located a spot that is holding fish, the next variable in the equation is boat control. Electric, GPS controlled, trolling motors allow the angler to have precise control over their boat while fishing. On my 27 Conch I use an 87-inch Minn Kota Instinct Quest 115-pound thrust trolling motor. It is powered by a brushless motor which – compared to the previous models – has more power and torque, runs smoother and is dead quite. This new motor has a feature called drift mode. This allows you to select a heading that you want to drift on, set your speed, and the motor will keep the boat on the drift heading at the selected speed. The drift can be moved in 5 degree increments and the target speed in 0.1 mph increments. Drift mode eliminates the impact of wind and allows the angler to dial in their presentation. It is incredibly effective when the wind is causing you to drift in a direction that opposes the current. Using features like drift mode and autopilot also allows anglers to hold bottom with less weight while minimizing line scope and keeping the line more vertical.
Spot lock is a feature that using the trolling motor’s GPS to keep the boat anchored in position with the ease of pushing a button. The jog feature allows you to move the boat forward, backward, right and left in 5-foot increments. When spot locked, I pay attention to the “boat scale” setting. This tells the motor how tight to hold to the spot lock and how hard the motor is going to work to hold position. If the motor is working too hard it causes the bow to rock, but if you lower the boat scale down to -2, it will stabilize. If you are tog fishing and the boat is slipping down current of the rock you are trying to fish then increase you boat scale up to +2 for greater holding accuracy.
| GOING LIVE? |
| Last season was my first year using Live Imaging or forward facing sonar. This technology has dramatically changed freshwater bass fishing. The transducer is mounted on the trolling motor and I found this beneficial at times as I could find fish in front of the boat that I could not see on SI. It operates in real time so you can literally see the fish as they move toward your lure. This gives the angler valuable feedback by helping you understand how the fish are responding to your bait. When fishing the deeper reefs I found success in down mode which looks straight down. Humminbird just released a new version, Mega Live 2 which has a more powerful transducer resulting in increased range and greater detail. I’m looking forward to trying it this season. |
I run high resolution charts like Coast Master to see high level of bottom detail. Every rock and high spot is now visible. I will change modes, when navigating I run the navigation chart or “declutter” mode to make it easier on the eyes and easily identify navigation hazards. When fishing I run the fishing charts which gives high detail bottom counters. This is incredibly helpful to locate potential bottom that is likely to hold fish. I also use the relief shading feature which highlights different depths and bottom which really helps when searching for a good sea bass or tog spot.
When I talk to anglers at shows, customers on my boat or through direct messages on social media, a lot of anglers are intimidated by the settings on their electronics. Hopefully, I’ve made things a little easier to decipher here and given you the confidence to make adjustments with some expectation, with regard to how to see what you’re trying to see based on the situation you’re in. These tools are very high-tech, but made simple by the user-friendly controls, if you can get familiar with how these things work, you’re definitely going to catch more fish.