A pint-sized plug with a knack for hooking big bass!
There’s a flaw in the way today’s generation of surfcasters think about plugs. Somehow, we’ve come to a point where big is good and gigantic is better, but the truth is, striped bass are notorious for keying in on a size bracket and shunning anything that falls outside of their preferred profile for that tide. We’ve all been there and we’ve all felt the pain of not having that perfect size plug and watching the guy that does crush fish while we stand by and watch, helplessly. It’s hard not think that the birth of the Hab’s Stubby was conceived on a night just like that.
If you read my 2022 article on building the Hab’s 2-ounce needle, then you know that I knew John Haberek, the brains behind Hab’s Custom Plugs, personally. John had a heart of gold and was a huge part of my growth as a plug builder. Looking back, I wish I had the forethought to ask him how all of his designs came to be, but, to me he was a legend and I did way more listening than I did talking; I also did a lot of laughing!
But when you look over the Hab’s lineup of needles, you can catch a glimpse into the mind of the man who was crowned “The Needlefish King”. With five sizes ranging from the 1-1/4 ounce Sand Eel to the 12-inch, 4-1/2 ounce “Footer”, John Hab’s was creating a system of needles to fit into every situation. Thanks to a website known as “The Wayback Machine”, I was able to go back in time and pull this quote from the original Hab’s website:
“HAB’S Needle Plugs are great lures for imitating almost any baitfish in coastal waters. These plugs create a small wake on the surface as they are retrieved. Needles are surface to sub-surface plugs, depending on the plug size and retrieve imparted by the angler. Proper presentation at night includes an extra slow retrieve followed by an occasional twitch or jigging up. During the day, the same techniques can be utilized with a slightly faster retrieve.”
With Hab’s lures there are two things to remember, first, John was a perfectionist and even after his plugs began catching fish he continued to streamline each design until it was perfect. And secondly, he built this system of needles, not to perform differently but rather to perform about the same in the water. The goal being to give the angler several profiles with the confidence that each version would fish just about the same as its larger and/or smaller siblings. I think that’s pretty cool!

Proof of a Perfectionist
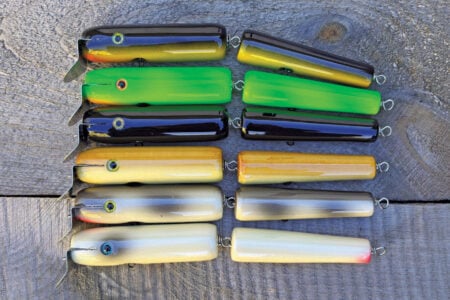
While researching this build, I found myself scrambling to locate any of my Hab’s Stubbies. Luckily, I have a friend that lives pretty close by who has more plugs than anyone else I have ever known. A quick text to Charlie and two Hab’s stubbies were delivered the following day on his way home from work. As is always the case when handling Hab’s plugs, I was immediately struck by the clean simplicity of the design and the paint. I was also predictably impressed by the uniformity between the two the plugs.
But as I looked closer, I realized that these were two versions from different eras of the evolution of the Stubby. The first one, was like the ones I had and misplaced, with two weights strategically located along the belly. The second one appeared to be missing the rear belly weight. Try as I might under lamp light and bright sun, I could not see the ‘halo’ of that second weight. Luckily it was a well-worn plug and my friend insisted that he didn’t mind if I cut the wire to check for a tailweight.
Sure enough, after pulling the wire and flaking away the rusted tail grommet, a tailweight was hidden there. Later testing revealed that the plugs were nearly identically balanced, and closer inspection revealed that in the later – tail-weighted – version, the forward belly weight and the hook were nudged forward, presumably to adjust for the changes in balance brought on by using the tailweight. I love that kind of stuff!
A Simple Turn
The Stubby is every bit as simple as the 2-ounce original, it’s basically a dowel with a slight shoulder to begin the taper to the nose and a very subtle taper, rounding out the tail. I’m pretty much certain that the originals were made from hard maple, you could use birch as well or even use some soft maple for a slightly lighter, higher-riding version.
Cut your stock to 1-inch by 1-inch squares and cut those to 6-1/2-inch lengths; find the center at both ends and set one spinning in the lathe. Use a gouge to round off the corners, making sure to leave about a half inch of each end square, now take a skew chisel and work the whole length of the plug down to about 13/16-inch diameter and turn off your lathe. This plug measures 5-1/4 inches, so make pencil marks 5-1/4 inches apart for your nose and tail.
Now make marks at a half-inch in from the tail mark and two more at 1-3/4 and 1-7/8 inches in from the nose, these mark the location of the ‘shoulder’ that transitions the body to the nose. Turn the lathe back on and touch each mark with your pencil to make them easier to see. Now, working with a small, sharp, skew chisel rough out the shape of the needle using these diameters as a guide. (Refresh your pencil marks as needed.)
Nose Mark: 1/2-inch
Shoulder Mark #1: 3/4-inch
Shoulder Mark #2: 13/16-inch
Beginning of Tail Taper: 13/16-inch
Tail: 9/16-inch
The taper from the nose to the shoulder is a straight shot and you can use your skew chisel to cut that. The shoulder on these smaller needles is barely discernable, you can almost just leave a 1/16-inch ridge between the taper and the main ‘fuselage’ of the body and then just let the natural transition ‘happen’ when you sand it. If you don’t nail it, don’t worry about it, this is more about achieving the signature look than it is about any benefit to the action. The tail taper is also slight and smoothly rounded—here too, perfection is not a requirement, just do your best to make it look like the blueprint.
Use a parting chisel to give the nose and tail nice, flat ends. Sand the whole thing smooth on the lathe with a strip of 180 grit sandpaper (pay extra attention to the shoulder) and move over to the drill press.

Bits & Bores
Now you’ll need to drill two centered, 5/16-inch diameter holes both about 5/8-inch deep, one at 2-3/4 inches back from the nose, this will be your hook hole. Drill the second hole at 2-1/4 inches back from the nose, this will house your chin weight. As you may remember from the last Hab’s article, there is one flaw in the design, with the eye sockets being drilled on the same line as the weight hole and the hook hole being so close as well, they are prone to breaking under strain. I’ve had two break on fish! So I drill the eye sockets just deep enough to accommodate the half-inch eyes, but you could also just build them blind, the fish won’t care.
Once you have all your holes drilled, thru-drill the plug using a 3/16-inch bit and then cut the square off the tail only. Head back to the drill press and drill a 5/16-inch diameter hole in from the tail a hair over 1-inch deep, this will hold your tailweight. Cut the square end off the nose and give the whole thing a light sand with 220 grit sandpaper, this will knock down all the sharp edges and you can move on to sealer.
Bathe & Spray
At this point, you should be holding a naked Hab’s stubby in your hand, from here it will need to be sealed. Hardwoods are prone to cracking, so I highly recommend a double-dip: seal once, allow a few days to dry, a light sand and then a second dip. A 60/40 mix of interior high gloss urethane and mineral spirits will do the job nicely. When the sealer has fully dried, give them another light sand with 220 sandpaper and wipe them down with a damp rag.
Next we need to add the chin weight. For this, buy yourself some .39-ounce tailweights from NJTackle.com and cut them to 5/8 inches on the bandsaw. Now you’ll have to drill a centered 1/8-inch diameter hole through the weight about half-inch up from the bottom. Trim the edges of the hole with a razor blade and epoxy it into the plug—making sure that the hole lines up with the thru-wire hole, because the wire needs to pass through the weight. When the epoxy has cured, cover the weight with Bondo and sand it smooth. Now it’s time for a couple coats of primer such as Painter’s Touch All-Purpose Primer and you’re ready for paint.
For colors, as always, I like to try and stay true to the originals. John was known for simple, yet clean, paintwork. Most of the plugs he made were either solid colors or two-tone. For mine, I will mostly paint black, white or parrot—I might add a blurple in there or maybe a sand eel, too. He was also known for adding a touch of glitter to many of his creations, I would recommend adding just a pinch of fine, silver glitter to your clear coat if you want to mimic this effect. I prefer to clear coat my plugs before assembling them so, after your plugs are painted, Super Glue some eyes in (if you’ve elected to use eyes) and give them a coat or two of your favorite clear finish – I use bar top epoxy.

Putting It All Together
When the finish has cured, assemble the plugs. Drop a #3 Krok swivel into the hook hole, slide a nose grommet over a pre-bent, 12-inch thru-wire and send it through the plug – threading the swivel on the way. Now slide a .24-ounce NJTackle tailweight over the wire and into the tail of the plug, cover the hole with a 1/2-inch tail grommet. Finish the build with a neatly-wrapped tail loop. Rig them with a 2/0 VMC treble up front and a flag on the tail. A little tip from me, instead of a 2/0 VMC try a 1/0 Salt-X treble, they are sharper and tougher than VMC, just make sure to rinse after use.
This pint-sized needle is a warrior that has landed many big fish since it was invented by the man with the handlebar moustache. It’s funny to think back to those days and then realize that his plugs have made the long trip to classic status. Now collected more than fished. But that’s part of the reason why I keep coming back to Hab’s classic creations, they don’t belong on a shelf, they belong in the surf, doing what they were designed to do. And I hope this article does this great design justice and that it catches some great fish for those of you that take the time to build them.