A ‘suspect’ swimmer made by one of the legends of wooden plugs.
The relationship between Danny Pichney and Donny Musso was… complicated. The duo worked together for a time, producing a plug called the Jinx, and a few other well-known classics can also reportedly be attributed to their team efforts. The alleged sale of the design that would become the Danny Plug, a design that Musso claims was his brainchild, was the final wedge that drove them apart. As Donny went out on his own, he created a series of plugs based off a shape that he called the ‘Torpedo’, most anglers know them as Donnys. This was a system that used the same shape, and different woods with lips that featured different line-tie positions to swim the different variations at specific depths. The one known as the ‘Pine’ was a shallow-swimmer that surfcasters quickly fell in love with. Rumor has it that Steve Campo was buying all the Donny Pines and Danny stepped up to fill everyone else’s needs with the Bootleg.
If you didn’t know what you were looking at, you might assume that the Bootleg was a Danny Surface Swimmer that was made extra slim. I read this as Danny’s way of removing enough buoyancy to get the plug to dive more easily. I think this plug, sort of, named itself… anglers using them probably called them a ‘Bootleg Donny’ and the name stuck. As far as the chronology of Danny’s building career goes, the Bootleg shows up relatively late.

Bootleg Footwork
In my research for writing this article, I called upon elite surfcaster – and fellow plug enthusiast – Steve McKenna to see if he had a Bootleg I could actually swim. In that conversation, Steve said of the Bootleg, “It’s kind of a weird plug, it doesn’t have a lot of action, but it does catch fish in the right situations.” The Bootleg has begun to stand out in my research as one of those plugs that draws different reactions from different casters. Russ “Bassdozer” describes the Bootleg in his awesome diatribe Surf Plugology, as, “A versatile and adjustable medium-diver that (via the lip and line tie) could be tuned different ways to swim slower or faster and shallower or deeper in the medium-diver range.” So it’s safe to say that the Bootleg was versatile and useful for – at least some – surfcasting situations.

I ran into Steve McKenna a few days later and he handed me two Bootlegs, one was brand new and the other had been rewired and lightly fished, he wanted the new one to remain in its new condition, but said of the used one, “You can swim that, you can even cut it in half if you have to, I don’t mind!” Of course, I didn’t cut it in half! But I did notice something when looking the two plugs over, the line tie positions were different, one high and one mid; this was something I’d never heard anyone else mention. Knowing that Danny handmade all of his metal lips, it is possible that the punch slipped on one of these lips and accidently created a custom version. I consulted the only Bootleg I have in my personal collection (still in the package) to break the tie and settled on making my version using a high-slot lip.
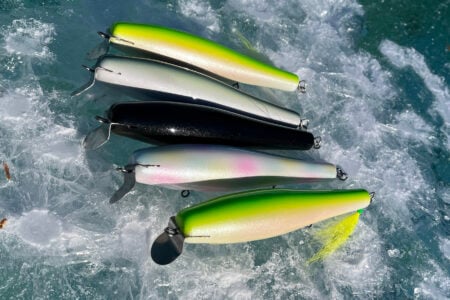
In comparing an original Bootleg with an original Donny Pine, I have a hard time seeing enough similarities between the two to denote calling one a ‘bootleg’ of the other. They are roughly the same length and have a similar nose diameter, but that’s where the similarities end. The hook and weight positions are different, the Bootleg is much skinnier overall, but features a wider tail. Perhaps most importantly, they are powered by vastly different lips; the Donny’s lip is a Lefty 2 and the Bootleg’s closest equivalent is a Lefty 1. That left only a swim test as the final deciding factor.
With an original of each in my bag, I took a winter walk to the water’s edge, donned my polarized sunglasses, and set my mind to a little game of compare and contrast. The most obvious comparison is that they both swim below the surface. But to my eye, that’s where the similarities end. The Donny features a smoother, more fluid swim and runs a foot deeper, the Bootleg has more roll and features a wilder, sloppier swim. These are both 6-inch swimmers that were designed to fish in the same areas, to me that doesn’t make one a copy of the other. Sometimes you need that sloppier, more frantic look to draw strikes, and other times you need that fluidity… in other words, they both have a unique value and they’re both worth building and fishing.

Boots On The Ground
Given that Danny was creating his own take on the Donny Musso Pine swimmer, we will assume that Danny used pine for his Bootleg. With the understanding that this swimmer is intended to swim subsurface, I would suggest using heavier pieces of pine. The widest point on this swimmer is 1-3/16 inches in diameter, so you can cut your stock to 1-1/4-inch squares and chop those up into 7-inch blocks. Find the center at both ends and set the block spinning in the lathe. Use a gouge to round off the corners, leaving about a half-inch of each end square and then lay out your reference marks. The Bootleg is actually about 5-7/8 inches long, so make your first marks 5-7/8 inches apart to mark you head and tail. The thing that makes the Bootleg look somewhat unique is how ‘long-waisted’ it is, the widest point is pretty far back at 3-5/8 inches back from the nose, make a mark there as well. Fire the lathe back up and touch each mark with your pencil to draw them out in a ring around the blank. Using a skew chisel, shoot for the following diameters:
Head Mark: 7/8-inch
3-5/8-inch Mark: 1-3/16 inches
Tail Mark: 11/16-inch
The Bootleg is a very easy turn; from the nose to the widest point is – more or less – a straight line. And, you could run a straight line back to the tail and get the same, basic, look, but there’s a slight inward curvature to the tail portion (requiring a rounded chisel to mimic) and the ‘apex’ of the shape (widest point) is gradually rounded out, not a defined peak. These little details will give you the signature Bootleg shape.

In The Details
Once you have your Bootleg body roughed out, use strips of 100 and then 150 grit sandpaper to smooth things out. As far as the lip slot goes, it should be about a half-inch deep into the face of the plug and centered. A band saw, scroll saw or even a pull or coping saw will work to make this cut. And now… we drill.
Using a drill press, make two 5/16 diameter holes at 1-1/4 and 4 inches back from the nose. These should be drilled about an eight of an inch deeper than halfway through, these will house your hook hangers. Now switch to a 3/8-inch bit, I recommend a forstner bit, and drill a hole at 2-7/8 inches back from the nose, this should be drilled just shy of halfway through and will hold your belly weight. Now thru-drill the body and cut the square ends off. Epoxy an 8.5-gram belly weight, (purchased at saltwaterplugs.com) into the weight hole and cover with Bondo or another type of exterior grade filler. Now thru-drill the plug, in from the tail end and coming out in the forward hook hole. Cut the square ends off and mark where the hole in the Lefty 1 lip will fall and drill from that mark back into the forward hook hole, using a hand drill and a 5/32-inch bit.
Once the filler has dried, sand it smooth and give the whole body and light sanding to knock down and rough edges and then seal the wood in a bath of your favorite sealer. When the sealer has dried well enough that a light sanding produces fine, white dust, give the whole body another light sand with 220 grit paper, wipe it down with a lightly dampened rag, allow it to dry and then brush off any residual dust before priming with the “rattle can” primer of your choosing.

Almost Done…
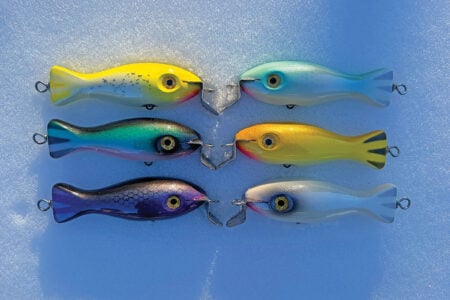
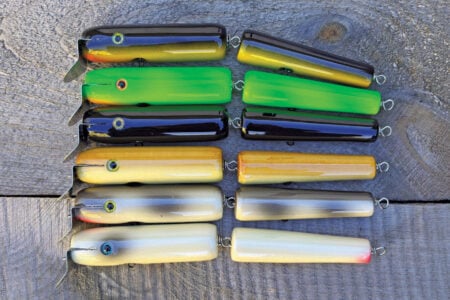
Now for the fun part. The sky is the limit when it comes to colors, Danny’s paint jobs were simple, blue over silver, solid white, black over silver, herring, various ‘cloud style’ colors and solid black to name a few. With a rolly plug like this one, I tend to lean toward solid colors because they don’t visually give away that rolling action, but any color you paint will catch fish. When your Bootlegs are painted and dry, give them a coat of epoxy or whatever clear coat you like, to protect your hard work.
Once the clear coat has cured, all that’s left is assembly. Start by sliding a Lefty 1 high-slot lip (NJTackle.com) into the lip slot with a smear of Super Glue and dropping a #3 Krok swivel into each of the hook holes, thread a pre-bent thru-wire through the lip, into the plug and then thread through the swivels on the way by. Finish with a tail grommet and a neatly-wrapped tail loop. This plug takes three 2/0 VMC trebles, I suggest that you cut the belly trebles and use a split ring on the tail—I’d also recommend using a flag in place of the tail treble.
This is a cool niche plug to add to your repertoire, and it’s one that no one else is likely to be using. The thing I love about recreating and fishing these creations from surfcasting’s decorated past is the connection to these legendary builders that I feel when I build and fish their designs. This one comes with a little bit of an extra lesson built in, because when you compare the Bootleg to Musso Pine, you get to see two, very different, ways to arrive at the same destination.