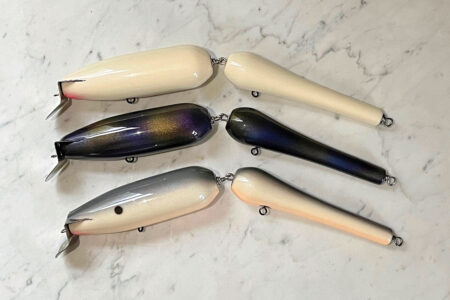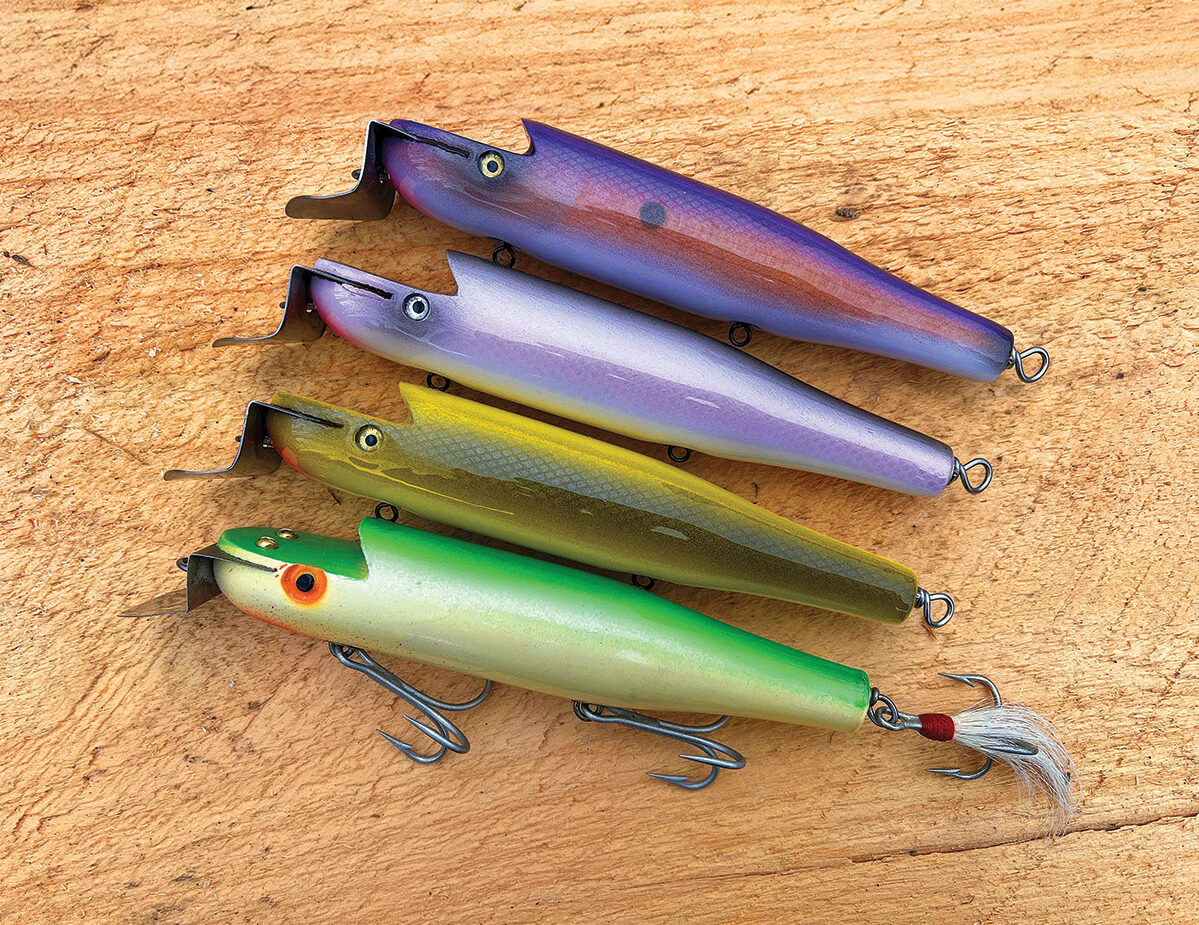
Building the challenging and unique ‘Dual Action Swimmer’ made by CT Yankee Lures.
Up until about a year ago, I don’t think I had ever seen this plug…at least I don’t remember seeing one. Then, one day a photo of this curious-looking metal lip popped up in my Instagram feed and I found myself immediately intrigued. Several months later, while at a fishing show on Long Island, I ran into locally famous plug collector Bob Jones and he had a small cache of Connecticut Yankee plugs he was selling. When I saw one of these swimmers among them, I knew I had to have it.
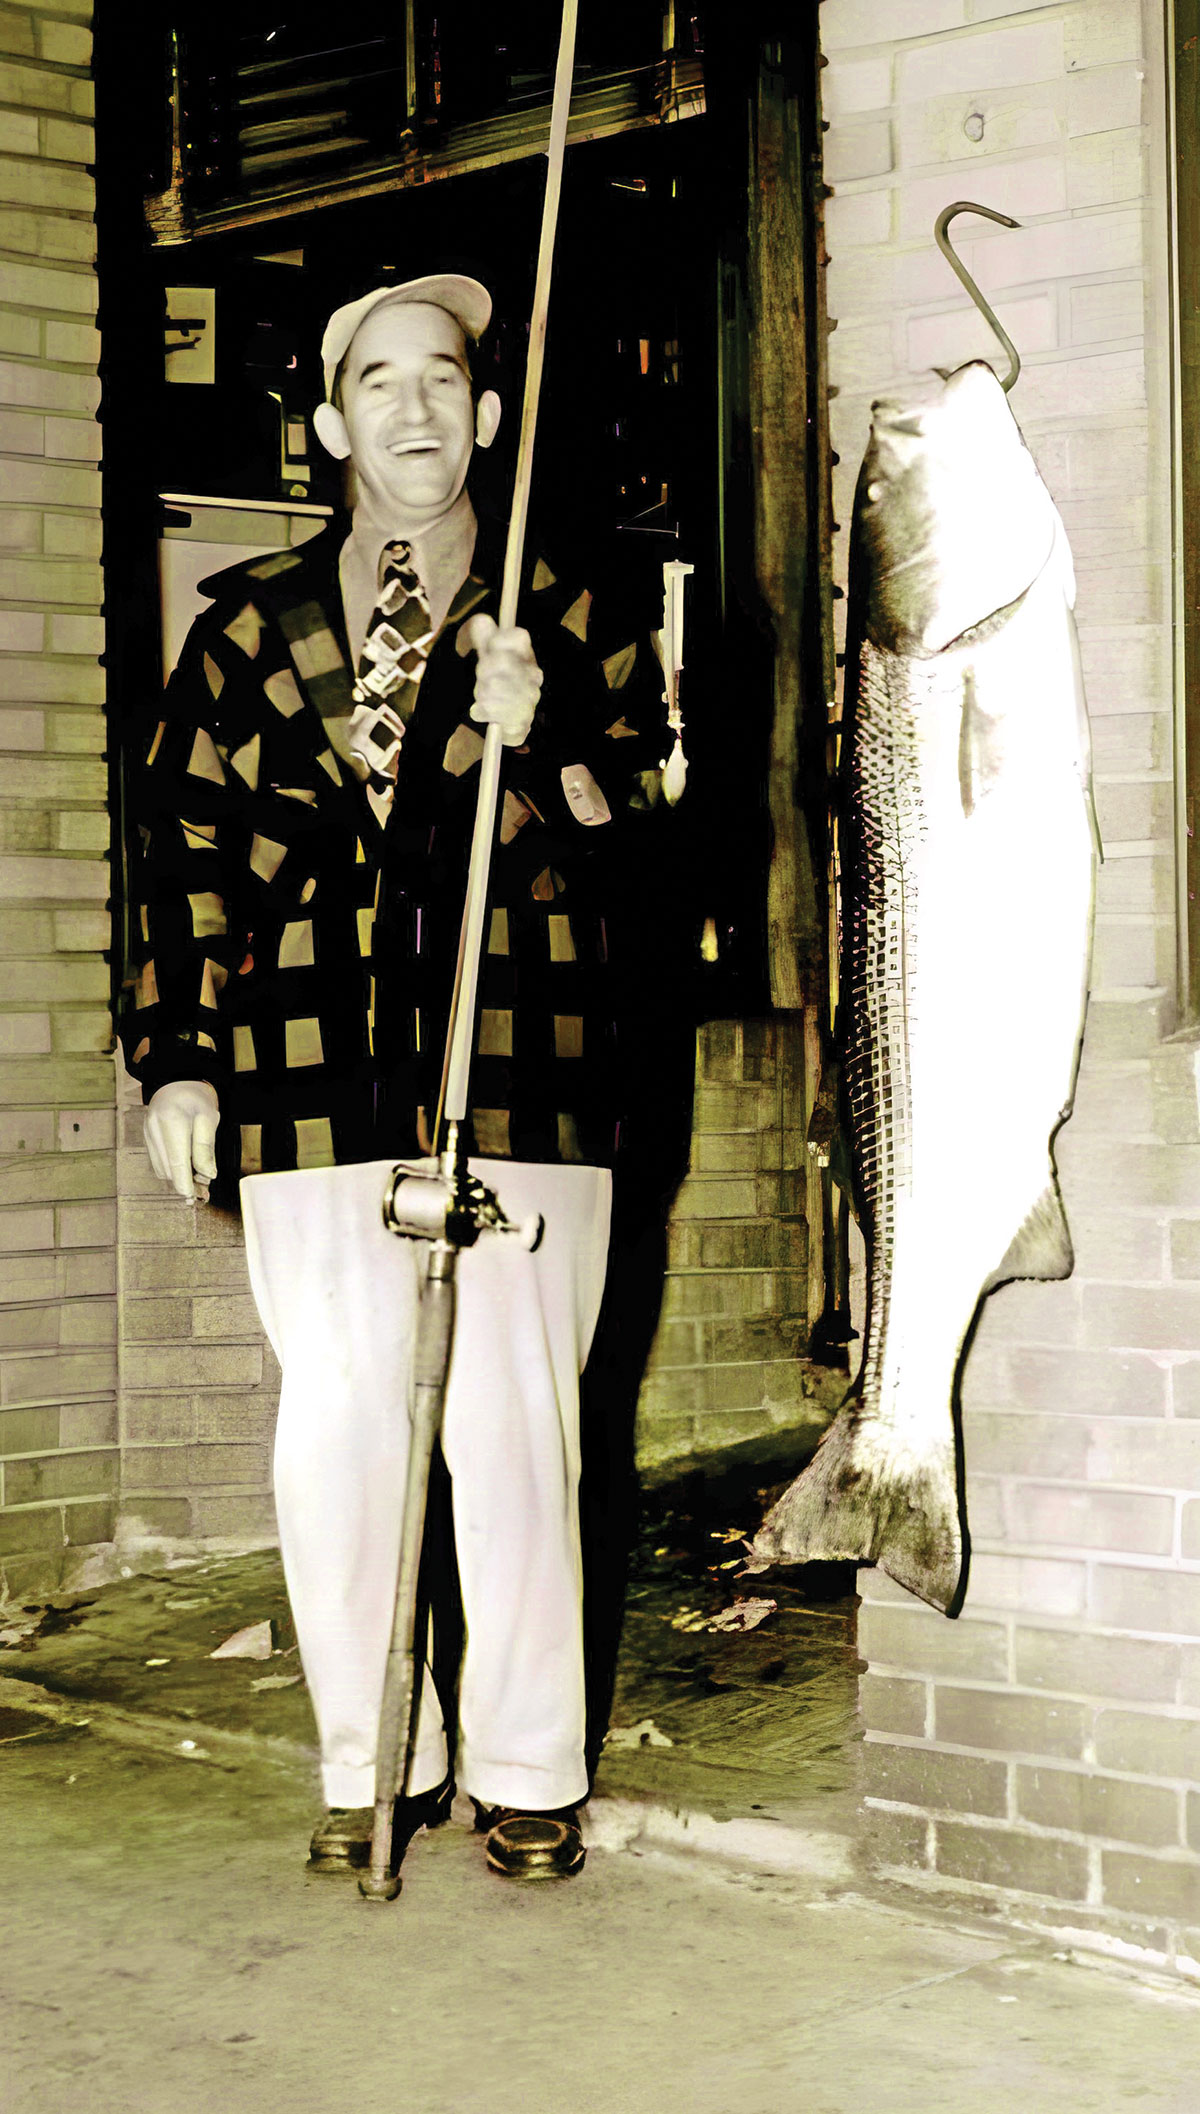
Connecticut Yankee lures were made by Walter Krystock of Meriden, CT. In an interview I found in a back issue of Surfcasters Journal, his son said that Walter started making lures around 1946 or 47 while recovering from back surgery. He said that his first lures were made using repurposed bowling pin blanks from a kids bowling set. Walter was quite the fisherman too, winning several contests and awards throughout his life; in 1959 he was crowned the ‘Bass Fishing Champ of Connecticut’ after amassing a staggering 1529 points that season. His largest striped bass landed on one of his own lures was a 50.5-pound beauty, the photo appears to show that a wooden popper did the job.
Krystock produced five set styles and many other ‘small batch’ creations. He was known to travel all over the Northeast to partake in surf fishing; from the Connecticut shore, to Cape Cod, to South County in Rhode Island to Martha’s Vineyard and beyond, he seemed to hit all the hotspots. He sold his lures between 1948 and 1970 out of the trunk of his car; they retailed for between $3.50 and $4.50. His son cited his dad’s painstaking attention to detail when talking numbers, he produced between 250 and 350 plugs per year with each plug being dipped several times in enamel to ensure a long-lasting seal. His final batch of lures was made with the help of his son in 1970. In the 1980’s, after his passing at age 76, a legendary group of surfcasters, the Campo Crew, developed a love for his swimmers, and used to stop to buy them by the dozens from his widow on their way to Block Island and Cape Cod.

Dual Action
It took some sleuthing to learn the true name of this odd-looking metal lip. Bob Jones called it his ‘darter’ and said it swims ‘kind of like a darter’. I reached out to another collector, who posts his collection online under the Instagram handle @googooeye_mike and he told me the true name of the plug, was the Dual Action Swimmer. Further investigation through several channels revealed that the plug got its name because it swims like a metal lip swimmer with more of a darting action in the current or when the angler jerks it forward.
I found this build to be challenging, but also a lot of fun. One of the things I love most about reviving these creations from the bygone eras of surfcasting, is that I get to live in the headspace of the builder for a while and this helps me understand the inspiration that gave birth to these interesting designs. I’m also constantly reminded how hard it was to build lures back then, you couldn’t just go online and buy metal lips and grommets from NJ Tackle, you had to pore over catalogs, and rummage through drawers of fasteners at the hardware store, you had to start from nothing and learn everything on your own. Builders of that time had to cut every metal lip – one at a time, by hand – and it was their own ingenuity that dictated their shape. This is why I have so much respect for the builders of old and also why I feel that it is so important to keep their memory alive.
The Build
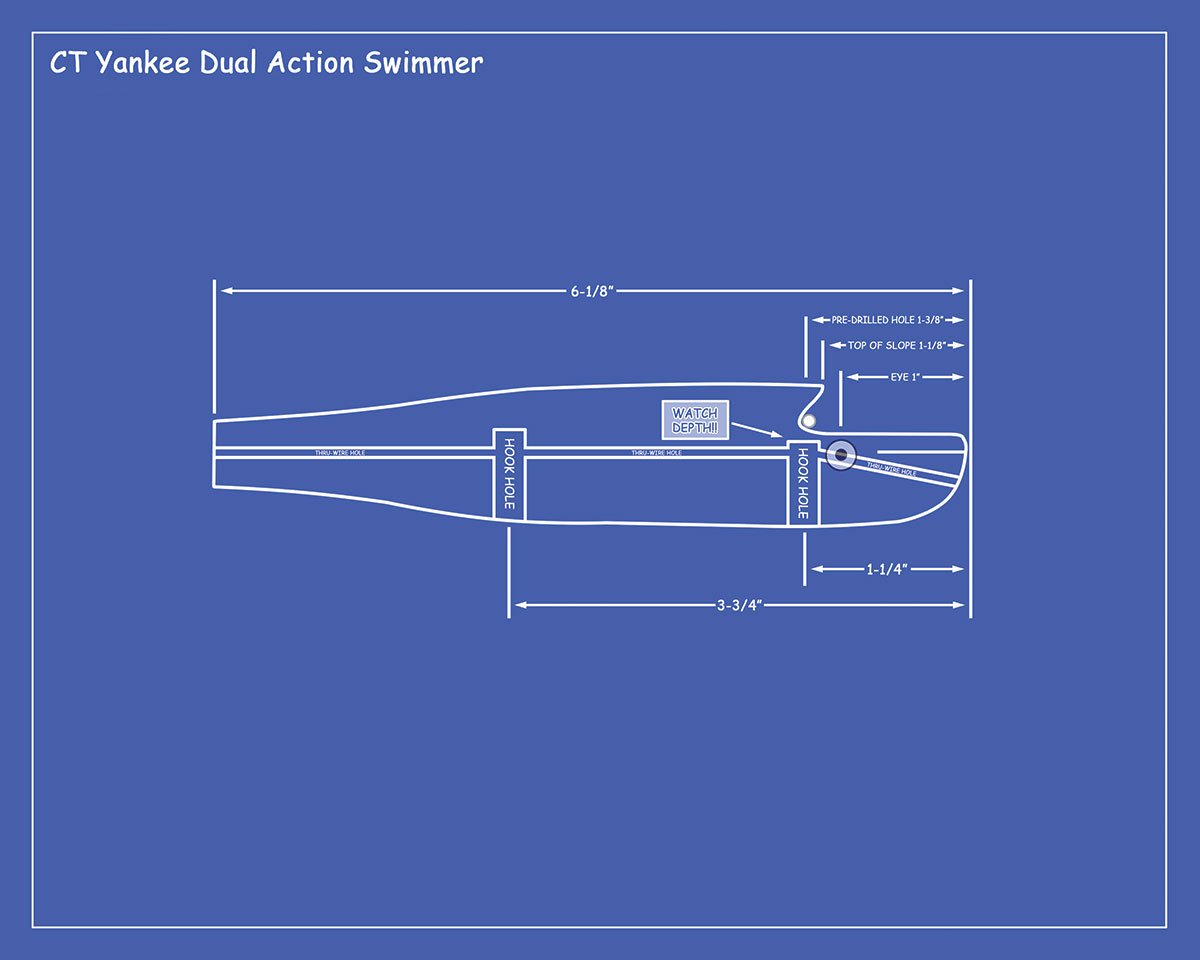
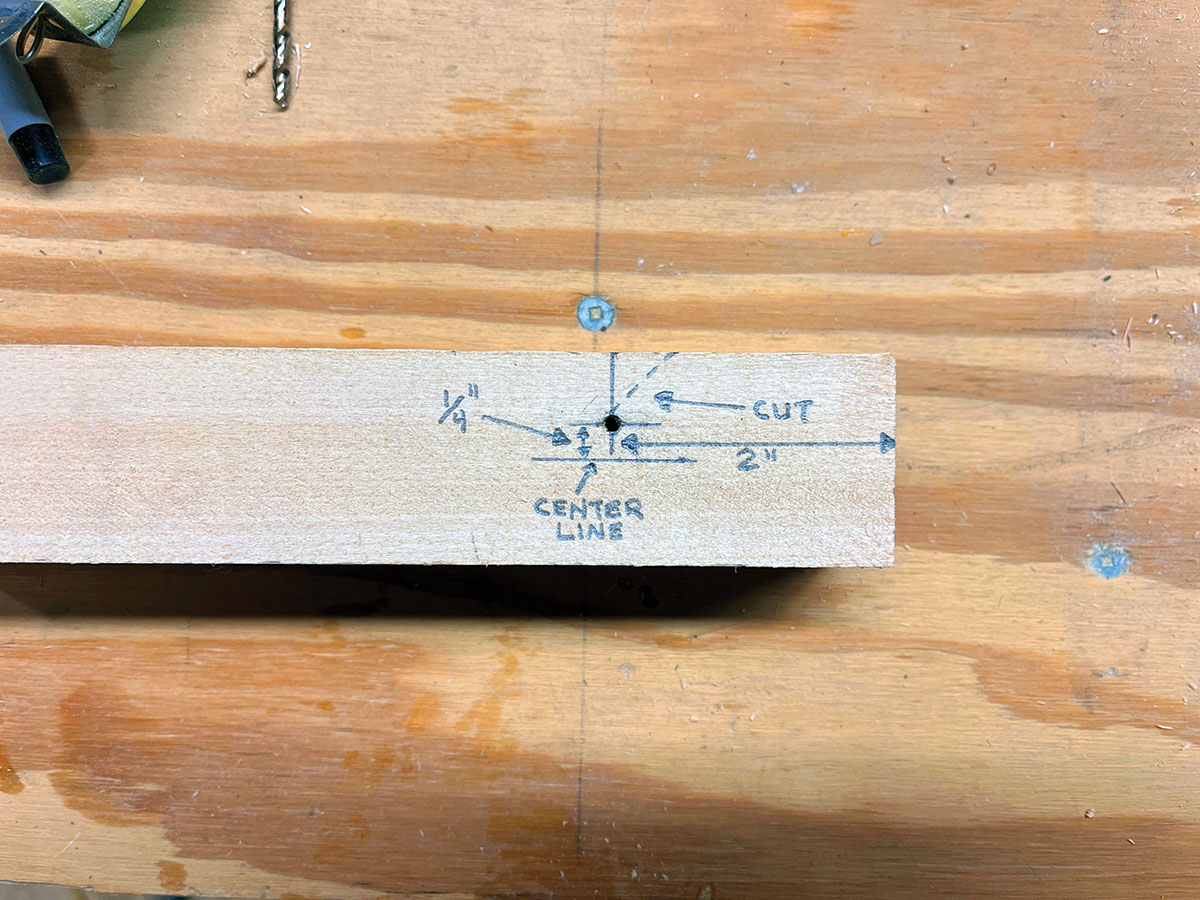
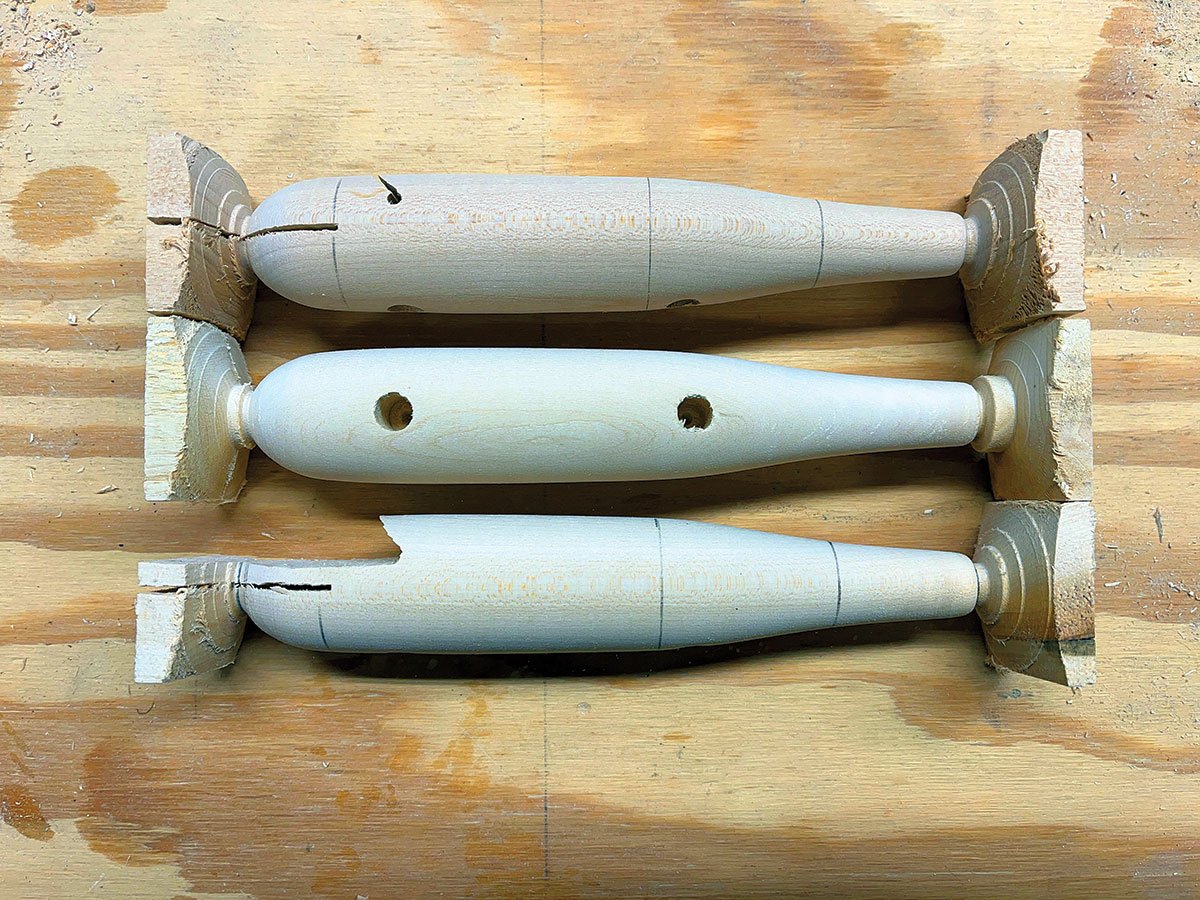
Based on the weight of my original, this plug is made from a medium weight piece of wood, some tight-grained pine, lighter Alaskan yellow cedar or even a lighter piece of soft maple would work. At its widest point, the Dual Action Swimmer is about 1-3/16 inches in diameter, so 1-1/4-inch squares would be about perfect. With an overall length of 6-1/8 inches I cut my blanks to 7-1/4-inch lengths. You have to do some pre-figuring with this plug, if you look at that notch, it’s rounded at the apex, so I drilled a 1/8-inch hole all the way through the blank 2 inches back from the head end of the blank and a quarter-inch above center. Then I used a band saw to make a cut at a 45-degree angle to the top of that hole. After that, I cut a centered lip slot and then found the center at both ends and set it spinning in the lathe.
Use a gouge to round off the corners of the middle of blank, leaving about a half-inch of each end square. The rest can be done with your trusty small skew chisel. Lay out these marks and touch them with a pencil to carry them around the body of the plug. These will be reference marks and should be refreshed as needed. Start by making two marks 6-1/8 inches apart, these will be your nose and tail. Now make a mark at 1 inch back from the nose, this marks the end of the rounded head taper. Your next mark should be 3-1/2 inches back from the nose and this marks the beginning of the tail taper. Lastly, make a mark at 5-1/4 inches back from the head. Your target diameters for these marks are as follows…
Nose: half-inch diameter
1-inch mark: 1-3/16-inch diameter
3-1/2-inch mark: 1-3/16-inch diameter
5-1/4-inch mark: 13/16-inch diameter
Tail: 5/8-inch diameter
The body is not unlike a glass bottle in shape, except for the rounded – almost half-sphere – head. All of the transitions between reference marks should be smooth and natural, flowing from one into the next. When you are happy with the shape, sand the whole thing with strips of 150-grit sandpaper until it’s nice and smooth.
Tight Tolerances
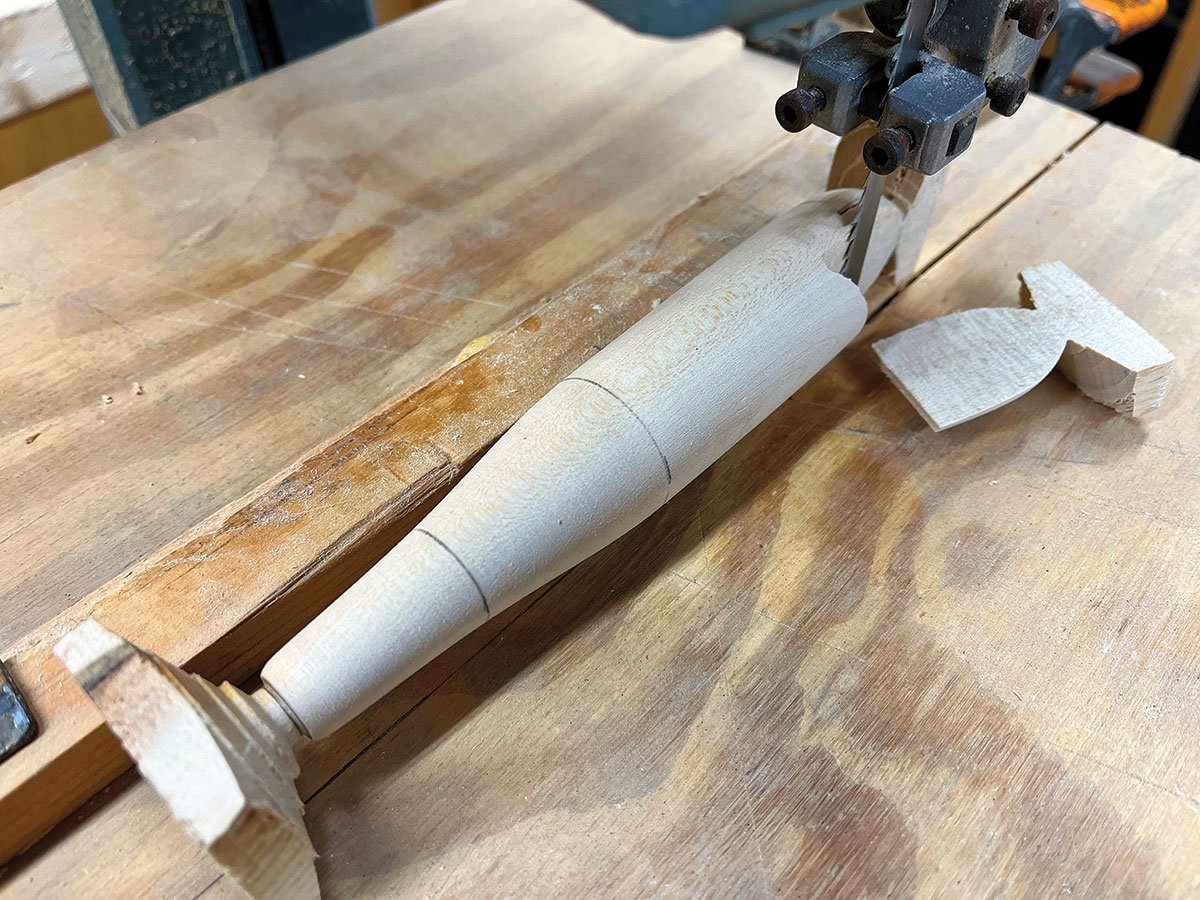
There’s a lot going on in a small space with this plug, so you’re going to have to follow these directions very closely and expect to mess up a few times, I know I did. First things first, we’ll drill the 5/16-diameter hook holes, we usually drill these about 1/8-inch past halfway through, but the forward hook hole CANNOT be drilled any further than halfway, or else it will come through when you cut the slope. If this happens you can repair the hole by gluing in a small section of dowel. The rear hole can be drilled to the usual ‘just past halfway’ depth. The forward hook hole should be drilled at 1-1/4 inches back from the nose and the rear hook hole about 3-3/4 inches back. Next, you’ll want thru-drill the swimmer from the tail to the forward hook hole only, we’ll drill the second half by hand, later.
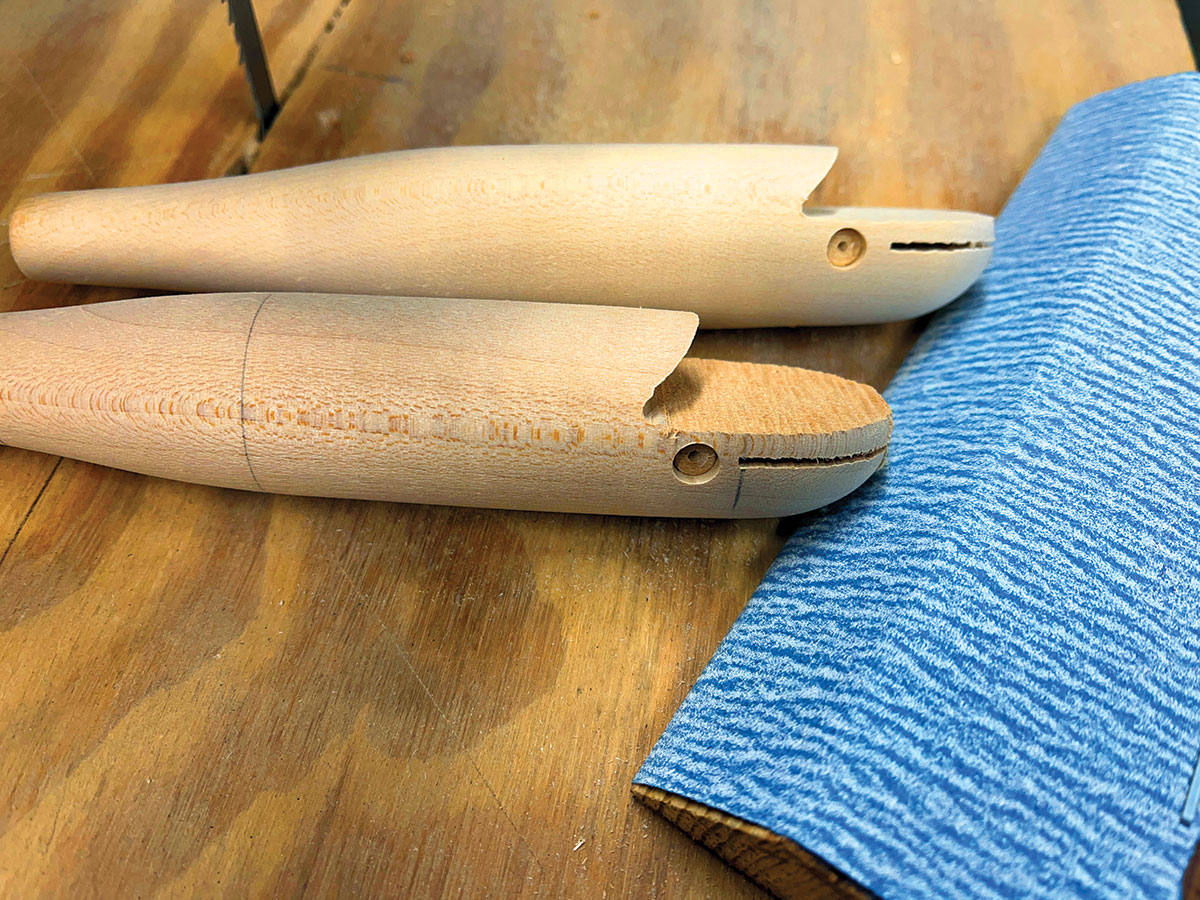
Now we have to perform the toughest maneuver of the build, cutting that head slope. Looking at several examples of this bait online, it doesn’t seem like Walter had an exact cut in mind, some of them slope slightly upwards, some are gently scooped, mine is – pretty much – straight. Using the square ends to anchor the cut, set up a fence on your band saw, you can use a straight piece of wood and clamp it to the table if your saw doesn’t have a fence. Set it up so that the blade will make a straight cut (parallel with the lip slot) exactly a quarter-inch above the lip slot. Carefully slide the plug along the fence and make the cut until you’re about a half-inch from the pre-drilled 1/8-inch hole; if things are lined up perfectly, finish the cut. If it looks like you’re going to come in a little low, eyeball it; if you’re coming in high, reset the fence and cut it again (unless you’re really close, in which case you can probably sand it). Now drill some eye sockets at 1-inch back from the nose, I used 1/8-inch eyes for this build.
Finishing Moves
Cut the squares off both ends now, the original was made with a perfectly round head, I chose to leave a little bit of the nose flat to give the metal lip something to seat against. At this point, you should slide your A40 lip into the slot and mark the location of the wire hole with an awl. Use a hand drill with a 3/16-inch bit to drill from the awl mark back to the forward hook hole; try to line it up with the thru-wire hole drilled earlier.
From here, we’ll need to create a custom sanding block, I made mine out an old piece of fir flooring I salvaged when demoing the attic in my garage. Cut a piece about 3 inches wide, by 8 inches long and then use your table saw to cut one of the long edges at a 45-degree angle. Staple a piece of 150-grit sand paper to the wood and fold it tightly from the top, around the 45 and across most of the bottom edge and fasten it down with more staples. This will make it possible to sand these cut edges efficiently. Using a back-and-forth sanding motion, sand the cut portions of the head slope until the saw marks are pretty much gone. At this point, you should have a plug body that looks pretty much like the picture. Use a piece of 220 sandpaper to smooth out all of the rough edges and make it look pretty—then it’s into sealer, a day or two to dry, another light sand, primer then paint and a coat of protective clear finish.
I couldn’t find a perfect match for the lip, but the A40 lip from NJ Tackle is the closest. However, the angle will need to be changed, using a pair of long, wide pliers, bend the bottom portion of the lip upwards until it’s about 10 degrees shy of 90, I also curled the edges of the lip slightly because the lip on the original was very gently scooped. Slather the tongue of the lip with epoxy and slide it into the slot. Then feed a pre-bent thru-wire through the lip and plug, threading a size 3 Krok swivel placed in each hook hole on the way through. Add a small tail grommet before finishing the plug with a neatly-wrapped tail loop, trim the tag end of the wire and the build is done. A pair of cut 3/0 VMC hooks with a bushy flag on the tail will complete the build. This unique plug is a challenging build, but it’s a good one for learning the craft of plug building, and to give you some basic strategy for replicating intricate cuts. Most of all, I would like to think that Walter Krystock would be very happy to know that surfcasters were making and fishing his designs 80-plus years after he started tinkering with ‘rolling his own.’