“A Gibbs ‘shop special’ from the 1970’s reborn 50 years later!”
Stan Gibbs could be considered the Godfather of wooden striped bass plugs, I might even go so far as suggesting that he should be considered just that. While there were lure makers that came before him, I don’t think there’s another person out there who can compete with the number of striped bass classics he invented. Not to mention the concepts he pioneered that hadn’t really ever been considered before his fish-addled brain made them happen.
As you might expect, there were special plugs made in the Gibbs shop that were never sold in stores a few that leap to mind immediately are the Stan Kuzia giant needlefish and this one, the Giant Jointed GTS. If it weren’t for my longtime friend Teddy Menard who actually worked in the Gibbs shop back in the late 1970s, I might not even know these existed and I certainly wouldn’t know any of these interesting details.
A Shop Special
As you may have guessed, “GTS” stands for Gibbs Trolling Swimmer, but the Giant GTS that most plug enthusiasts and surfcasting historians are familiar with is the 1-piece version. Rare in its own right, the 3-3/4 ounce Giant Trolling Swimmer had a following among the Cuttyhunk commercial fleet at that time and accounted for many large fish. In fact, an old boss of mine – over 20 years ago – loved them so much that he and his fishing partner were making their own, he showed me a few that they had turned out for their nighttime excursions to Cutty.
Teddy Menard is a phenomenal storyteller with a great memory, when I asked him about the Jointed GTS he said, “At that time everyone was using the Creek Chub Jointed Pikies on the backside beaches, and they were working really good. But the problem was, it seemed like they weren’t sealed, so they’d crack after a few fish. John (Gibbs) was letting us fix our Creek Chubs at the shop with new wires and better sealing until one day he had a batch of 50 of these Jointed GTS’s going; ‘wait until you see these swim’ he told me! When they were finished I bought as many as I could. He wouldn’t let me buy 47 of the 50 so I had to settle for five.” He laughed. Teddy went on to tell me that they sold them out of the shop for double the price of the one-piece version, “I think they were maybe $4.50 or $5 bucks…”
As far as Teddy knew, the jointeds were never sold to tackle shops and were only used by local fishermen who were ‘in the know’. “We usually made 50 here, 50 there, I think we might have made a batch of 100 at one point. John didn’t want to sell them to the tackle shops because he thought no one would want to pay the extra money for them.” Teddy then told me that the first night he used the Jointed GTS, he landed two fish over 30 pounds and they went on to catch many, many more big fish. “They leave a wicked wake on the surface,” he added with boyish excitement, “and when you set the hook, there’s a huge explosion out there as the fish turns and tries to run! You have to fish them with a loose drag, or you’ll lose a lot of fish.”
The Build
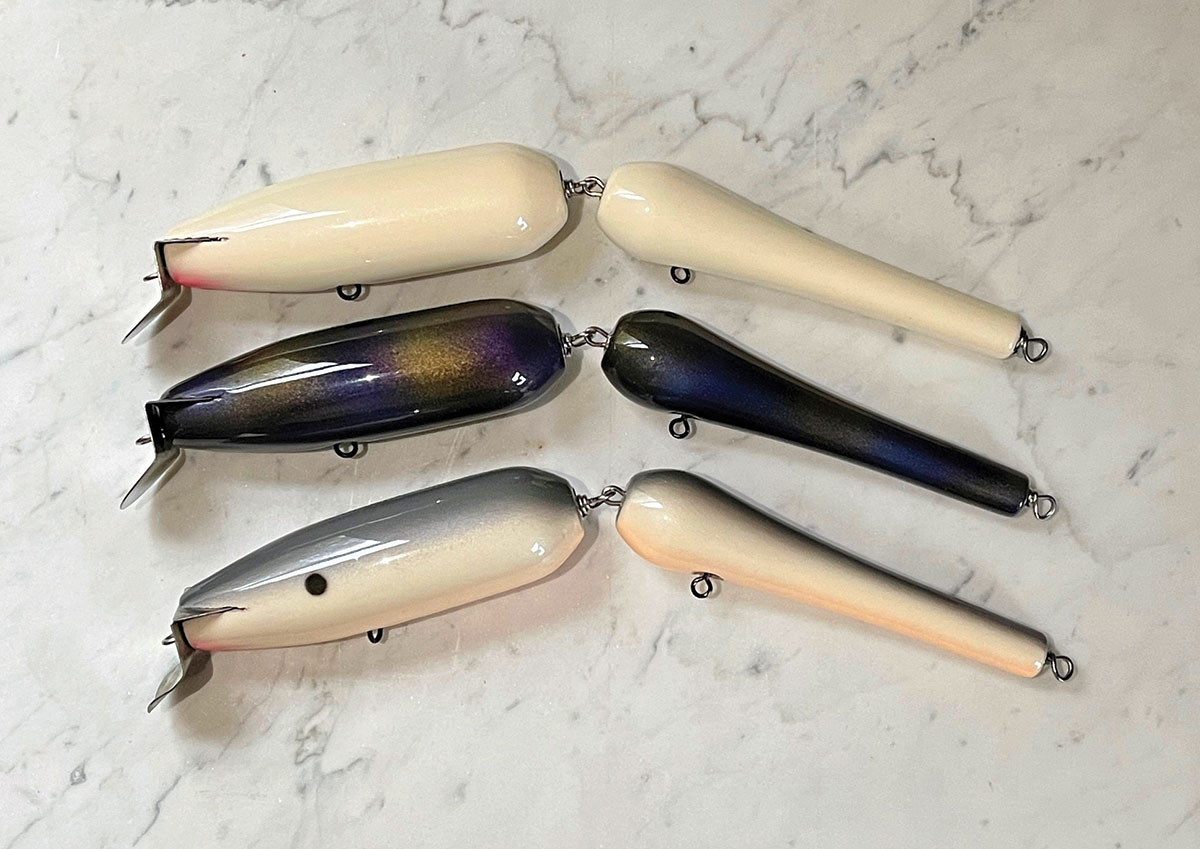
In spite of it’s size and the fact that it’s jointed, the Jointed GTS is a fairly simple build, it also requires the use of some skills we haven’t really covered yet in all these years of plug building articles. Teddy was gracious enough to let me borrow his only remaining Jointed GTS, a well-decorated war hero that has been repainted jet black, the scars of heavy use can be seen through the most recent layer of paint. One sniff of the hook hole and I could tell it was made from sugar pine. These days sugar pine is very expensive and I typically use ‘furniture grade’ white pine to sidestep the cost of the sugar pine making the trip from California.
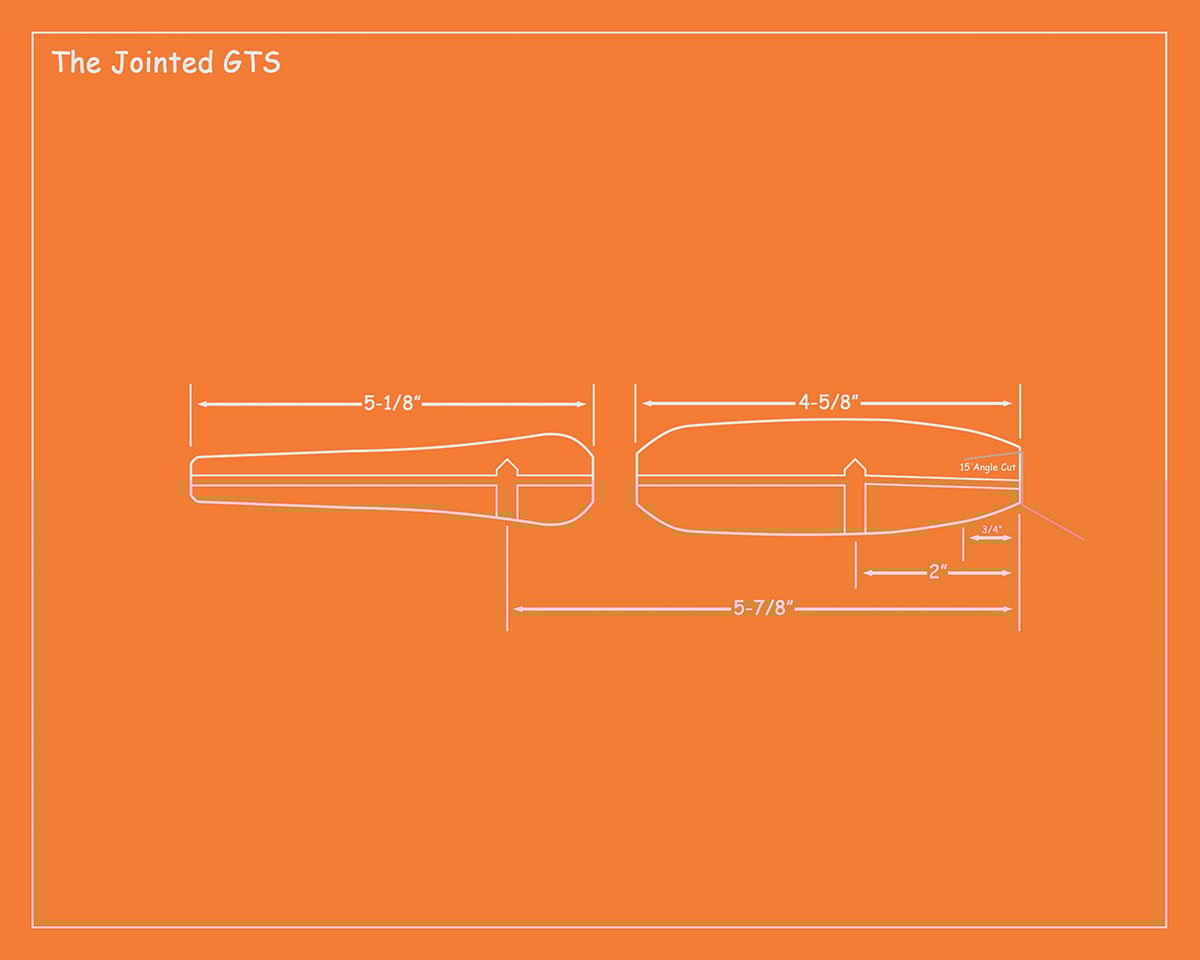
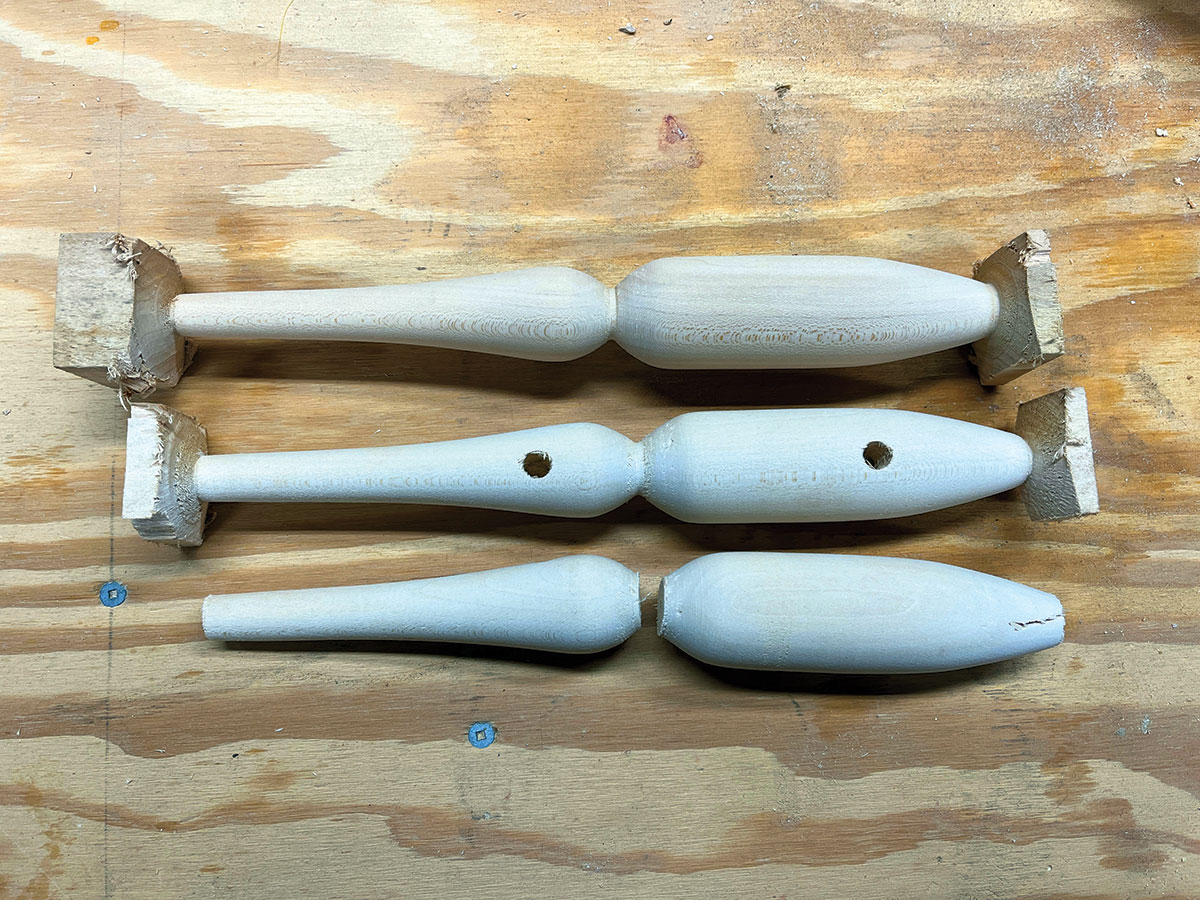
We’re going to turn both halves in one piece, if you’d prefer to turn the head and tail separately, that’s fine. At its widest point, the Jointed GTS registers a diameter of 1-5/16 inches, I turned mine out of 1-1/2 inch squares. The overall length of the body is 9-3/4 inches so I cut my squares to lengths of about 10-3/4 inches. Find the center of both ends and set it spinning in the lathe. Use a gouge to round off the corners, leaving about a half-inch of each end square. Power down the lathe to lay out your reference marks. Begin by making a mark for the head and tail, these should be about 9.75-inches apart. Measuring back from the head mark, make marks at 1-7/8, 4, 4-3/4, 5-3/8 and 7 inches. Turn the lathe back on and touch each mark with a pencil to carry them around the body in a ring; these will be your reference marks and should be refreshed, as needed.
Your target diameters should be as follows:
Head: 5/8 inch
1-7/8-inch Mark: 1-5/16 inches
4-inch Mark: 1-5/16 inches
4-3/4-inch Mark*: 1/2 inch
5-3/8-inch Mark: 1-1/8 inches
7-inch Mark: 3/4 inch
Tail: 1/2 inch
Using a mid-sized skew chisel you should be able to rough out the entire body—I suggest saving the chamfered joint (4-3/4 inche mark) until the end. The plug should have a slightly tapered head, compressing in from the 1-7/8-inch mark. The ‘fuselage’ of the head section should be a 1-5/16-inch diameter cylinder. The taper should get steeper as you work back to the 5-3/8 inch mark and then, at the 7-inch mark, the curve will reverse slightly, as the exaggerated and elongated rear segment terminates in a half-inch diameter at the tail. The forward half should measure 4-5/8 inches, while the rear half tapes out at 5-1/8 inches.
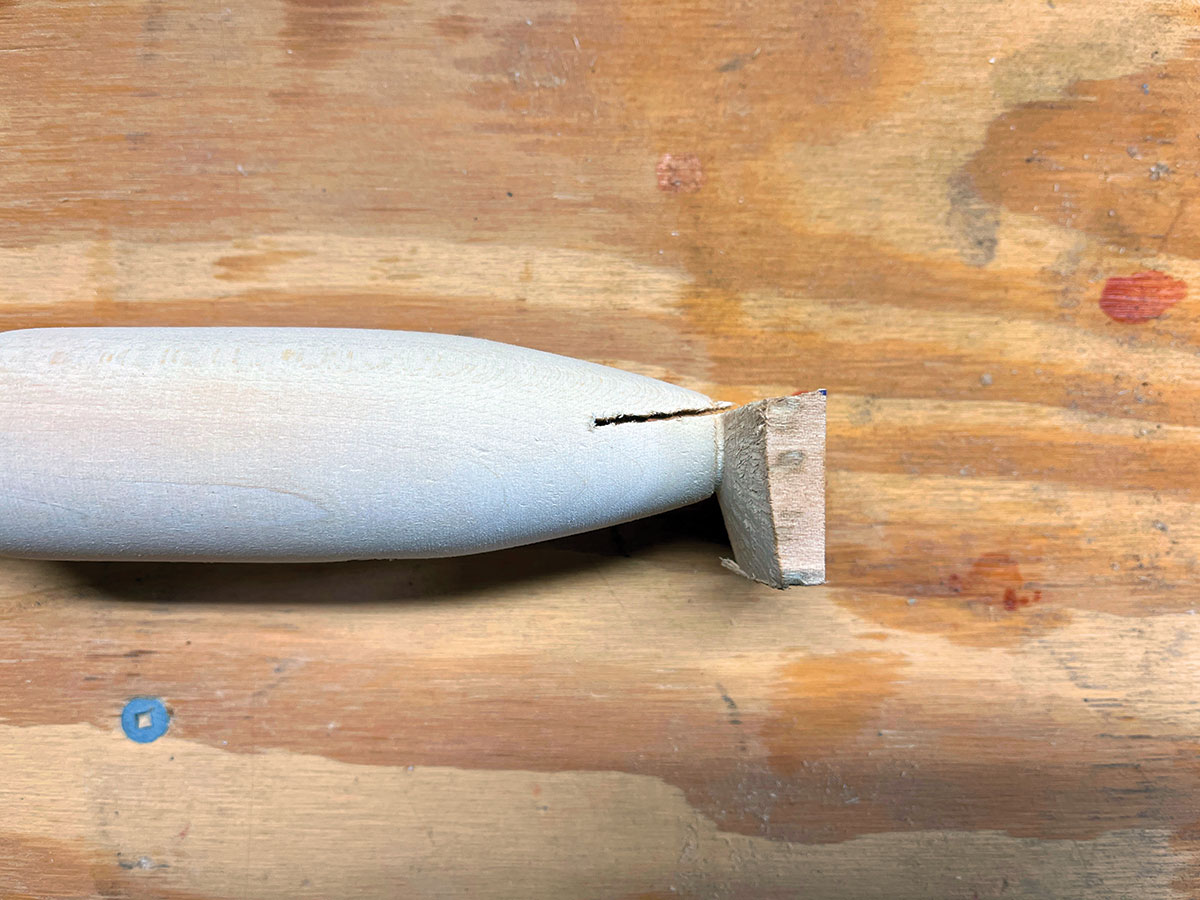
Rip This Joint
Gibbs made these with at least three different chamfer styles at the joint; there was a steeply rounded version, an almost spherically rounded chamfer and a simple 45-degree angle chamfer, similar to a Murat Mur-Eel. The 45-degree angle chamfer is the simplest, all you have to do is slowly plunge a sharp, pointed chisel in at the 4-3/4-inch mark until you achieve a v-shaped notch leaving a diameter of a half-inch. You’ll see that I opted to replicate the more ‘spherical’ chamfer which can be achieved with small skew chisel and some patience. Next, sand the whole thing with strips of 100 and then 150 grit sandpaper while it spins on the lathe.
Now we need to drill a few holes, start by using an 11/32-inch diameter bit and drilling holes at 2 inches and 5-7/8 inches back from the head, these should both be drilled a little more than halfway through. Next we need to thru-drill this bad boy. Drilling a straight and centered hole for almost 11 inches is a tough shot, so make sure you’re bit is sharp. I use the center points left by the lathe and drill from the head back to the second hole first and then flip and repeat the process until they meet in the rear belly hole. The last thing we have to do before we cut the square ends off is cut the lip slot.
The Jointed GTS has a unique lip slot because it’s cut from the very top of the face down and back at about a 15 degree angle. Use a band saw, scroll saw or pull saw for this process and cut it deep enough to accept an NJT Tackle Atom 40 lip. Once you’ve cut the slot, you can cut the square ends off and cut the body in half at the center of the chamfer. Sand the whole thing with 220 grit, rounding off any sharp edges and flattening the faces of the head, tail and joints. When you’re happy with that, give it bath in the sealer of your choosing, the old standby 60/40 mix of interior high gloss polyurethane and mineral spirits will do the job nicely. When the sealer has fully dried, give is another light sanding and blow all the dust off before priming and painting.
Finishing Touches
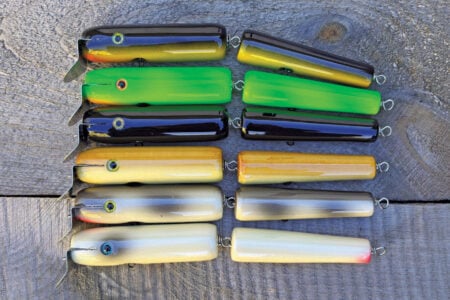
The sky is the limit with colors, but since this plug doesn’t have any internal weights, it’s prone to rolling, so I prefer simple solid colors like black, bone, pearl white and yellow. When the paint has dried, give it a coat of your favorite clear coat, whether that’s some Varathane Acrylic or an epoxy like Envirotex is your call.
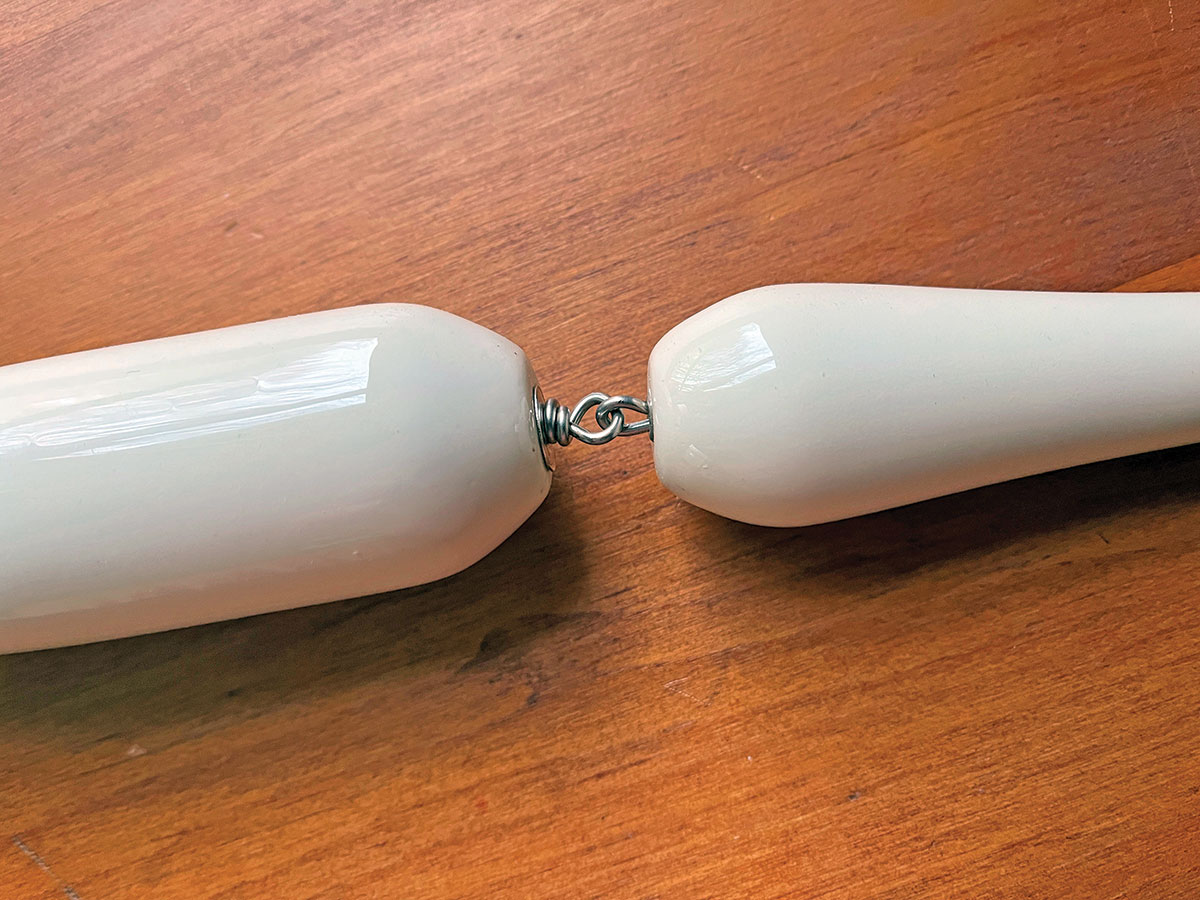
Wiring is next. Begin with the head section, add a couple drops of Super Glue to the tongue of the Atom 40 lip and slide it into the lip slot. Then feed a 12-inch pre-bent wire through the lip and plug, threading a 1/0 Krok swivel dropped into the belly hole on the way. Wrap the tail as you would any plug, except orient the loop horizontally. Now you’re going to want to cut the pre-bent loop off another wire and create your own, smaller, loop. I bend mine around a 1/8-inch diameter dill bit—this will keep the joint nice and tight. Clip the newly bent loop over the tail loop of the forward segment, slide a nose grommet up the wire and over the tag end, thread it through the tail section and a size 1 Krok swivel dropped into the rear belly hole and wrap a neat tail loop. You may add belly grommets if you wish.
Add a pair of cut 4/0 VMC trebles and a flag on the tail. It won’t take long for you to see why Teddy and the other Cape surfcasters kept this thing a secret on the beach. A big wake, easy swim and a massive target, made the Jointed GTS a stone cold killer on the Cape Cod beaches from the 70s and through the 80s. And I’ll bet it still has some mojo left in it… let’s find out in 2024!