A soup to nuts tutorial on choosing, using and maintaining trim tabs.
Without a doubt, one of the best tools in the boating angler’s toolbox is a set of properly sized, functional trim tabs installed on the transom. If you’ve ever wondered why they are such a critical component for your boat’s performance, how they operate, when to use them, maintenance issues, or are considering the possibility of adding them to your current ride, this article will give you the answers you will need to expand your knowledge on the topic moving forward. So start up those engines and let’s get ready to adjust your boat’s attitude for the coming 2020 season.
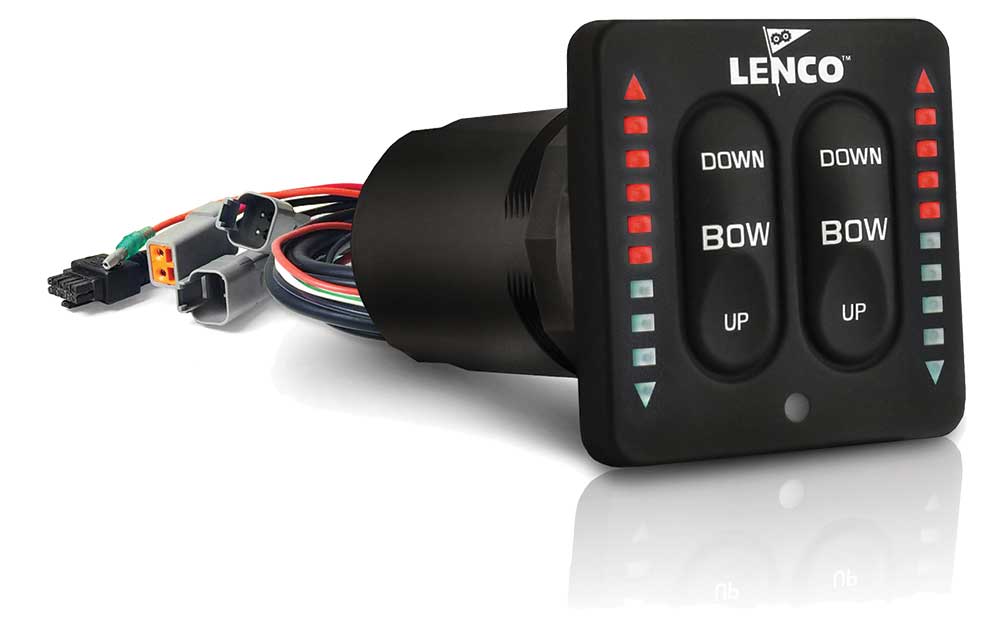
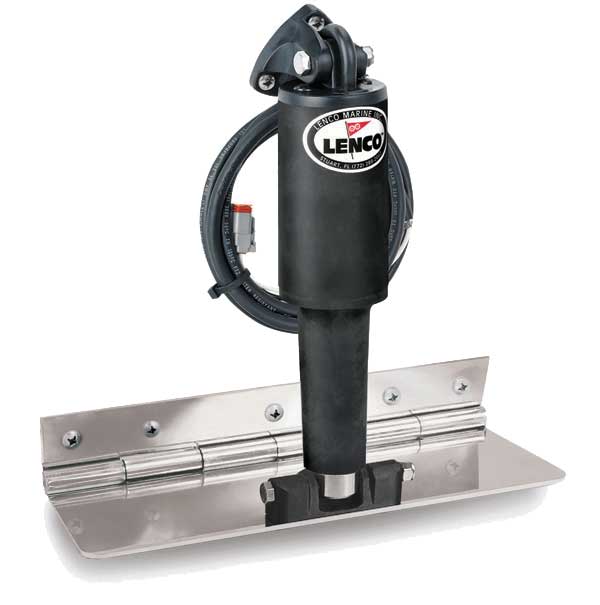
A complete trim tab system typically consists of multiple moving parts that include a pair of hinged metal (stainless steel or aluminum) plates that are attached to the vertical surface of the transom, just above the running surface bottom interface. There are also electric or hydraulic cylinders/pistons/actuators that control the angle of these plates relative to the boat’s running surface. Making up the rest of the system are a hydraulic reservoir (only if the system features electric/hydraulic operation) or a control box (if it’s an all-electric operation), a wiring harness for each tab from the transom to the helm, and a 12-volt switch at the helm that controls the independent operation of each of the trim tabs.
Basic Tab Operations – Reverse Psychology
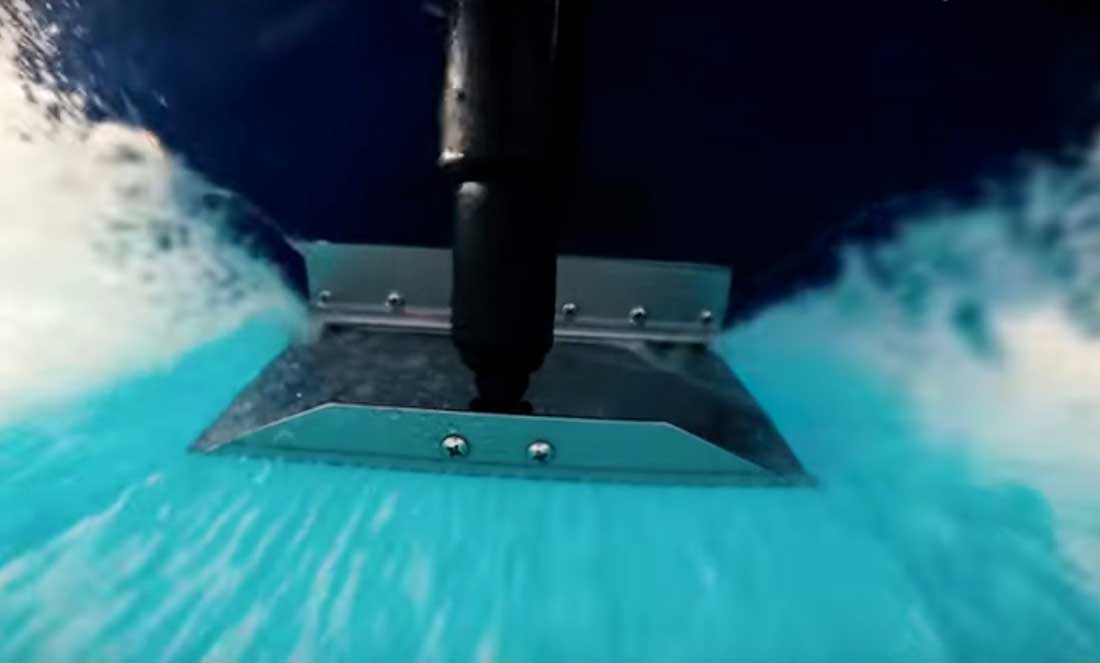
Trim tabs are akin to having a large paddle positioned in each corner of the transom. They deflect water flow moving fore-to-aft along the boat’s running bottom to lift either the port or starboard stern sections (or both), which in turn lowers the bow on the opposite side. Properly sized trim tabs will lower your vessel’s bow on demand via their individual switch controls, but the one thing that they cannot do is raise the bow in their neutral or fully retracted “up” position. If your boat is bow heavy or “bow steers” because of improper loading or a poor design, it’s important to realize that trim tabs will not solve this problem.

To operate your trim tab system, hitting the starboard “bow down” button actually deflects the port side tab at a downward angle, raising the port stern and pushing the starboard bow down. Pressing the starboard “bow up” button has the reverse affect; it raises the port trim tab, which in turn lowers the port stern of the vessel and raises the starboard bow. As you can infer, engaging the port “bow down” function deflects the starboard side tab downward, raising the starboard stern section and lowering the port bow. Pressing the port “bow up” has the reverse effect.
What’s the Right Sized Trim Tab?
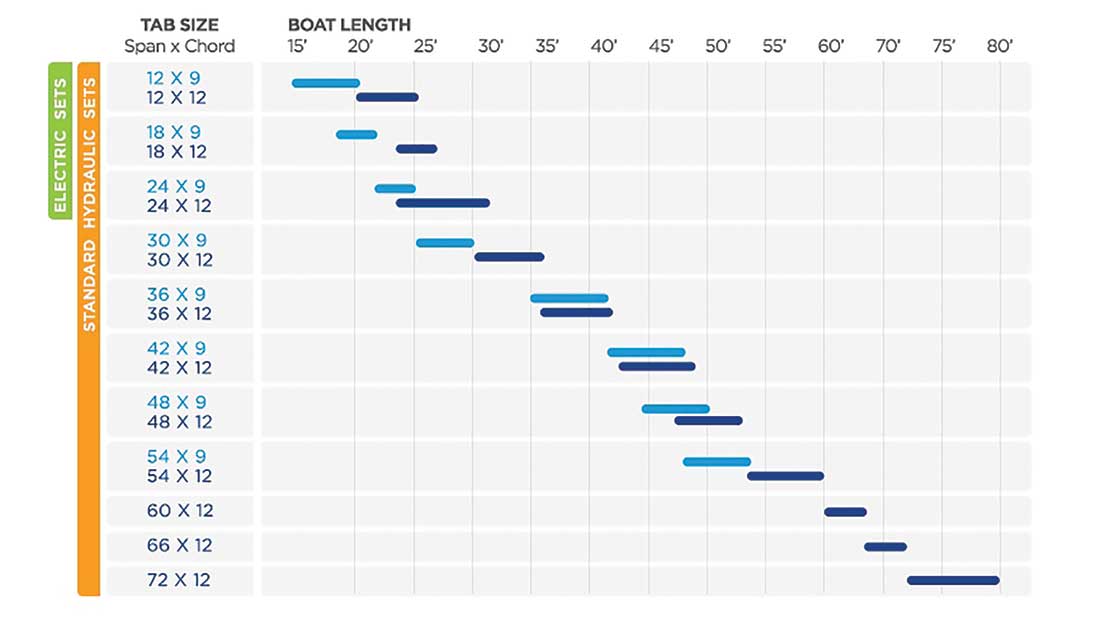
Because trim tab surface area is critical to efficient performance, having the proper sized planes on your vessel’s transom is important. Most tab manufacturers suggest an inch of tab width (span) for every foot of boat length, with a 9-inch depth (chord) for fast boats and a 12-inch chord for slower, heavier craft. As an example, let’s go through the exercise of outfitting a 25-foot planing hull for a set of trim tabs, going with a pair of 24 x 9 tabs would be an optimum match, but probably not practical due to the typical space limitations on the transom. Some narrow 8-foot and 8-1/2-foot beam boats with twin outboard installations are going to prevent you from installing a set of 24-inch tabs per side, but this challenge can be addressed by going to a deeper 12-inch chord on a smaller 18-inch or 12-inch wide after-planes.
 The primary drawback with relying on the depth of the trim planes to make up for insufficient width is that the longer tabs can actually cause speed-robbing drag behind your boat. The smaller, longer tab has to deflect much further down into the water to have the desired trim impact as a wider, shorter trim plane. If it gets too far down into the water, it can act as a speed brake, or worse, as a rudder, with neither result being a preferred scenario when negotiating rough seas. Be sure to get the largest tab that’s right for your boat if the builder or the dealer give you this option. A properly sized tab will create the required amount of water pressure deflection in each corner of the transom to control the bow’s attitude, but will accomplish this with a minimum of drag.
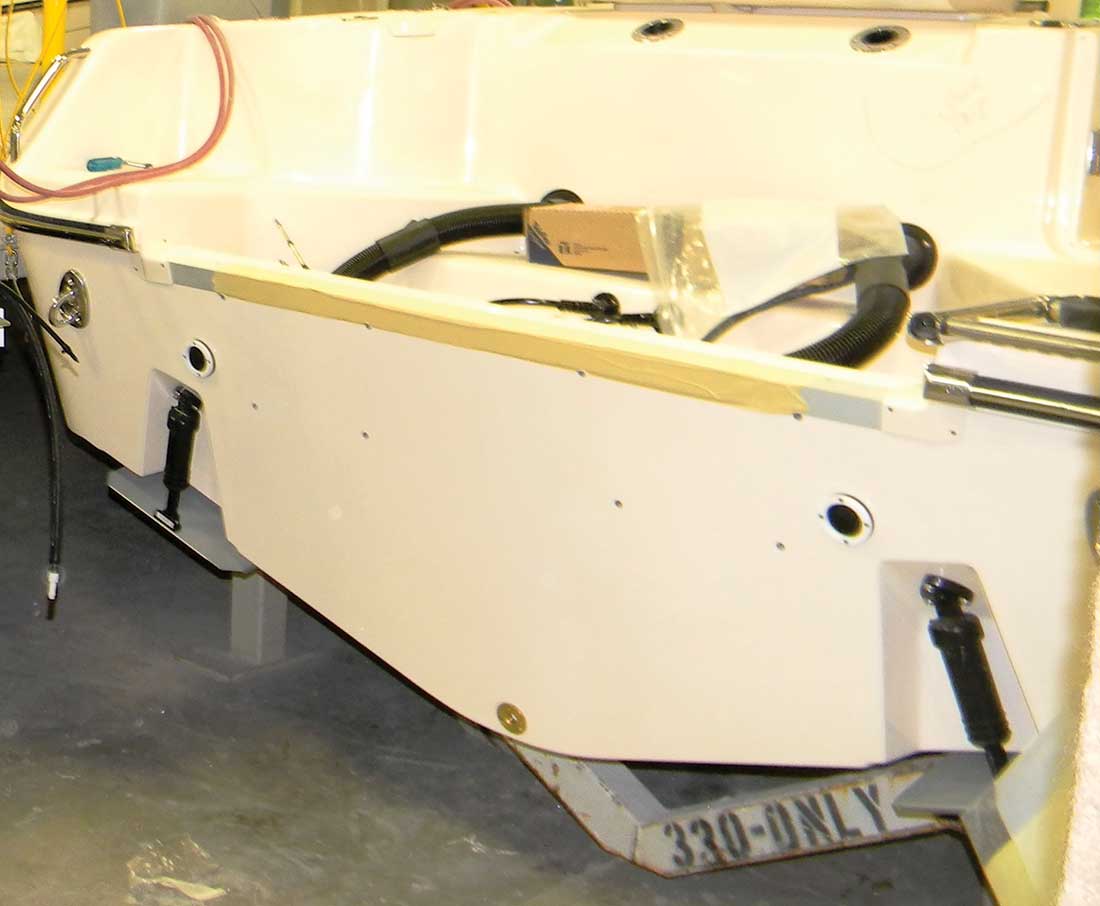
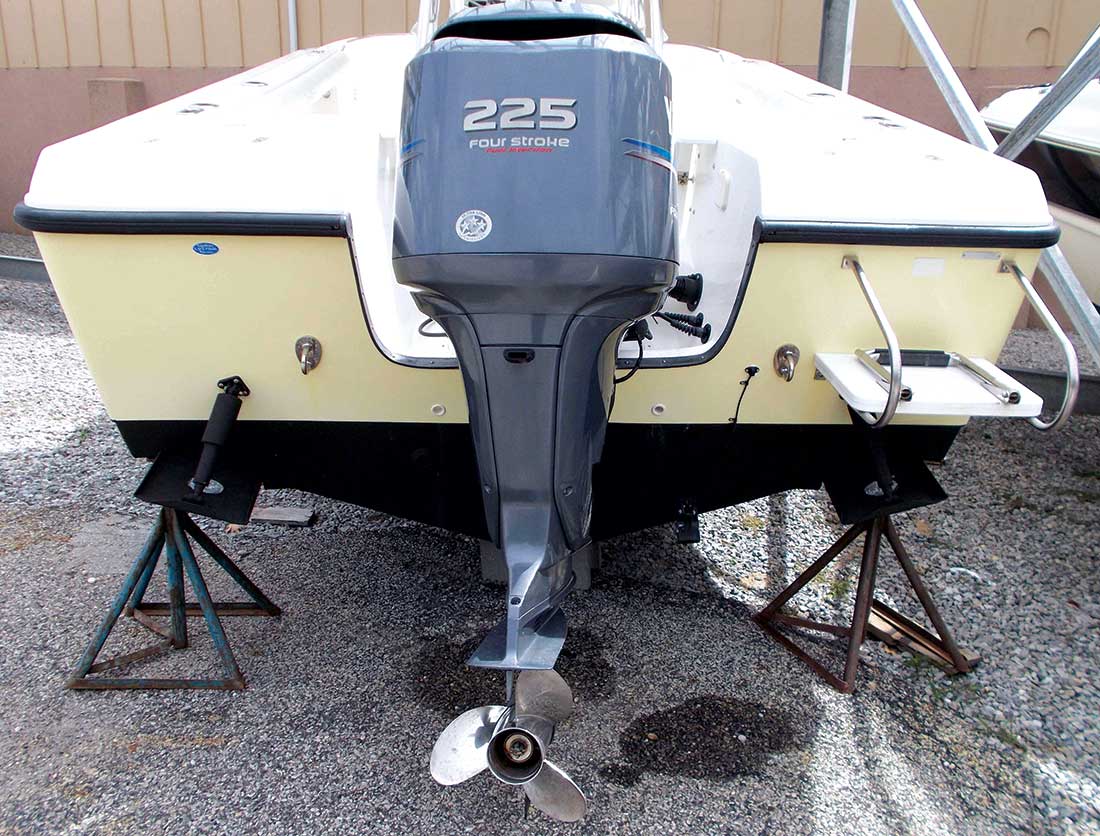
If you are installing a set of tabs as an aftermarket project on an experienced sport fishing platform, just about anyone who’s handy with common tools can do the job right. You can also retain your local marina’s service yard to install a set of tabs, an option I have tried with success on a few occasions. This operation should take about three to four hours to complete at the current labor rates, plus the over-the-counter cost of the tabs, which are offered through most marine wholesalers and discount catalogs. Lenco and Bennett Marine dominate the trim tab market, but quality units are also manufactured by Dometic/SeaStar, Mercury K-Planes and a few others. Each installation will vary a bit, but you should also be sure to mount the tabs at least 3 to 4 inches inboard from the outside edge of the chines and at least 12 inches outboard from the vessel’s outboard(s) lower unit. After having gone down the aftermarket tab route a few times, I would recommend an OEM trim tab purchase whenever possible, since the builder can most easily accomplish a top-quality installation when the boat is being assembled.
Engine Trim and Adjusting Your Trim Tabs
It is a common misconception that if a boat has power trim on the outboard or outdrive it does not need trim tabs. While it is true that power trim can be used to adjust the boat’s running attitude, it cannot account for side-to-side listing conditions. For increased speed and power, use your trim tabs in conjunction with your outboard’s or I/O’s power trim control. Trim tabs, in combination with power trim, enable both the hull and prop to be trimmed independently. The trim tabs trim the hull, while the power trim adjusts the prop. The result is optimum performance and efficiency not attainable by the use of power trim alone. To achieve maximum performance:
– Adjust the trim tabs to achieve a planing attitude.
– Use the power trim to position the prop path parallel to the water flow.
– Re-adjust the trim tabs to “fine tune” your ride.
A perfect example of this operation was detailed in a recent performance review that I conducted on the NorthCoast 255HT back in the fall of 2019 and is available on the Fisherman’s website. In one section of this video, I detailed how to use the trim tabs in conjunction with the engine trim to improve hole shot efficiency. I also showed how to plane the boat on one engine using the trim tabs as a key ingredient in making this happen. It’s an interesting video that will give you some added context to the advice detailed in this article.
When and How to Use Trim Tabs
I spoke with some of the Bennett Marine reps at the recent Miami Boat Show to get their latest intel on the optimum trim tab solution for a variety of different types of boating, wind and sea conditions. They directed me to their website, which broke it down into the short strokes and is an excellent guideline:
Making Small Adjustments: The key to getting the best results from your trim tabs is to operate them in short half-second “bursts” and let the boat react before making another adjustment. The amount of time between corrections is influenced by the size of the trim tabs and the boat’s speed.
Finding Optimum Attitude & Avoiding Over-trimming: Operating your tabs in small adjustments will help avoid over-trimming, which occurs when you’ve deflected the tabs too far. An over-trimmed boat will “plow” or “bow-steer.” If you over-trim the boat, simply press “Bow Up” and the bow of the boat will rise.
Trimming From a Bridge or Tower: When steering from a bridge or tower, a good trimming method is to watch the bow spray, stern wake, or the rooster tail. An untrimmed boat will produce more spray aft of the bow and it will produce a larger wake. When trimmed, the bow spray is farther forward, the wake is reduced, and the rooster tail is smaller and farther behind the boat. You’ll also notice that the engine RPM will increase when the boat is properly trimmed.
Correcting a Listing Condition: As a result of uneven weight distribution, prop torque or wind, a boat can run with a list. Deep-vee hulls are particularly vulnerable to this condition. Running with a list is uncomfortable, as well as unsafe. You can easily bring the boat to a level attitude using your twin tab controls. If the port bow is high, push the port side “Bow Down” direction (This lowers the trim tab on starboard side.). If the starboard bow is high, push the starboard side “Bow Down” direction until the boat is level (This lowers the trim tab on the port side.).
Correct Porpoising: Porpoising is a condition more common in faster, performance boats. As speed increases, the bow repeatedly rises out of the water until gravity overcomes lift and the bow bounces down, creating a rhythmic bouncing effect. Press “Bow Down” in half second bursts. As the trim tabs deflect, the porpoising subsides and your speed should remain the same or increase. Only a slight amount of trim tab deflection should be necessary.
During Take-Off: Properly sized trim tabs can significantly reduce the time needed to get up on plane. They also allow a boat to keep its bow down and stay on plane at lower speeds. As the throttle is advanced, the stern of the boat begins to squat, lifting the bow. As the boat accelerates, push the bow down position of the helm control in short bursts. The boat reacts by the stern lifting, the bow coming down, speed increasing and the engine laboring less.
Using in a Choppy Sea: For the most comfortable ride, when running into a head sea you want to trim the bow down so the sharp forward sections of the boat do their work cleaving the waves. This will bring the vee of the hull in contact with the waves rather than having the waves pound the flatter aft sections of the hull.
Using in a Following Sea: For best maneuverability and maximum steering control, trim tabs should be fully retracted in a following sea, or when running an inlet. Keep the tabs up so the tide or current won’t push the stern from side to side.
Using In a Beam Sea: Boats operating with waves approaching from the side often throw spray up on the windward side. This spray often is carried aboard by the wind (particularly on smaller vessels). Trim tabs are used to raise the windward side of the boat, blocking the spray that blows over the boat, resulting in a smoother and drier ride.
Backing Down: When operating the boat in reverse, both trim tabs should be fully raised. The trim tabs produce drag if they are left down in reverse. This puts strain on the tabs as well as affects the boat’s handling in reverse. Additionally, if one tab is deflected more than the other in reverse the boat tends to pivot around the deflected tab. Properly installed tabs, fully retracted have no effect on backing down.
Automatic Trim Tabs: Some manufacturers offer an “automatic” mode for their trim tab operation, just press a button and the boat trims itself for just about every situation out on the briny. Bennett Marine’s Auto Trim Pro automatically levels the pitch and roll of your boat, adjusting your trim tabs to changes in vessel speed, sea conditions and shifting weight. Operators can enjoy the convenience of riding in auto mode, or shift to full manual mode anytime. The “Auto Trim Tab Control” automatically reduces bow rise and corrects listing. The “Manual Tab Control” puts you back in manual control at the touch of a button. An LED Trim Tab Position Indicator alerts you to the position and activity of the trim tabs. “All Up” and “All Down” Buttons allow for one-touch manual adjustments. Plus an Automatic Tab Retraction function protects tabs during storage and trailering. Nice!
Maintenance Matters
Once again, I used the opportunity to be at the Miami Boat Show this past February to chat with the folks from Lenco Marine on what owners need to do to keep their trim tab systems in tip top shape. One of my biggest problems with the original set of Lenco trim tabs that were standard issue on the 2006 EdgeWater 228cc was the absence of an “auto retract” feature for the tabs, which automatically retracts the planes into the neutral position when shutting off the engine. Both the original owner and I were plagued with leaving the tabs “down” on occasion, which caused barnacles to attach themselves to the stainless steel piston rods, effectively scoring the water tight seals and compromising the actuators, which needed to be replaced. I solved this problem by upgrading to a new Lenco replacement kit that used my boat’s original trim tab plates but included new actuators, a new control box and an LED indicator switch with the desirable “auto-retract” feature that totally solves this problem from repeating itself.
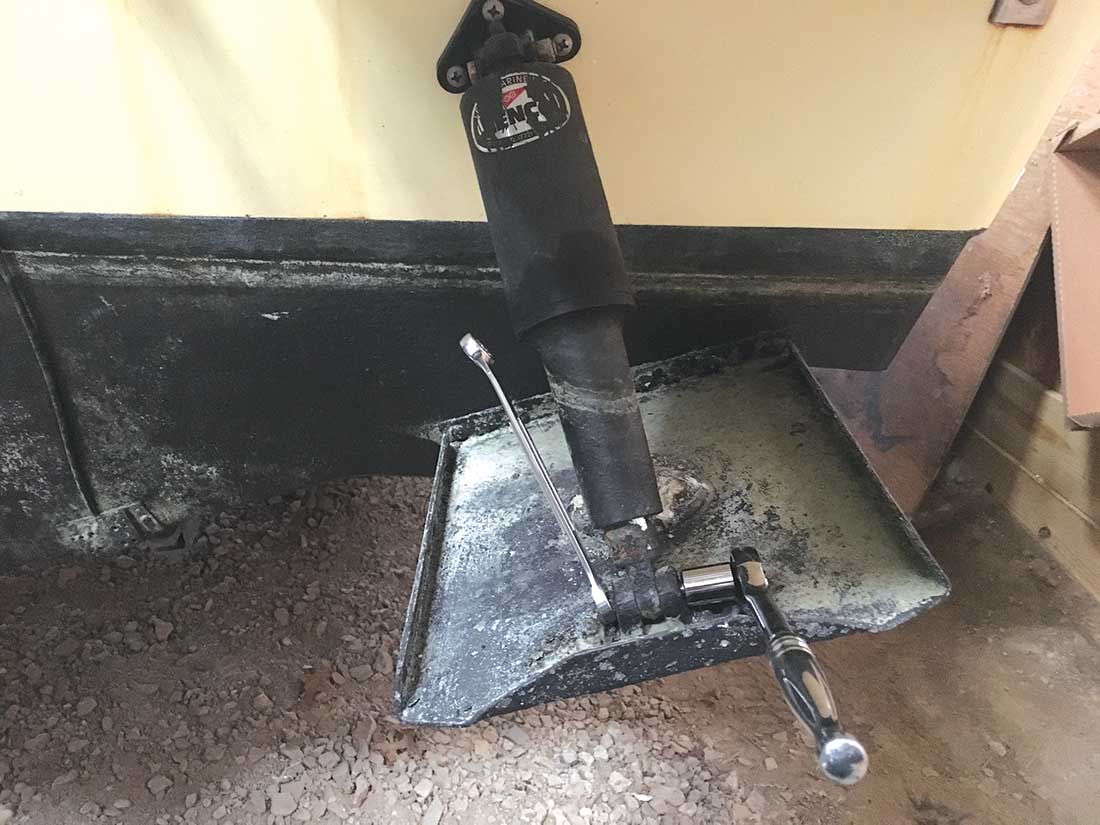
The Lenco crew at the Miami Show recommended that anglers who keep their fishing boats in waters where saltwater corrosion and electrolysis are a problem install small circular zinc anode tabs somewhere on the top of the stainless steel trim plate. A 1.5- to 2-inch circular zinc tab should be ideal and these can be purchased at most marine supply outlets. Be sure not to paint over these sacrificial zinc tabs, or you’ll defeat the purpose of installing them! Drill a small hole through the tab plate for the stainless steel attachment bolt/nut (best located on the bottom of the tab to minimize water deflection) and you’re in business.
It’s also a good idea to paint your stainless steel tabs, to avoid barnacle build-up that can potentially reduce their effectiveness. When going down this path, it’s best to use a primer first, before applying the bottom paint. I’ve used the two part epoxy based Interlux Interprotect 2000E on roughly a half dozen installations as my primer and have had zero problems to date. When painting your trim tabs, the drill is to first wipe the metal plates clean with acetone to remove any contaminants. Next step is to lightly sand the top and bottom of the plates with a #100 grit sandpaper to give the metal a little bit a of “tooth” to better accept the primer. Wipe the plates clean again with the acetone and then layer on at least two coats of the 2000E epoxy primer, allowing at least eight hours of drying time in between coats. After waiting 24 hours for the primer to fully cure, apply two coats of an ablative/polishing anti-fouling paint to avoid paint build-up and you’re all done. If you skip the all-important step of applying a primer coat before going with the anti-fouling paint, there’s a really good chance that the severe water pressure slamming against the tabs might peel off the paint after only a few weeks of use, so be advised and do the job right from the start.
If your boat uses electro-hydraulic trim tabs, the folks at Bennett Marine recommend that you periodically check the fluid level in the tab’s hydraulic power unit. With the Bennett trim tab system the fluid level should be about 2 inches from the bottom of the reservoir with the tabs fully retracted in the “up” position. To refill, remove the HPU’s Lexan cover and filler plug located at the front left hand corner of the reservoir. Fill with any type of automatic transmission fluid (AFT) like a Dexron. It’s also a good idea to check for clean electrical connections on the back of your boat’s helm-mounted trim tab control, the HPU ground wire and the unit’s quick-disconnect wiring harness.