The SoCo Chief doesn’t have a storied history among striper fishermen, but this is because of its scarcity; collectors estimate that there may have been as few as 300 made. The inventor was a renaissance man named Robert Sweeney. All of the credit for digging up the history of SoCo Lures goes to the late Frank Pintauro and his friend Dave Dennison; their write-up for the Saltwater Lure Collector’s Club (www.swlcc.com) gave me more than enough info to round out a quick back story. It’s really quite amazing that a plug devised and made in a Quonochontaug, Rhode Island horse barn back in the early 1950s was so unique and yet, his concepts were never really emulated—perhaps until BigWater Lures made a limited run of winged sea robin swimmers just a few years ago.
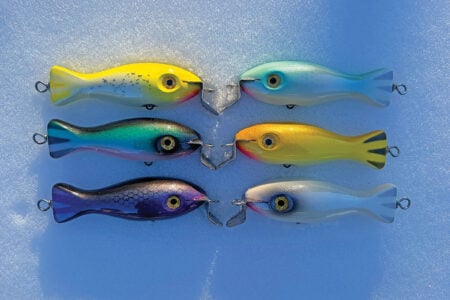
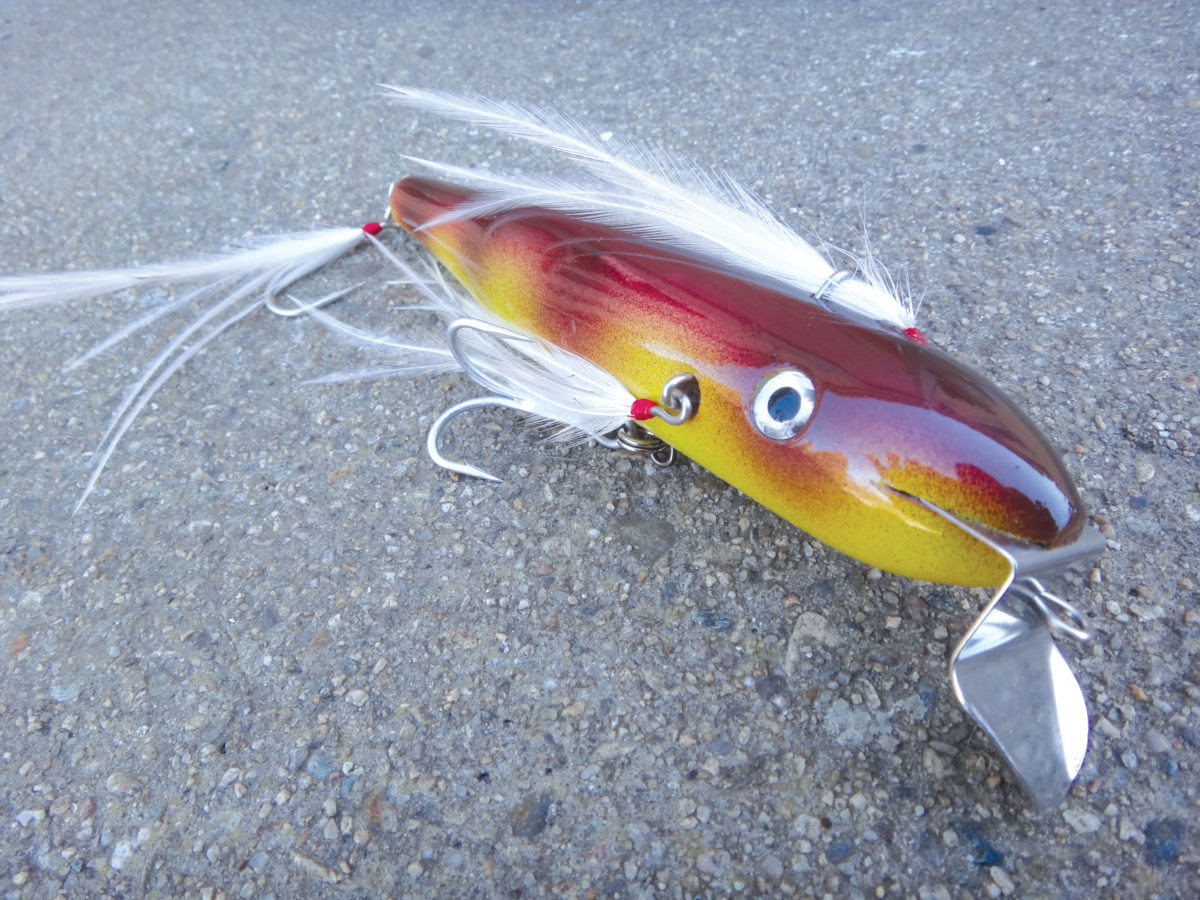
If you’re a vintage plug collector, the SoCo Chief is considered by many to be the Holy Grail, everything about it is unique. From its feathered wings and back plume, to its odd hook placements and lip that looks like a piece of medieval armor—it’s a marvel of creative ingenuity. When I look at something that was custom-made in small quantities and built with so much unique attention to detail I see something that was inspired by a real life experience. Speculation about what the Chief was made to imitate runs the gamut from squid to a sea robin to whiting. It doesn’t matter what it was, if you like having a different look to throw when the bite goes quiet—you can bet that you’ll be the only one throwing a Chief!
Tweaking History
After raving about Sweeney’s ingenuity, I also want to come out on the right side of conservation with the final product. The original Chief was one serious mouthful of hooks, with a long shank single hook stashed within each wing, a heavy treble at mid-ship and a large dual-hook on the tail, I’m going to streamline and simplify the layout to make bring it up to 2017 standards; a single 4/0 treble on the belly and a 6/0 tied siwash on the tail.

Going further, there isn’t a single man I know that owns one of these that would even allow it out of his sight. So there was more than a fair amount of improv on my part when it came to resurrecting this bait into something we can easily build. The originals—to the best of my knowledge—were not weighted and probably relied upon the weight of the many hooks to balance and properly accentuate the swimming action. Then we come to the issue of the lip. My goal with all of these builds is to present my best interpretation of a now defunct plug using materials that are readily available, so we’re not going to be hand-cutting and bending stainless steel. The NJTackle Danny #3 lip is closest to the SoCo; it’s slightly wider so I scaled the plug shape to fit the lip. I hope you will all like and enjoy my take on the Big Chief.
Into the Woods
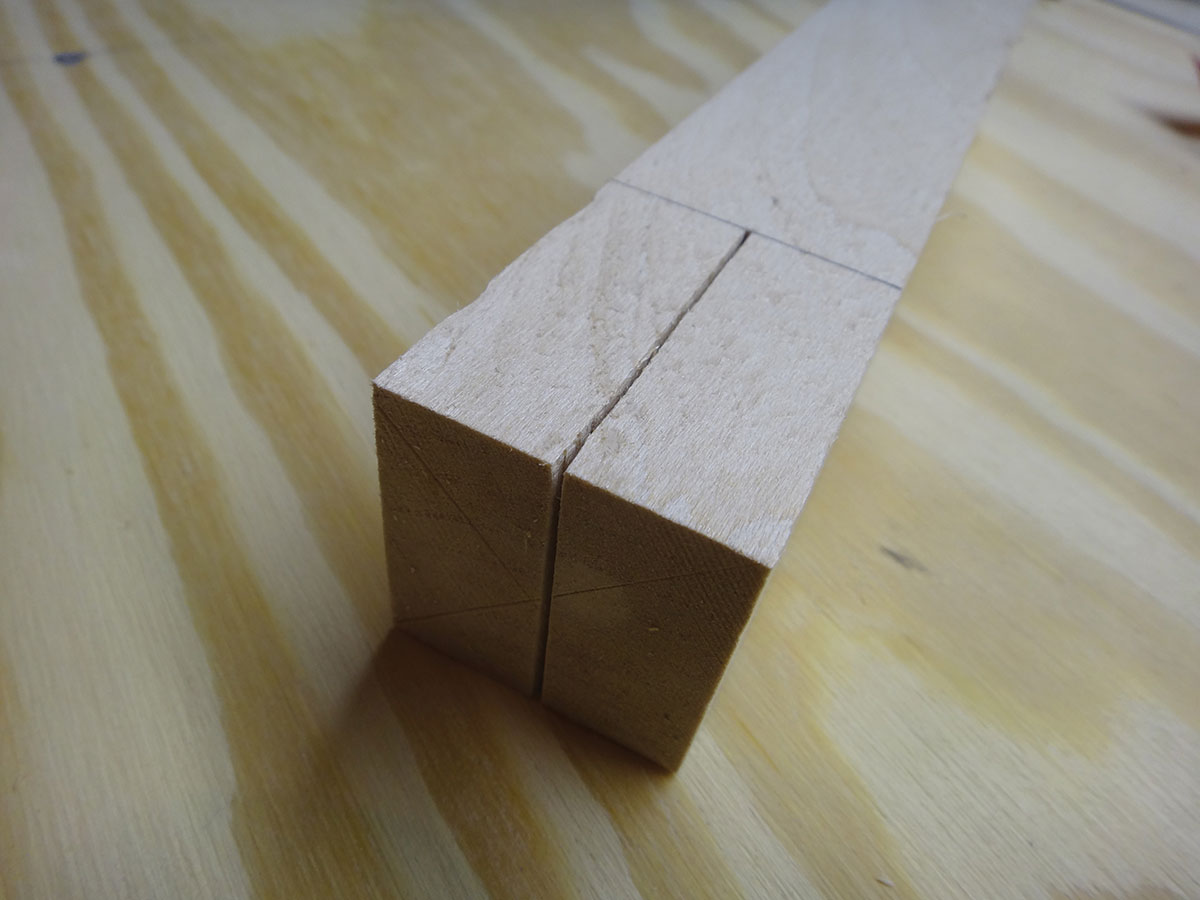
Sweeney had the bodies turned at a woodshop in New Hampshire and, knowing the tendencies of the time, they were probably made from sugar pine. Sugar pine can be pretty pricey these days so just go with some clear white pine—find a piece with tight grain for a closer match with sugar pine.
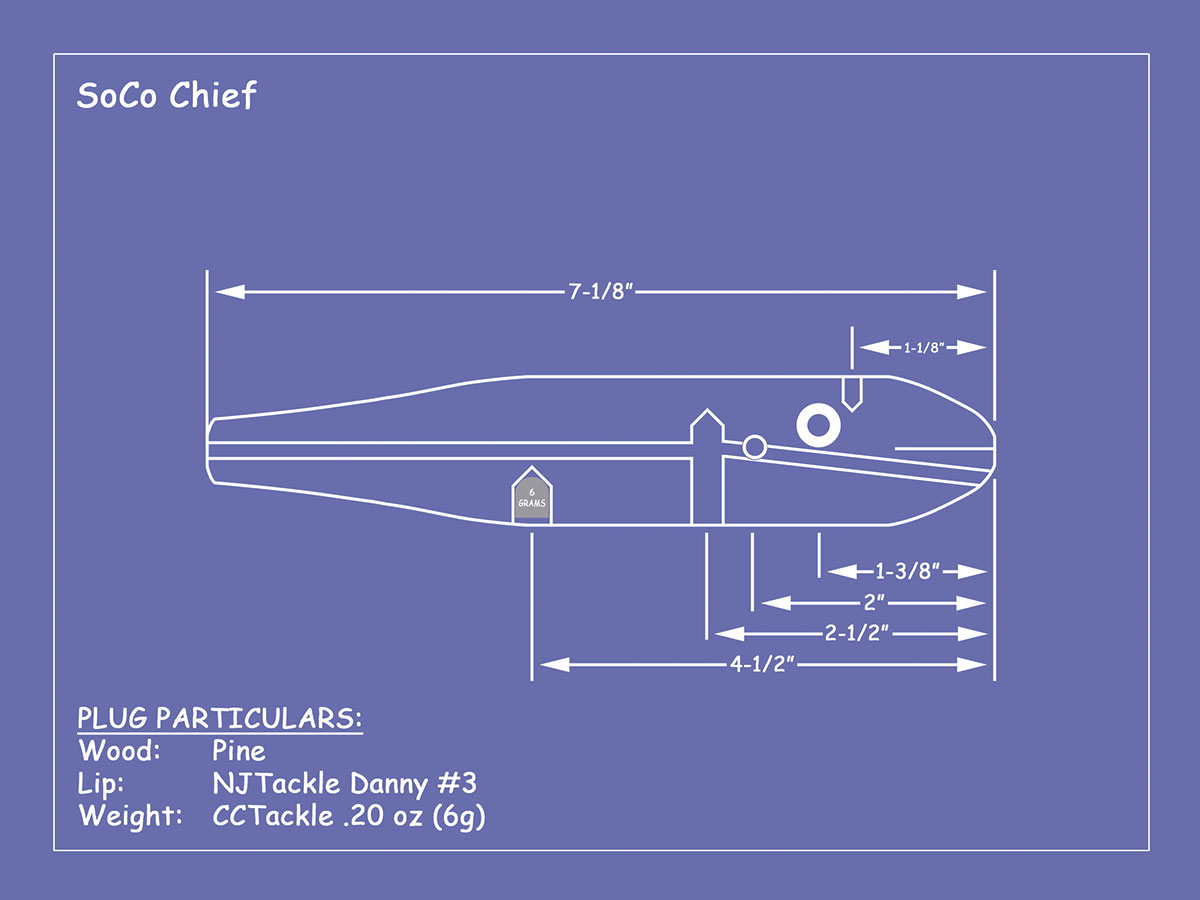
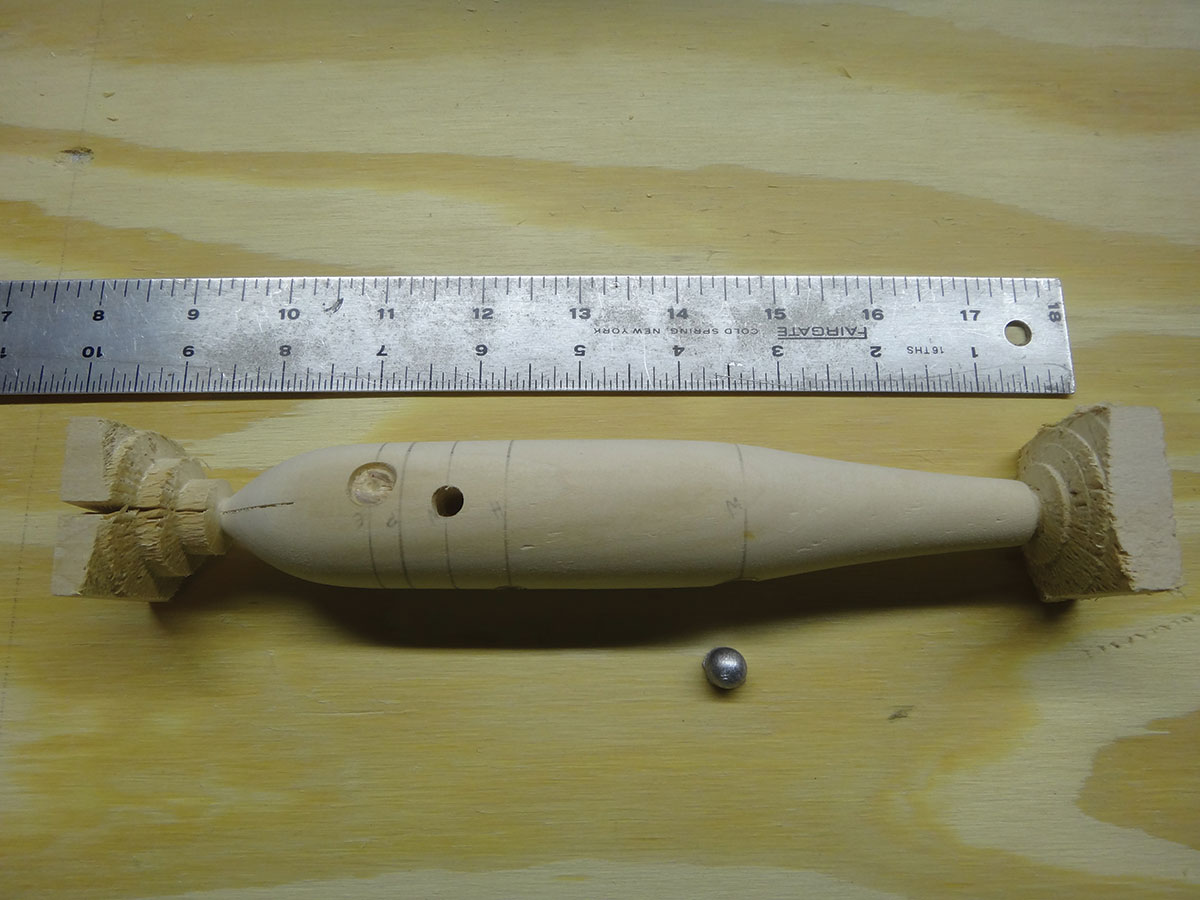
The length of my version of the Chief is 7-1/8 inches and the widest diameter is 1-5/16, so begin by ripping some pine to 1-3/8 sticks and cut it up into 8-inch blocks. As with all metal lips I suggest cutting the lip slot while the blank is still square. The slot depth on the finished product is 7/8-inch, so cut a centered slot with the band saw at length of about 1-3/8 inches. Now find the center at both ends by connecting opposing corners with a ruler and pencil and set the blank spinning in the lathe. Use a gouge to knock the corners off the block (leaving about a half inch at each end square.) Now shut the lathe off and lay out these reference marks. Start by making two marks 7-1/8 inches apart; your head and tail. Then make a mark at 1-3/8 inches back from the nose and then two more at 4 and 5-1/2 inches back from the nose. Turn the lathe back on and touch each mark with the pencil to carry them around the plug body in a ring—refresh the marks as needed.
Start by shaving the whole area to be turned down to a 1-5/16 inch cylinder. Then round the wood down between the nose and 1-3/8 inch mark to an elliptical curve culminating at the nose with a 3/8-inch diameter. The tail taper will begin at the 4-inch mark and then begin to reverse and elongate at the 5-1/2 inch mark. Check yourself at this mark where the diameter should be just a touch under one inch. Then continue a gradual taper until it terminates at the tail with a diameter of 9/16 inches. Sand the whole deal on the lathe using strips of 150 grit sandpaper and then we’re ready to drill some holes.
Running Drills
The wild design of the Chief means that we’ll be making Swiss cheese out of our freshly-turned blanks. We have to drill holes for the hook, weight, wings, plume, eyes and of course the thru-wire, so buckle up. Let’s begin by drilling the holes in the belly. The hook hole should be drilled at 2-1/2 inches back from the nose on center using a 5/16-inch bit, drill this hole about 1/8-inch past halfway through. Then swap to a 3/8-inch forstner bit and drill a centered hole at 4-1/2 inches back from the nose, this hole should be drilled about 1/2-inch deep, we’ll drop a Cape Cod Tackle .20-ounce belly weight, or another type of weight that weighs about 6 grams into this hole after sealing. Now roll the plug 90 degrees and drill a centered 1/4-inch hole all the way through at 2 inches back from the nose, go slowly so the bit doesn’t blow out the other side. Now roll the plug again and, using a 3/16-inch bit, bore a hole in the top of the head at 1-1/8 inches back from the nose; this hole should be centered and drilled to an approximate depth of 3/8-inch. Now drill the eye sockets.
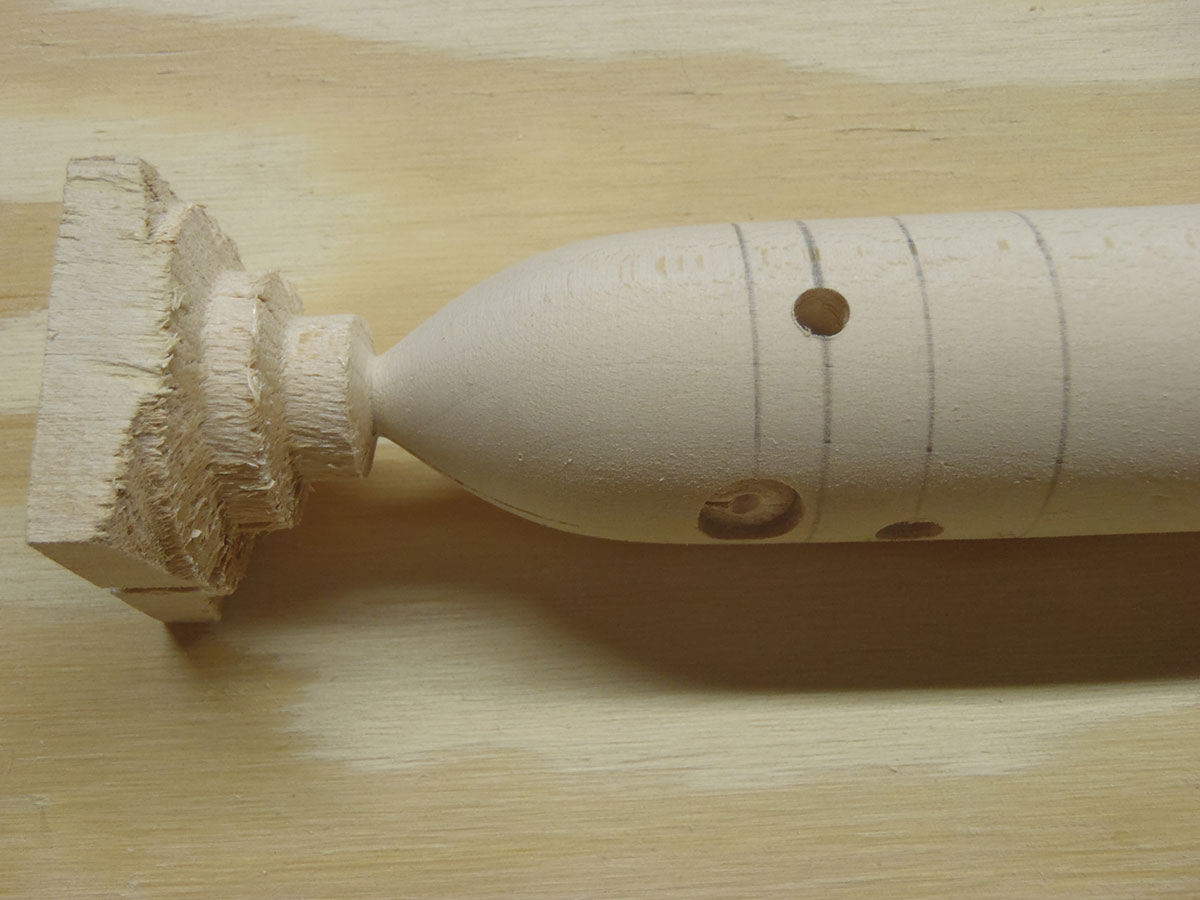
The eyes are drilled at 1-3/8 inches back from the nose and they are located at 1/8-inch above center; I recommend tipping the blank slightly as you drill the shallow sockets as this will help you achieve uniform depth. Finally, thru-drill the plug from the tail coming forward to the hook hole and then cut the squares off the ends, slide the lip into the slot, mark the line-tie with an awl and drill a 3/16-inch hole with a hand drill from the awl mark back into the hook hole; do your best to come out roughly in line with the thru-wire hole. Hand sand the whole body, then give it a bath in a 60/40 mix of polyurethane and mineral spirits—allow to dry for several days. When sanding produces a fine, white dust, you’re ready to paint.
Assembly Haul
Give the body a light sand and then wipe it down with a barely-moist-cloth to remove dust before priming. As far as I have seen there were three original colors, but there may have been more. The classic Chief coloration is a mottled, rusty red over a Gulden’s mustard yellow—the other colors were a blue and silver herring and simple white/red head. You can obviously do whatever you want. After you’ve gotten your Rembrandt on, Super Glue some molded 3D eyes into place and then clear coat the plug and allow it to dry.
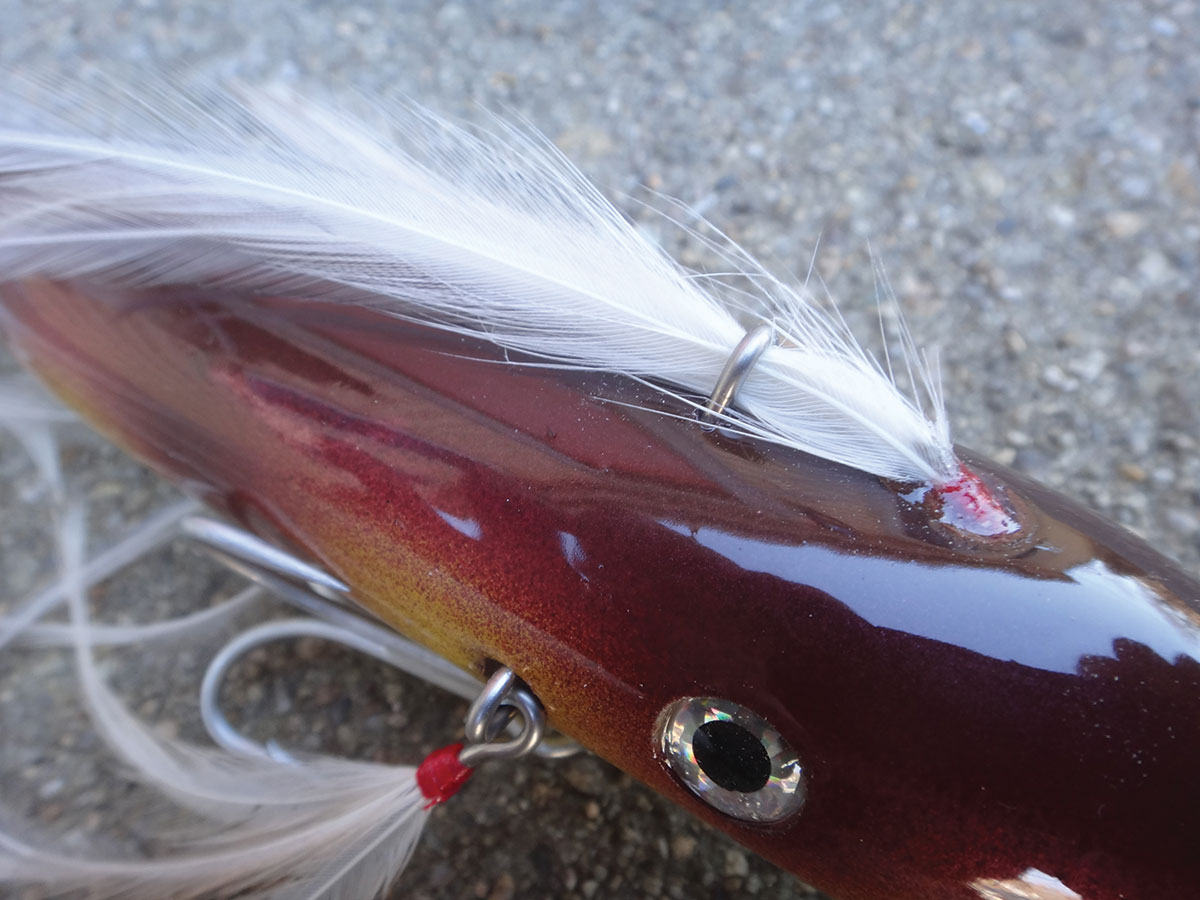
At this point it’s time to begin the lengthy assembly process. The first step is prepping the lip. The original lip was hand-cut and unlike any other I’ve seen, it almost looked like the first step to a really challenging paper airplane. The Danny 3 from NJTackle is closest, you’ll want to use some strong pliers to curl the edges upward (see photo). Now slide a 12-inch thru-wire through the lip and then into the plug. You’ll need to drop a size 1 Krok swivel into the hook hole and a pair of cheap size 5 swivels into the 1/4-inch ‘wing holes’. Send the wire through, threading all three swivels on the way, then Super Glue the lip into the slot and seat it. Finish with a tail grommet and loop, as usual.
Now you’ll need to channel your inner Bob Popovics and bust out your bobbin and feathers. I tied the wings on pieces of scrap stainless wire with an open loop bent in one end. Tie about a half-dozen long, white hackles to one of these loops to create each wing and then pinch them onto the size 5 swivels. The head plume could be tied on just about anything—even a toothpick—but I just use more wire. The plume should roughly resemble the wings, but with no loop. Trim the wire flush to the thread, dip the thread in epoxy and slide it into the hole on top of the head. While the epoxy is curing, tie a hackle tail on a 6/0 siwash hook. And all of your tying is done.
The final step is to add something to hold the plume flush to the body. Sweeney did this with a small u-shaped nail. There are two good ways to achieve this. You can buy some short, open-eye screw eyes sink one into the top of the plug about 3/8-inch behind the plume and then close the screw eye around the feathers. A simpler method is to essentially make a small u-nail with stainless wire, drill two small holes and epoxy the wire ‘u’ over the plume to hold it in place. When you have secured the plume, add the tied tail, trim the wire inside the wings short and throw a 4/0 treble on the belly.
This is a very involved build, and while I can’t guarantee that it swims like the original, my focus here was more to inspire some out-of-the-box thinking. You could just as easily add these flourishes to any other plug to get a unique look that no one else is throwing. Believe it or not, I have already begun researching next year’s builds and one of them is something I’m willing to bet 90 percent of you have never even heard of. It should be fun… see you in nine months.