The fly described in this article is a chartreuse and white deceiver. This style of fly was originally designed by Lefty Kreh, one of the most famous of all fly fishers. The deceiver is one of the most popular saltwater flies, and for good reason. From tuna to stripers, this fly can catch just about any gamefish that inhabits saltwater—and many that favor freshwater. It is a great fly for novice tiers to learn. Beginners will not only master basic tying techniques, but they will learn to tie in hackle and bucktail. The same material can be tied on a lead head to produce an amazing bucktail jig.
Secure a hook in the jaws of your vice. Attaching the thread to the hook shank is the first step in tying any fly. You cannot simply start to tie materials onto the shank of the hook as they will not hold on this polished surface. You must use the tying thread to create a base on the metal hook on which the materials will be added.
Material List
Hook: Mustad #34007, size #2 – 1/0
Thread: White waxed 3/0 monocord
Tail: 4-6: White Saddle Hackle
Top Collar: Chartreuse Bucktail

Flash: Pearl Crystal Flash
Under Collar: White Bucktail
Topping: 6-8 strands Peacock Herl
Cement: Clear Head Cement or Dave’s Flexament Cement
 1
1
 1
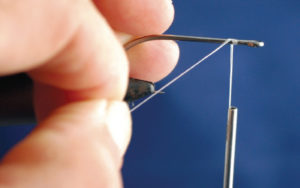
1Hold the bobbin in one hand with 3 to 4 inches of thread coming off the tube. Next while holding the loose end of the thread with the thumb and forefinger of the other hand; lay the thread on top of the hook shank with the bobbin on the far side of the hook.
 2
2
 2
2Keep tension on the thread as you wind the bobbin around the shank, being sure that each new wrap is next to the previous wrap. As you wind the bobbin around the hook, you will be creating a base layer on which you will tie in material. A half-dozen wraps will secure the thread and allow you to release the tag to cut it. Continue to wrap up and down the shank of the hook until you have a nice base wrap with no metal showing.
 3
3
 3
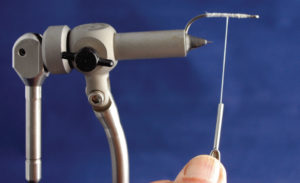
3Finish the base wrap at the bend of the hook. Some tiers recommend using 2 to 3 half hitches after each step of the fly’s construction. Others feel that this adds unnecessary bulk to the fly. I agree that the half hitches help lock the material down and for the pattern we are tying, bulk is not an issue. You can now allow the bobbin to hang free and coat the base wrap with head cement.
Now that the hook shank is covered with the base wrap, we will start the fly by tying in the tail. Select 4 to 6 white saddle hackles that are about the same size. The overall length of the feathers should be at least twice the length of the hook shank. Strip the fluff off the end of the hackles and trim the stems. Match two to three feathers with the smooth side out and the curved side facing in. Tie the feathers on the left side of the hook shank.
 4
4
 4
4Begin by loosely tying at the base of the feathers and then tighter as the thread is advanced toward the hook eye. Repeat the same process with the same amount of hackles on the right side of the shank. Secure the feathers with head cement. As the cement sets, add some additional wraps, working back and down the shank. Tie off with 2 to 3 half hitches.
Move the thread back to the eye of the hook by making some additional wraps up along the shank, stopping 1/4-inch in back of the eye. Cut five to six strands of Pearl Crystal Flash Pearl and double them around the tying thread. Spread half the flash on either side of the fly. Use the bobbin to secure the flash by wrapping thread tightly down on the material.
 5
5
 5
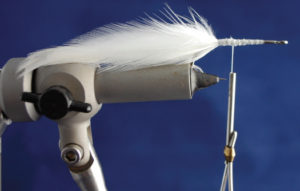
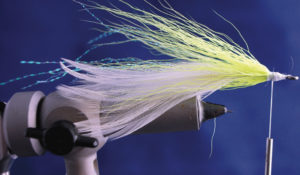
5Once again move the thread back to the same position of 1/4 inch behind the eye of the hook. Cut a small amount of chartreuse bucktail for the top collar or the top of the fly. Start with about a 1/8-inch bundle. Do not use too much bucktail because this can create too bulky of a fly, and the fly will be difficult to sink in water. You can always tie in some addition bucktail before finishing this step. Square the butt ends of bundle by cutting the ends. This makes it easier to work with the bucktail. Never cut the tips; it does not matter if the hair is different lengths. With your free hand hold the bucktail over the top of the hook shank, keeping it behind the eye of the hook.
 6
6
 6
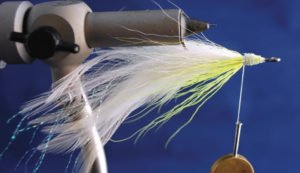
6Be sure to spread the hair around the top side of the shank. Use the bobbin to wrap it in tightly and tie off with 2 to 3 half hitches. Cement the wraps. To tie the bottom collar (the belly) of the fly turn the hook point up. Tie in a same amount of white bucktail as chartreuse bucktail and follow the same procedure as in step 3 to tie it.
 7
7
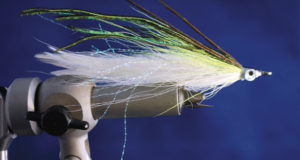 7
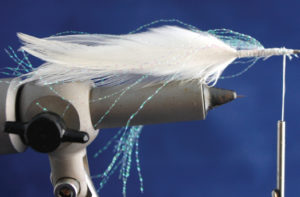
7Select six to eight strands of peacock herl. Trim the butt ends and tie them in on top of the chartreuse bucktail. Build a neat head with additional wraps. The final step is to use several half hitches to tie off the finished fly. Coat the fly with head cement and allow it to dry. (Photo 7) You can also add some stick on eyes or a dab of paint to create an eye before adding a final coat of epoxy.