Five essential rigs for targeting deep water fluke.
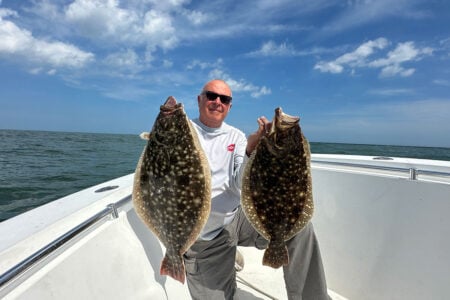
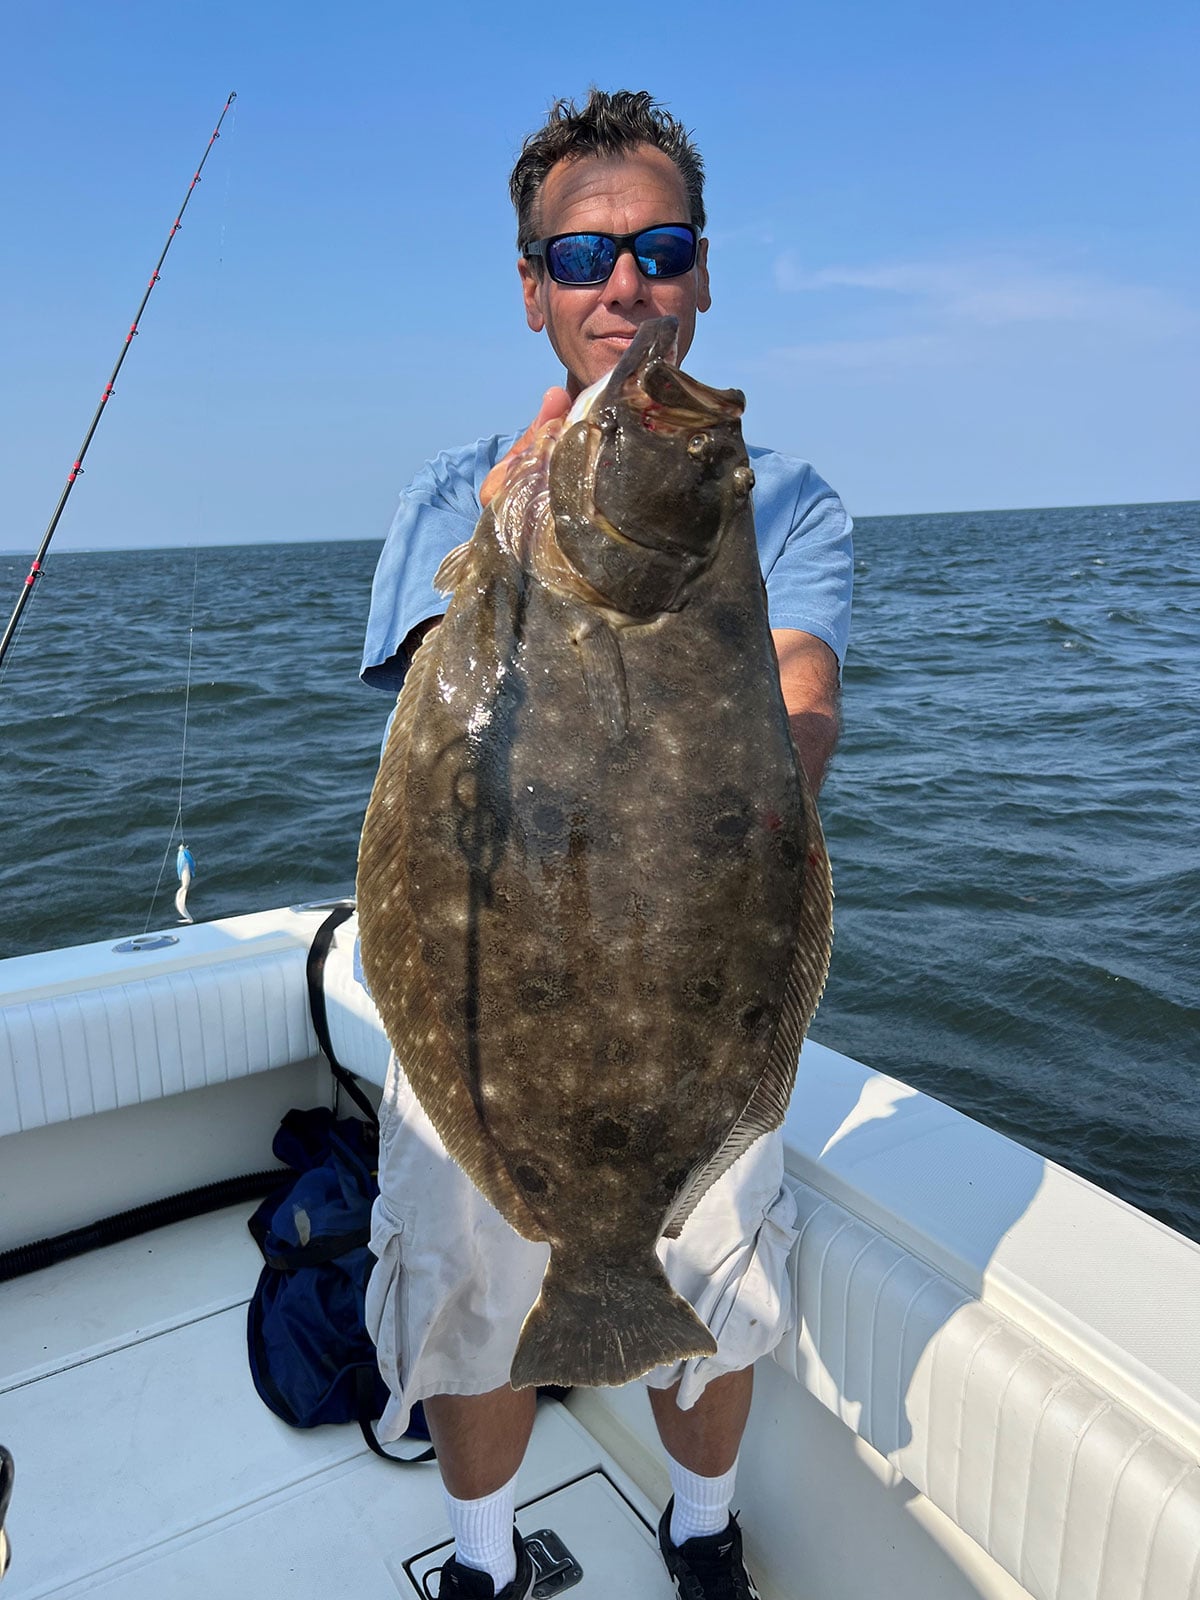
While technically found in the inshore and offshore waters from Nova Scotia to Florida according to fishery experts, recreational anglers who make a more concerted effort targeting summer flounder aka “fluke” range from North Carolina to Cape Cod. Many different rigs and tackle are used throughout this “prime” area, along with emerging techniques we are seeing in shallower waters with hard jerkbaits that you might associate more with freshwater bass fishing. Inlets, bays, sounds, and true deepwater ocean areas are the types of terrain these fish call home throughout the season, feeding on squid, sand eels, mackerel, shrimp, crustaceans, and more. They’re known to be dumpster divers when it comes to feeding, often blindly striking at just about anything that might fit in their mouths, due to their poor eyesight.
For anglers fishing in anywhere from 30- to 100-feet of water (or more), you’ll usually be targeting them on the drift. With this in mind, you want your bait to be presented from no more than a couple feet off the bottom, ideally only a few inches, as these fish sit and wait to ambush their next meal. Further up in the water column, you’re simply not in the strike zone and wasting time, unless you’re hoping for bycatch such as black sea bass, bluefish, dogfish, and more.
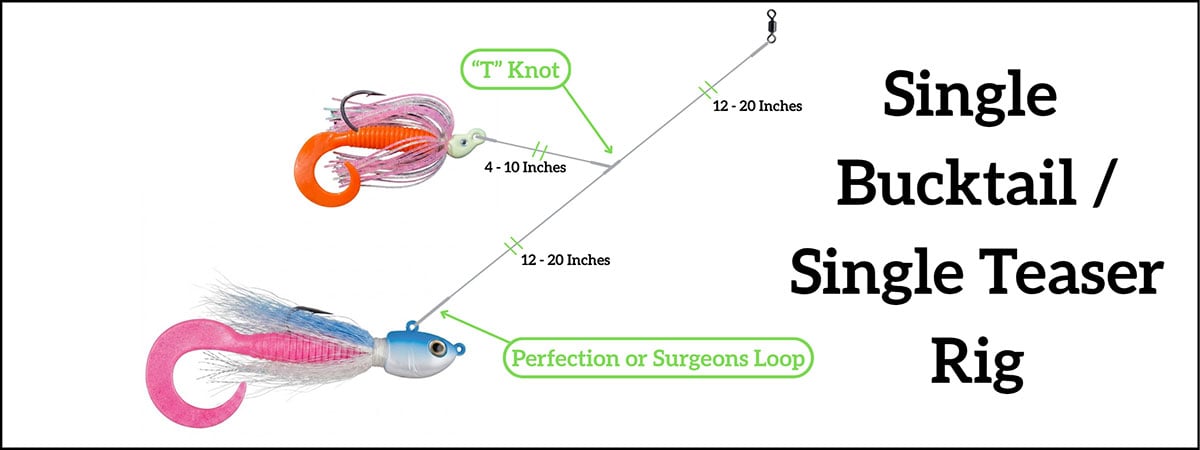
Single Bucktail / Single Teaser Rig
If you ask me, this is the most common rig you will see when targeting deep-water fluke. It gives you two bait profiles within close proximity to the bottom, with the bucktail serving both as the weight to get your presentation to the bottom as well as an additional hooked bait. You can mix and match colors between bucktail, teaser and plastic trailer to figure out what’s the most productive color or bait that day, using your time on the water more efficiently. Having two baits, you might pick up a couple fluke at the same time or a fluke and sea bass combo. But what’s often overlooked is the value of having two presentations so that you’re still “fishing” if a bait-stealer rips off your trailer or strip bait. And, oftentimes, you can still catch that fish with the second bait.
To adjust to changing depths and currents, simply use a heavier or lighter bucktail. With the rigging shown, an enlarged loop allows you to exchange bucktails of different weights or colors, or you can remove it entirely so you don’t have it banging against your rod blank or boat when traveling between spots or to and from the grounds. I will also sometimes exchange the bucktail entirely for a cannon ball sinker if I want to slim down my presentation during finickier bites. This is additional another option when fishing around stickier areas, as a bucktail is a lot more expensive than a cannonball sinker.
Use your favorite bucktail with a 90-degree line tie, whether it’s a fixed or one with a swinging hook. Personally, I won’t go much heavier than 6 ounces, maybe 8 under certain conditions. I top out at these weights for a mixed bag of reasons; perhaps the most obvious is that most manufactures don’t go beyond that range, but I also think going heavier gives the fluke more leverage to shake off the hook. The 90-degree line tie is ideal as it maintains a more vertical presentation in the water, helping you detect strikes easily while maintaining a natural presentation.
To tie this rig, I first start off with the bottom perfection loop. This is where you will be sliding your bucktail on, so make sure your loop is big enough to maneuver the line around the hook. Twelve- to 20-inches above that, you can tie a dropper loop or a T-Knot. I’ll do a dropper loop if I’m using an octopus hook, but much of the time I will use a T-Knot. The T-Knot simply keeps your teaser swimming in a more natural position. Make sure your dropper loop or T-Knot is long enough (4 to 10 inches) to effectively add your secondary bait. Above that, leave an additional 12- to 20-inches of leader, tied off to your choice of swivel.
Popcorn / Chicken Rig
The Popcorn Rig, also known as a Chicken Rig, is probably the most popular selection for deep-water, fast-water spots like the Nantucket Shoals. It gives you the option to have two rigged teasers, with a cannonball sinker at the bottom. The greedy angler could replace the cannonball sinker with a bucktail if they really wanted to, but for me personally I like to stick to two hooks maximum. Why this rig is so popular at spots like “The Shoals” is because you are often forced to fish 8-ounces or even as much as 24 ounces to stay down in these areas. Bucktails of these extreme weights would be too easy for the fish to ‘shake off’. This setup doesn’t guarantee that you’ll put every fish you hook on the deck, but it does offer just enough wiggle room to tame most of their famous headshakes and catches a lot of fish.
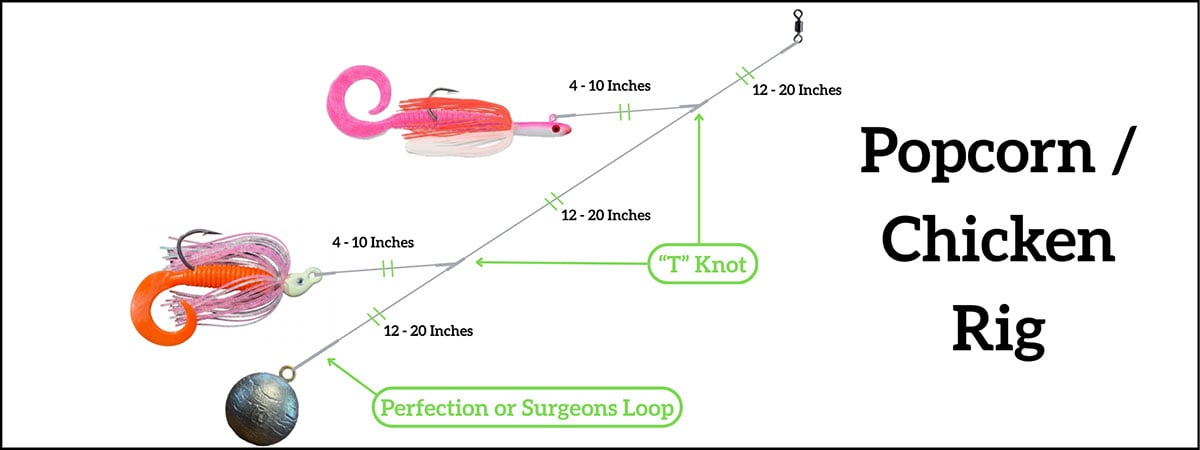
Tying this rig, it’s much like the single bucktail / single teaser rig shown above. Simply start with your perfection loop where your cannon ball sinker can be attached. Twelve- to 20-inches above that you can tie your dropper loop or T-Knot which goes to your teaser or octopus hook. Follow the same procedure for the next bait above it and add an additional length of leader finishing the rig with a barrel swivel. This rig can be very long and may require a 7-foot, 6-inch rod, which is what I prefer using in the areas that require this rig, anyway.
Spinner Rig
Probably one of the most “classic” rigs for fluke out there, the spinner rig is a tried-and-true staple. I grew up fishing this rig off the beaches of South County, in Rhode Island 15 to 20 years ago and it still does damage today. Speaking with veteran anglers and just knowing from my own experience, this rig was the Northeast hardcore angler’s answer grabbing more attention from summer flounder, prior to the introduction of products like Gulp and FishBites.
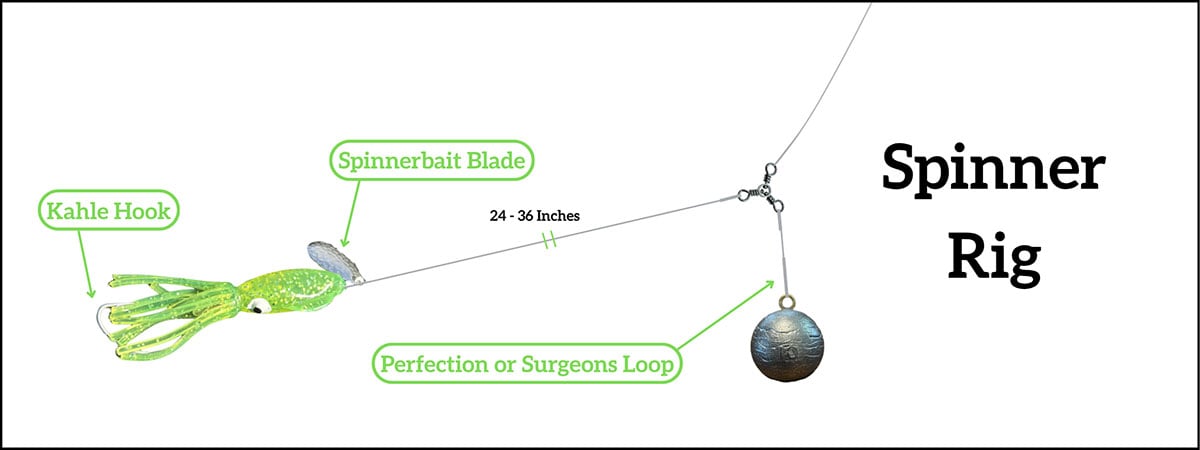
The rig starts with a snelled Khale hook, which is a little bit more specialized in application. It’s a bit of a hybrid between a J-style and an Octopus hook, with an extra wide gap throat, along with a hook point that aligns with the hook eye. When dragged along horizontally, squid strips, mummies, silversides, fluke bellies, and other natural baits just appear more natural, and the hook presents itself perfectly for a bite. Beyond the snelled hook, anglers will use a mix of beads, chafe tubing, or directly insert something like a B2 Squid body or bucktail teaser. This gives the rig a little bit more body and color. After that, beads or chafe tubing are added again, then a Colorado or willow blade attached to your leader with a clevis. The blade is where this rig made its fame, I’ll remind you again that fluke are known for their poor eyesight. The vibration and flash would draw fluke in to attack. Another 2- to 3-feet down the line from the blade is a 3-way swivel, which you can attach your weight to and mainline to. Some rigs will come with a duo lock snap that you can directly attach your lead to, while others you would have to attach with a short section of leader material.
A lot of the rigs you can buy today can benefit from a quick makeover, swapping in an Owner Inshore Slam K-Hook, BKK Wide Gap-R, or VMC 9801-PS Wide Gap Turned Eye hook, as they are much stronger, sharper, and fluke worthy options. Very few options exist for a more locally produced hand-tied rig these days sadly, but some tackle shops will make their own with more premium components so be on the lookout!
Live Bait Rig
Another classic for fluke anglers, this rig is very simplistic but offers a very natural presentation of both live and dead baits. The rig itself is generally used with more medium to large baitfish, such as snapper blues, mullet, mackerel, squid, and more. It starts off with an octopus hook, big enough to accommodate your bait selection but small enough that it still allows the bait to swim freely without being weighted down. A short length of leader, 2 to 3 feet is needed, which can sometimes be even shorter if your bait is swimming to the surface more. After that, a barrel swivel connects your leader to your mainline, with a fish finder just above it. The fish finder glides up and down your mainline and with slow drift conditions you can feel more of the bite then the fluke will feel resistance.
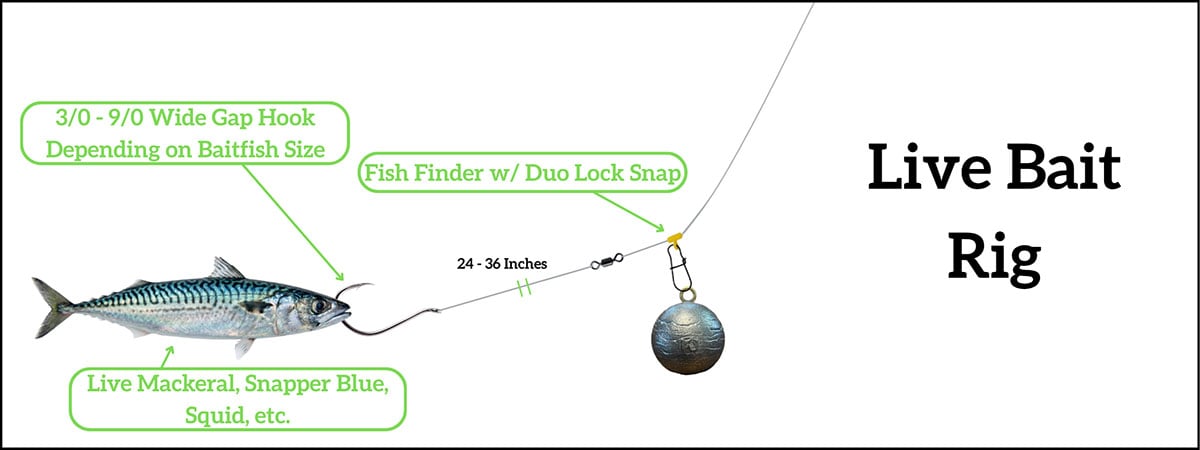
The key with this rig is knowing when to set the hook. Larger fluke will easily devour a larger baitfish, but it often takes them a few hits to take them down and truly eat them. Drop a bit of slack in your line, wait a few seconds, sometimes as much as much as a minute… and then reel in any slack until you feel weight.
Spoon Rig
A little bit of a daunting rig to some, this really comes into play when you have a good drift speed, 1 to even 2 or more knots depending on the size of your spoon. Spoons commonly range from 3 to 6.5 inches and can be bought both in “blank” form for your own rigging or pre-tied. Companies such as M3 Tackle, Jigging World, and a few others will have these in various unrigged or rigged configurations, so pick your poison from there. There are times when you need to let fluke whack the spoon a few times before setting the hook, other times they will nearly rip the rod out of your hands. With a tandem hook setup, I’ve found that I end up snagging a lot of fish as your overall rigging, spoon + bait, could end up being 10 to 12 inches of profile for the fish to figure out how to fit in their mouths.
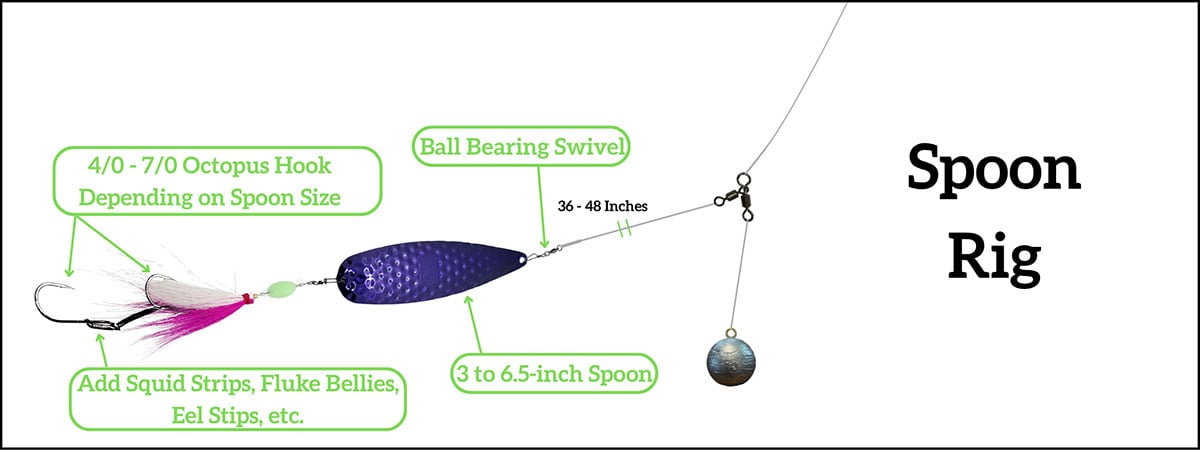
As for tying these rigs, I start with a heavy fluorocarbon leader material or hard nylon, such as 60- to 100-pound Seaguar Blue Label or 40- to 60-pound Mason Hard Nylon. I prefer the heavier line because it’s stiffer and less prone to twist. An octopus hook with a straight eye is attached with a crimp, a few beads added just above it and another octopus hook can be floated down the leader material, which should have an offset eye. This hook isn’t fixed in any way, but it allows you to slide it up and down the leaser material to adjust to the bait size Additional beads and your choice of skirting material can be added just above this, but ultimately this will terminate to a duo-lock snap swivel that is crimped on. This rigging shouldn’t be much more than 6 or 8 inches depending on what spoon size you intend to use, with smaller sizes getting the shorter lengths. The duo-lock snap can be attached directly to the tail of the spoon, while the head of the spoon can be rigged with a ball bearing duo-lock snap.
After creating your rigging for the spoon itself, the ball bearing swivel attached to the head of the spoon can be run with 3- to 4-feet of leader material, which allows the spoon more movement. The ball bearing swivel at the head of the spoon mitigates line twist which is key as these spoons twist and turn constantly. I personally lead this to a three-way swivel, while some will run a swivel and fish finder rig just like the Live Bait Rig above. Squid strips, fluke bellies, and other long, natural baits are perfect to use with spoons, as the spoon itself truly brings the natural bait to life.
Ending Thoughts
While fluking can be super simple or as technically driven as you want, the key to me is always adapting, experimenting, learning, and finding the fish! Every year seems to have its own personality, so far the 2026 season in my home state of Rhode Island has started off shallower and closer to home then I’ve seen in several years. I would likely think that the water temps and unprecedented number of squid have played a direct part in this, but it’s hard to truly know. More time on the water has helped me significantly over the years, but going out with friends and on charters throughout the Northeast has also played a significant role to putting flatties on deck and teaching me new ways to adapt to this ever-evolving fishery.