Professionals in all industries utilize a variety of tools to help them complete their task. For example, an experienced carpenter knows when to use a 14-ounce hammer over a 22-ounce hammer. He owns 15 different types of saws, all designed for different situations. Anglers are no different. We own plugs of every size, shape and color. We have rods which come in a variety of lengths and actions, designed with a specific technique in mind. We choose between braid, fluorocarbon or monofilament in endless numbers of breaking strengths.Arguably the most powerful tool we own is the chartplotter/fishfinder. Recent advancements in cartography have revealed every hump, ledge and channel on our body of water. Using map chips such as CoastMaster or Navionics, we’re fed accurate tidal and current data, minute by minute. Our fishfinder comes with a multitude of sonar options in different frequencies and beam shapes, some designed to look straight down and others out to the sides.
Even with the most advanced tools there is little value if we don’t know how to utilize them. “I see it every day,” states Humminbird Saltwater Field Staff Manager, Bill Carson. “90% of the anglers utilize 10% of their fishfinder. One of the most powerful capabilities is Down Imaging and this is by far the least used of the sonar technologies.” This article serves to educate on Down Imaging sonar and how to work it in your angling arsenal.
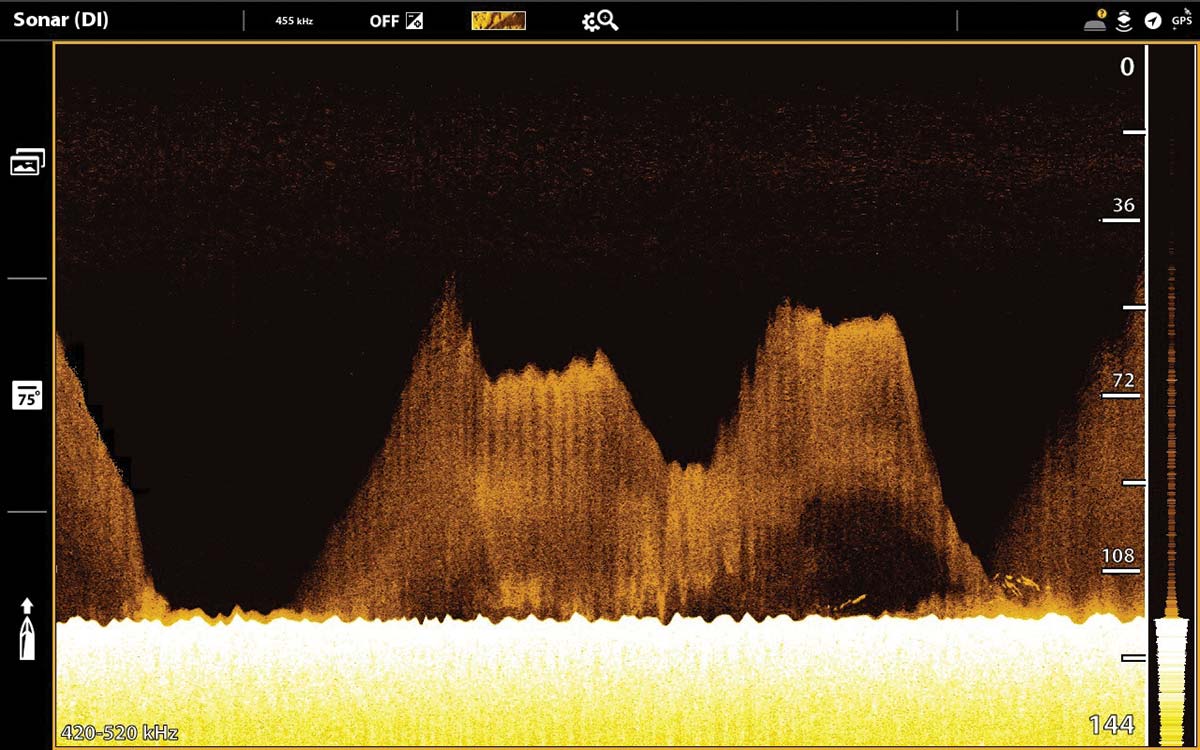
Most modern fishfinders provide three different types of sonar. The first is 2D sonar, the traditional downward view generating bright, colorful fish arches. The second is Side Imaging (SI), a sonar which shoots to the port and starboard sides of the boat, covering a wide swath with a narrow beam. The resolution Imaging sonar is better than that of 2D so the image on your screen appears closer to that of a photograph than traditional sonar. The third technology is Down Imaging (DI), which uses a Side Imaging beam pointed straight downwards. It resembles a traditional 2D image but with more detail. All three technologies excel in certain situations and fall short in others. Used together, they are a deadly combo.
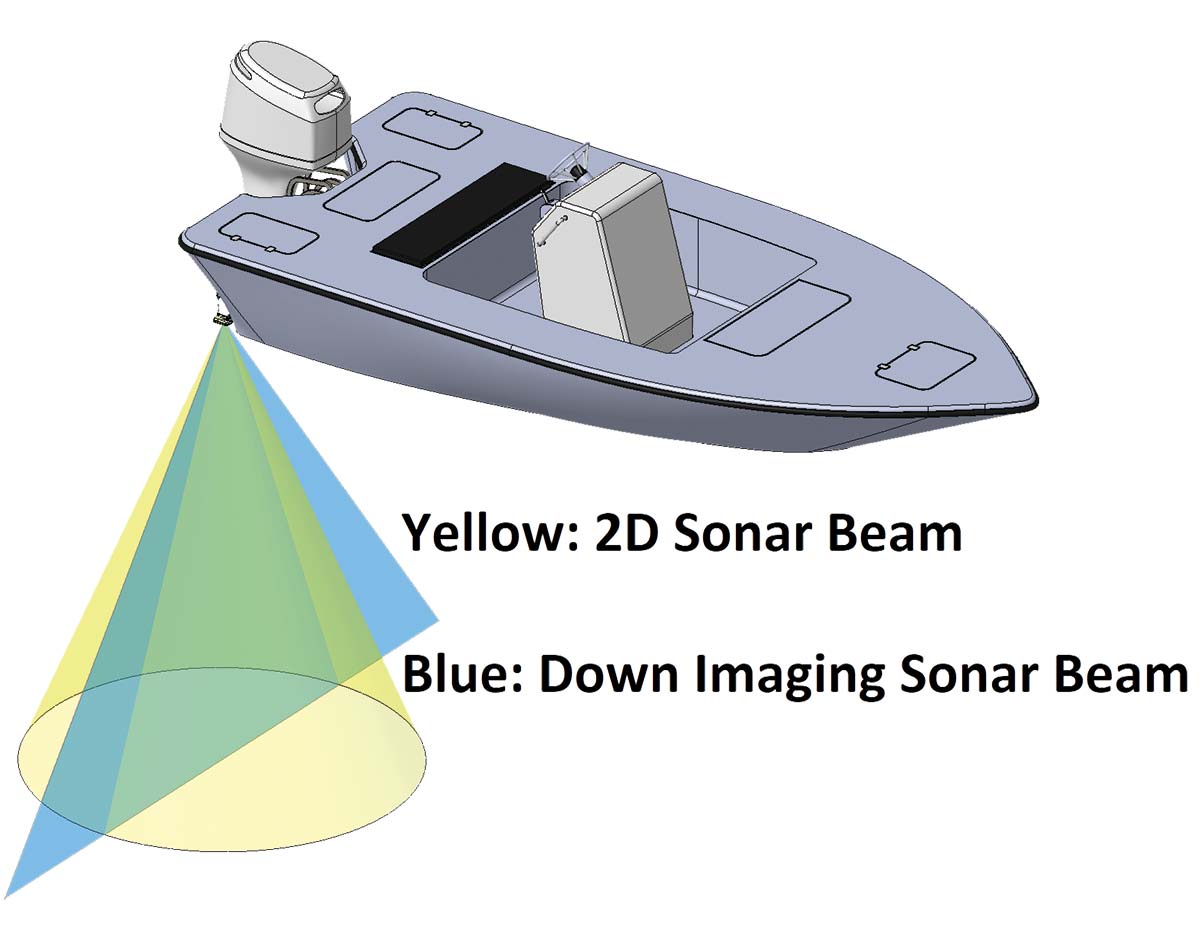
To understand why 2D sonar and Down Imaging look so different, we must understand the beam shape. 2D sonar has a large, round conical beam illuminating the sea floor. As you travel toward an object, you receive echoes long before you’re over it and well after you’ve passed it. This is the reason fish show up in an exaggerated arch. The boat may travel 20 feet while marking a striped bass that’s only 3-feet long. The DI beam is different. It is shaped like a hand fan, wider side to side and very narrow front to back. This thin beam creates a very accurate representation of what is below the boat. Fish sizes are closer to true form and it is easier to understand the bottom composition. Fig. A shows the comparison between the two beams.
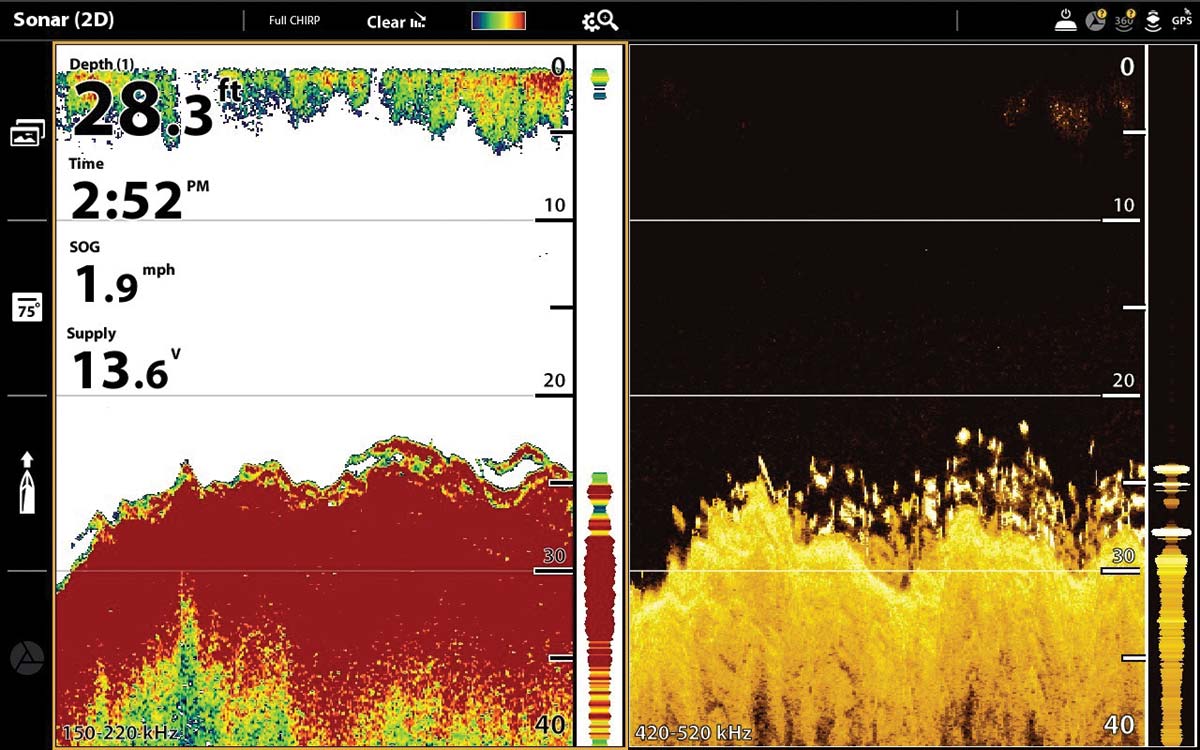
Both sonar types have their strengths and weaknesses. 2D sonar provides power, operating in lower frequencies (50khz-200khz) which allows sound to travel great distances in deeper depths. The wide conical beam exaggerates fish size so not to be missed by the angler, especially when travelling at high speeds where fish are under the boat for only a few seconds. On the contrast, Down Imaging runs at higher frequencies (455kHz – 1.2MHz) which lack power and should be used in depths less than 200-300 feet. The narrow beam provides better resolutions and is ideal for fact checking 2D sonar. Anytime an angler is unsure of returns on his 2D sonar, DI is used to clarify.

“I’ll admit, at first I resisted Down Imaging” states Captain BJ Silvia of Flippin Out Charters in Newport, RI. “I felt I could do it all with 2D and Side Imaging. That all changed this spring. I happened to turn on DI in a rocky area and instantly began marking tog, something not done with normal 2D sonar.” The science behind his discovery was the DI fan beam scanning between each rock, boulder and crevice, allowing the sonar to separate the tog from an adjacent piece of structure. Since then Captain BJ’s kept it on all season. “This summer we got on schools of striped bass which were glued to the bottom. I’m talking hundreds of fish packed together, 5-feet high. Other boats would get close to see what I was fishing, look at their screens and drive away not knowing what they saw. I know they went over the school and mistook it for bottom. If they knew what my Humminbird SOLIX showed, it’d make them sick!” In the case of these stripers, the narrow fan beam illuminates a smaller piece of the bottom than the round 2D cone, shortening the fish arch, preventing them from blending together and allowing for better target separation.
Offshore specialist, Captain Dom Petrarca of Coastal Charters Sportfishing is another angler who’s discovered the power of this technology. “For years we’ve seen the giant clouds of bait on our fishfinders and assumed the tuna were in there. With traditional sonar the bait shows up as a washed-out cloud, only showing gamefish when they’re separated from the pile. It was also difficult to distinguish the type of bait. Down Imaging changed all of this and is great for cutting through the bait, revealing giant tuna swimming in the middle. I can clearly identify the type of bait and know if the fish are on herring, mackerel or smaller sand eels so I can adjust my presentation accordingly.” The science to this lies in what many mistake for a shortcoming in DI, higher frequency sonar and its lack of power. Captain Petrarca uses this to his advantage. Running two SOLIX 12s on his 29-foot SeaVee, he compares the 2D sonar to the modern DI. The weaker, thinner sonar beam reflecting off the smaller baitfish provides fainter echoes back to the transducer, preventing the screen from becoming washed out. As tuna pass through the beam, there is a clear difference in the reflection strength between the bait and predator making them easy to locate. “It’s all about efficiency. I use whatever tools are available to find fish and hook up fast. Down Imaging keeps me from driving over fish that other guys normally miss. When the bait’s thick, 2D sonar gets blown out.”
The science of sonar can be complex and overwhelming to many anglers. “You don’t need to be a sonar engineer to run your fish finder,” states Bill Carson. “It comes down to putting in time with the units. Go over a known area, be it a reef, bridge or bunker school and observe your screen, monitoring the effects as you adjust settings. 2D, SI and DI are simply tools at your disposable to help you accomplish the job at hand which is catching more fish.” The same way you wouldn’t use a hammer to drive a screw, you shouldn’t limit yourself to using just one type of sonar. There is a better tool for that job. We hope this article helps remove the mysteries of Down Imaging and provides examples you can apply it to your fishery.
We would like to thank Captains BJ Silvia and Dom Petrarca for their knowledge in this article. Please visit their websites at http://flippinoutcharters.com/ and https://coastalcharterssportfishing.com/.